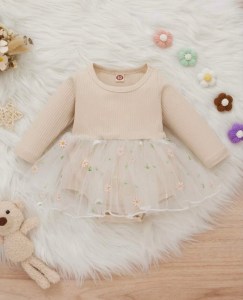
I have JUST discovered SHEIN… I know I’m so late to the party.
If you don’t already know, SHEIN has incredibly adorable fashion but I had no idea this included a baby/kids section. I was a little apprehensive about the quality since it’s so inexpensive. I gave it a shot (and placed a decent sized order) because we all know how painful it is to pay for shipping when you could just spend more money to get it for free. (Why are we like this?)
Anywhoo, I was pleasantly surprised at how nice the pieces were! I felt obligated to share some of my favorites that I got for our sweet Goldie girl ❤️
Don’t forget to follow me on LTK (Hayley Kahl) for all of my favorite fashion/beauty/baby finds!
Come take a peek inside Baby Girl Kahl’s nursery and see how Dylan & I organized and prepared for her arrival!
Hi everyone, happy Friday!!
It’s been a seriously long minute since I’ve posted here on Clyde’s Corner. I’ve had so many things I’ve wanted to share, but this whole pregnancy thing is no joke and has kept me pretty busy. You know that feeling when you want to take a toothbrush and scrub the drawer that sits underneath your oven? No? Just me? Cool. These COMPLETELY NECESSARY tasks have kept me veryvery busy.
We are officially less than 1 week out from Baby Girl Kahl’s due date! I can’t even believe it… except that I totally can because everything hurts and I’m feeling comparable to a whale that walks like a penguin. It’s really quite the site to behold 🙂
Dyl and I are SO ready to meet this little sweet pea.
The carseat is installed, the burp clothes are washed and folded (and then refolded and refolded), the nursery’s set up, and the house has been deep cleaned one too many times. #Nesting. All that’s left to do is have a baby! Woohoo (but also, insert terrified face).
With the help of trusty Pinterest, I’ve done as much preparing as I can. From organizing drawers to setting up little baby/changing stations all over the house (and stocking up on coffee), Dylan and I are as ready as we can be 🙂
I thought it would be fun to share some pictures of the nursery and a few of the ways I’ve prepared around the house for her arrival!
I share these pictures knowing full well that once she’s born there may be more functional or convenient ways to organize or do things–but we’ve never had a baby before so this is where we’re starting! I’ve also linked some of the items we ordered or were gifted, but since we haven’t actually used them yet I can’t really recommend anything. Once she’s born I will review all of our favorites!
Come take a peek 😀
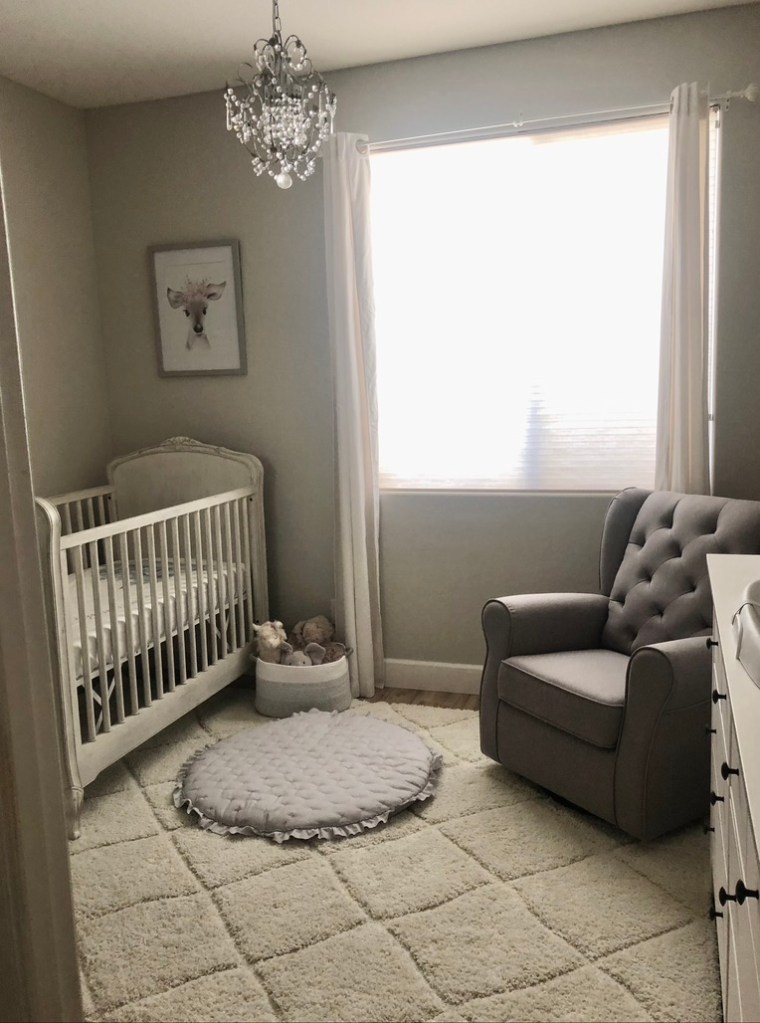
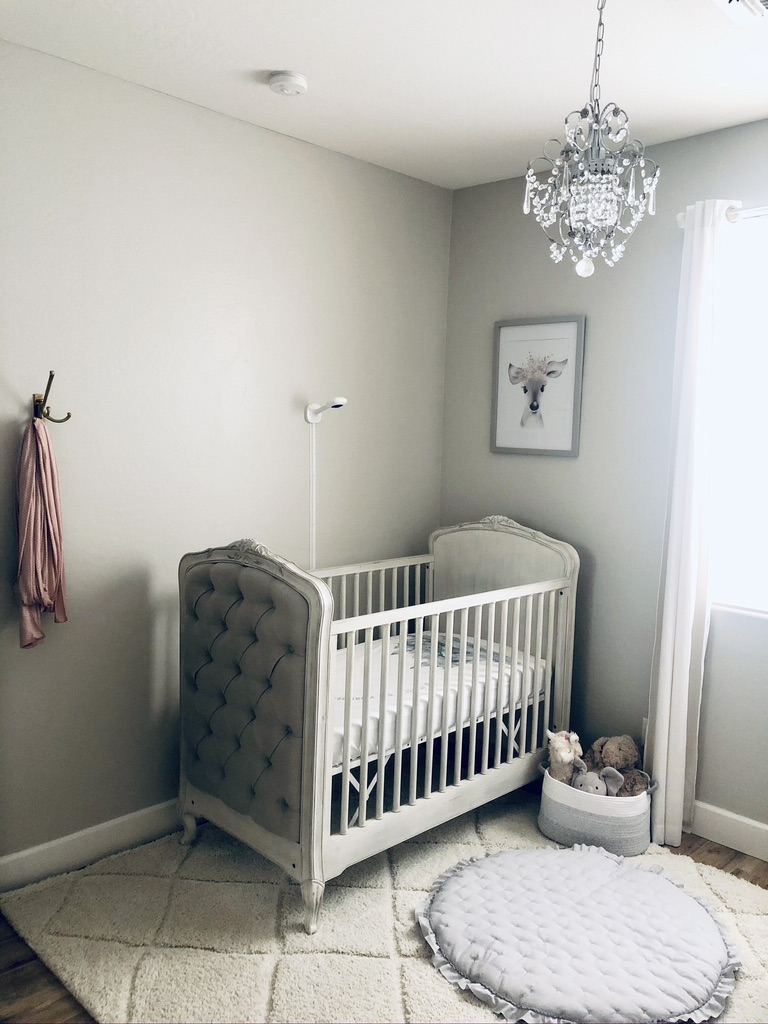
Baby Girl Kahl’s Nursery
Our goal for her nursery was to make it incredibly functional, feminine, dainty and overall a serene & calming space. I sit in her rocker every single day–it’s so relaxing ❤
Her chandelier makes the most beautiful patterns on all the walls at night, the lights dance around–it’s pretty magical.
We decided on the Nanit baby monitor after having several friends recommend it (you can see it mounted on the wall next to her crib). From what we’ve seen so far I have a feeling we’re going to love it. Anytime one of us walks near her crib we get a notification on our phone letting us know her crib has been “attended”. It also has a built-in nightlight and sound machine! We purchased the Nanit stand for our bedroom–the little camera part just pops off making it incredibly mobile. I will let you guys know what we think of it once she’s born!
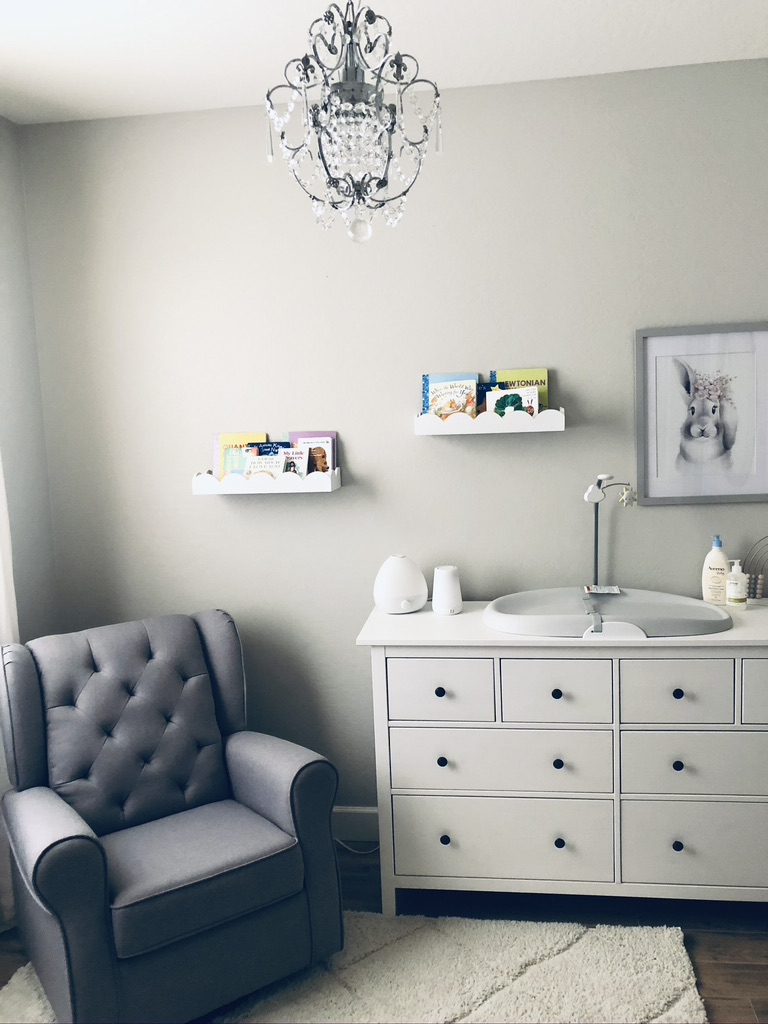
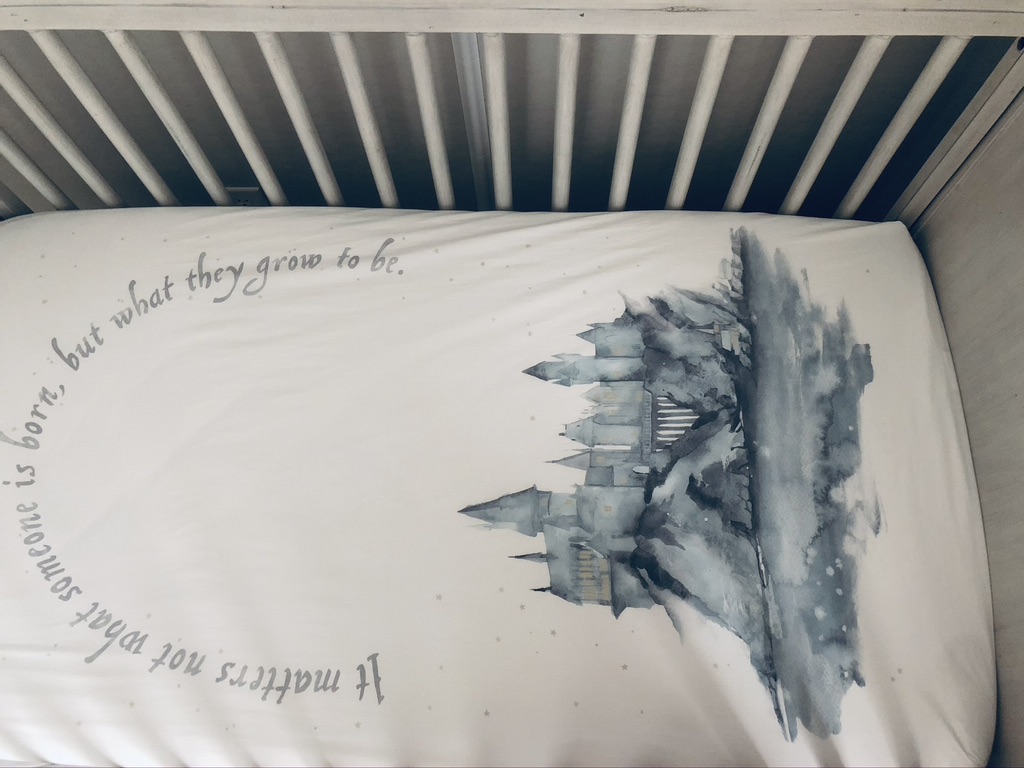
And in usual Kahl fashion, there are of course subtle touches of Harry Potter throughout her nursery 🙂 This Harry Potter Pottery Barn crib sheet (say that three times fast) is one of my favorite things in her room! It has the sweetest Dumbledore quote: “It matters not what someone is born, but what they grow to be” ❤
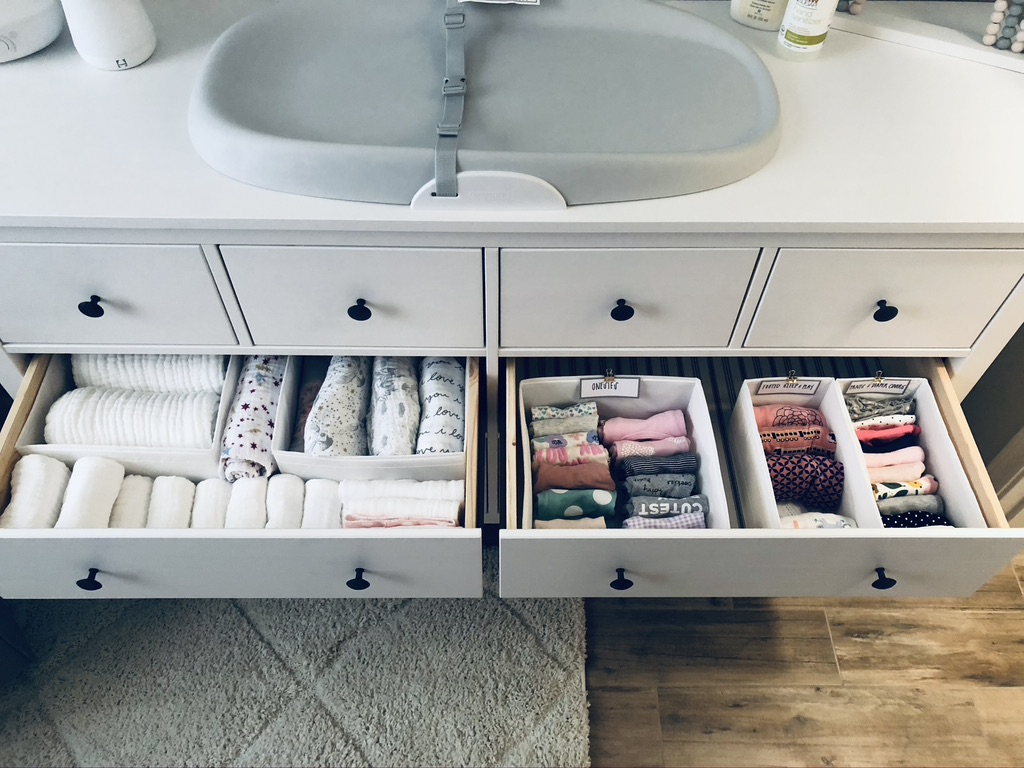
The top four drawers in order from left to right are 1) Bibs/socks/hats/headbands. 2) Easy-use swaddles/sleeper gowns. 3) Diapers/wipes/diaper creams etc. 4) Anything health related (Tylenol/gripe water/nasal suction)/nail clippers & brush/pacifiers & teethers.
I added these little labels to the storage cubes with gold alligator clips (for easy updating and changing out). I thought this would help Dylan, and a sleep-deprived me, grab what we need without unfolding an entire drawer–seriously all baby stuff looks the same once it’s folded up.
Did anyone else have to Google how to fold baby clothes???
The large drawer on the left holds all swaddle blankets & burp clothes. The drawer on the right holds all newborn-sized onesies/footed pj’s/leggings & diaper covers. All of her cute outfits and dresses are hanging in the closet!
The bottom left drawer holds blankets, extra crib sheets and extra waterproof mattress protectors. The bottom right drawer holds all of the 0-3 month onesies/footed pj’s/leggings etc. My plan is to move everything up to the drawer above once she grows into this size and then wash the next size and put it into this bottom drawer.
How We Organized Her Closet
This little sweet pea is so spoiled with her walk-in closet ❤
We have her diaper pail and hamper stored in here, as well as a cube-storage shelf (not seen in this picture). All of her newborn to 0-3 month outfits/dresses/rompers are washed and hanging
I used these labeled cubes on top for additional storage of: 1)Diaper Pail Refills. 2)Backstock–this includes extras of diaper creams, shampoo, body wash etc. 3)Moby baby carrier (this is quite bulky so I have it in its own bin). 4)Too small— I’m hoping this system works out. This bin is for when we go to put something on her and it no longer fits. This way it doesn’t get mixed back in with her clothes or put in the hamper to be washed and then eventually back in her drawer just to repeat the process.
This is the cube storage in the back of her closet. It’s still kind of a work in progress. These cubes hold larger clothes sizes that haven’t been washed yet and the one on the bottom holds extra accessories such as sun-hats/sunglasses/noise cancelling headphones etc.
Baby Stations Throughout the House
Guest Bathroom
Since my last post Dyl and I have done some kitchen updating (bye-bye weird green countertops!), including a giant kitchen sink perfect for bathing newborns 😀 . I put together a basket in our guest bath that can be easily transported back and forth, it contains everything we’ll need for bath time!
I found this sweet baby basket at TJ Max!
Family Room
In our family room I set up a nursing/changing station using this adorable caddy that matches our room decor and blends in seamlessly. My Brest Friend Nursing Pillow is stored in the cabinet right below the diaper caddy (though I’m sure it will be left out more often than not…at least it has a home for when people come over and i’m frantically trying to tidy up and shoving things in crazy places–you know what I mean). I made sure to clear out a ton of space in these cabinets to store baby products that I haven’t accounted for yet! For being so tiny babies have a lot of stuff… like a lot of stuff.
The caddy holds diapers, wipes, hand sanitizer, swaddles/burp clothes and my pump. The other pump parts that will get sanitized regularly have their own basket in the kitchen.
Linen Closet
I ordered these cute storage bins a while back to organize our linen closet and used those same tags with gold alligator clips to label them! I decided to dedicate two of the baskets in here to wipes and diapers. Instead of having to pull from those giant boxes of diapers and wipes (which are stored in our guest room closet), I plan to use this as a restocking station for all of our little changing areas around the house.
Please don’t judge my basket obsession–I blame Marie Kondo and The Home Edit. If you haven’t watched The Home Edit on Netflix stop reading this immediately and go watch it. By the end of the day you’ll be knee deep in reorganizing every nook in cranny in your home, I promise.
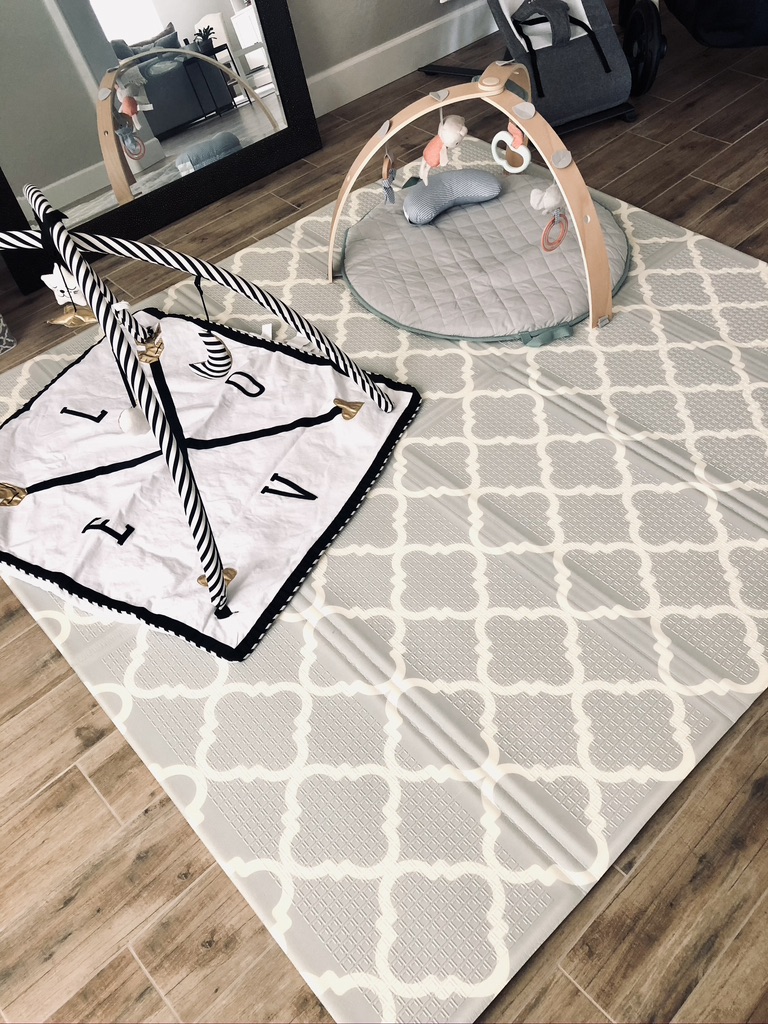
Play Room
Remember our dining room? I did a post on the transformation that you can see HERE, well we are converting it into a playroom haha. This is what we have set up thus far. Dylan and I figured that we can work on it and adapt the room to her needs as she grows. Right now this foam mat and these activities gyms are about all she’ll need.
Also, how cute is this play mat?! It’s reversible–the other side has tons of animals on it!
In addition to these little stations throughout the house, we also have a changing station set up in our bedroom next to her Halo bassinet since she will be sleeping in our room for the first few months 🙂 ! Buh-BYE sleep! I’m only kidding… I haven’t slept in MONTHS.
Leave A Comment & Subscribe Below
Thanks for stopping by Clyde’s Corner I hope you have an amazing Friday!! If you have any newborn tips/tricks/product recommendations for new parents drop them in the comments below, Dyl and I will take all the advice we can get ❤
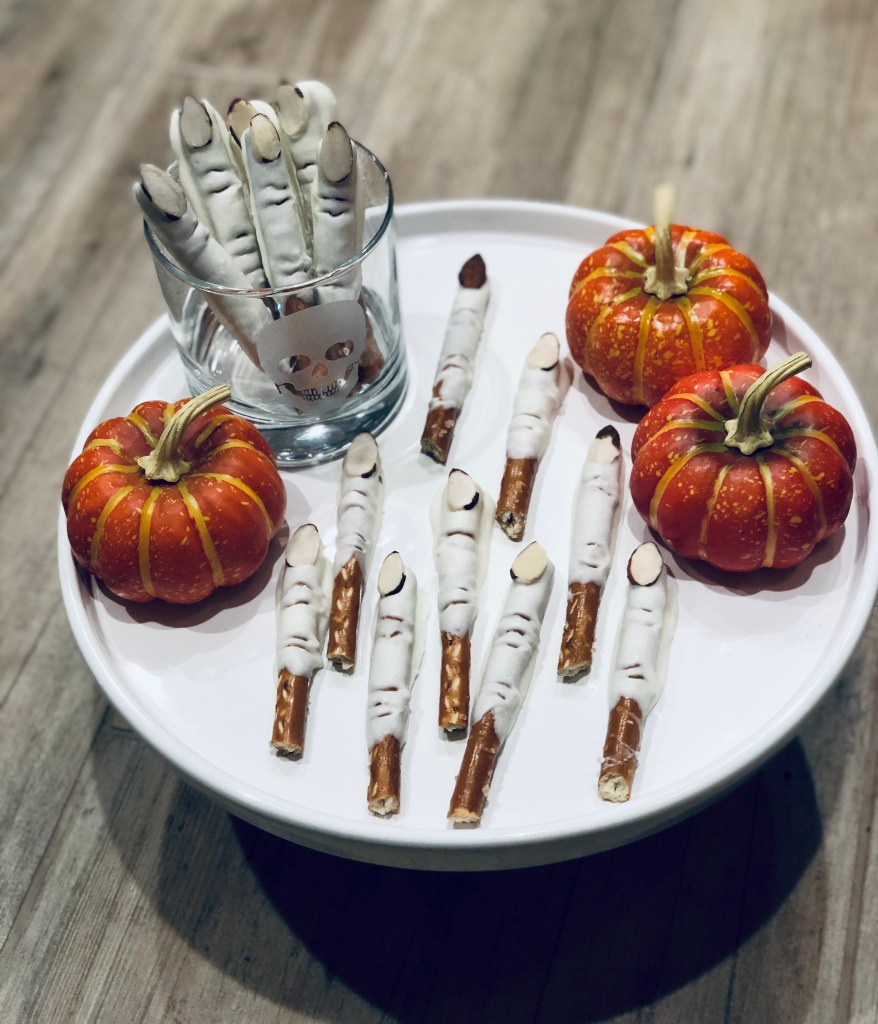
Sweet. Salty. Spooky & DELICOUS. These are the perfect Halloween treat–or if you’re like us here at the Kahl’s, the PERFECT Harry Potter Marathon snack!
If you have no idea who Peter Pettigrew is and why his missing finger is of utmost importance, no worries you can call these tasty treats “Spooky Witch Finger Pretzel Rods” (but seriously you should go read Harry Potter).
Every year Dylan and I have a Harry Potter Movie Marathon the weekend after Halloween. It just seems like the perfect time of year to revisit Hogwarts–the air is crisp, spooky Halloween decorations are still up, AND not to mention Halloween candy and decor are usually half off 😉
I go all out for our HP weekend. I’m talking themed meals and treats all weekend long, specialty cocktails and Hogwarts decorations. This may be my favorite weekend of the entire year.
Our tablescape from last years HP weekend!
You can absolutely count on an upcoming post sharing all about our HP weekend this year!
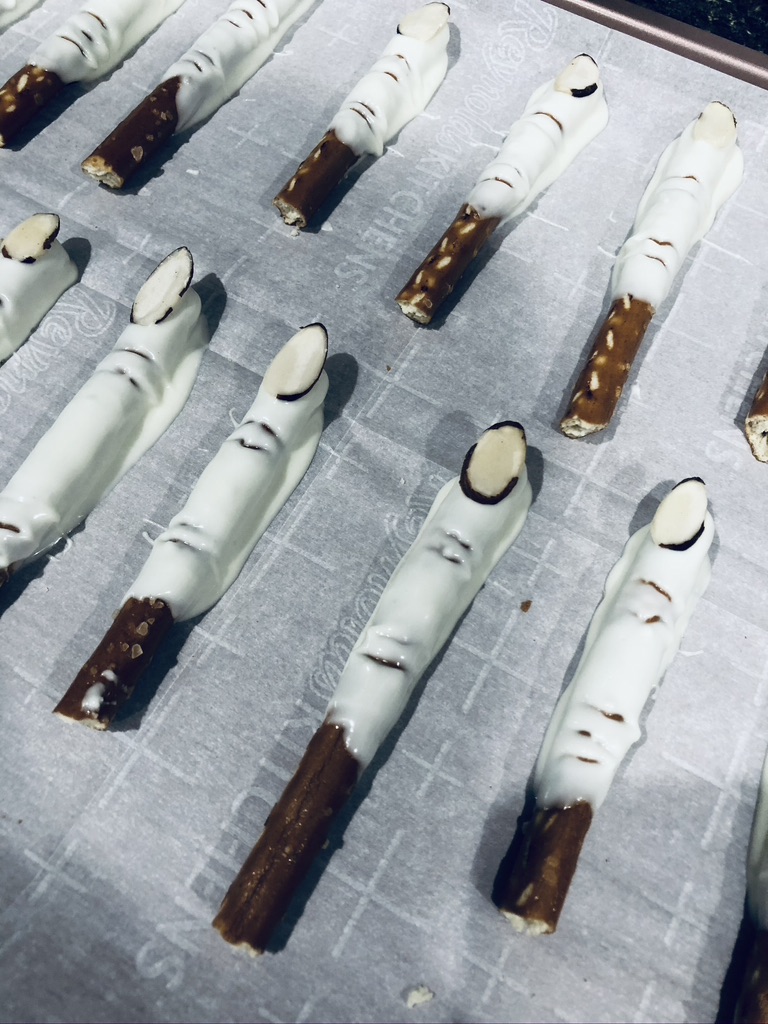
Back to this tasty, yet kind of disturbing treat. You can whip these babies out in just a matter of a few minutes. You’re basically dipping pretzel rods into melted chocolate and adding a sliced almond to the end to look like a fingernail. GROSS. But hey isn’t that what Halloween season is all about!?
Set them out on a decorative tray or stand them up in a glass, no matter how you serve them they instantly spook-ify any tablescape!
If you have zero interest in Harry Potter, these are still the perfect treat to make during the Halloween season. The only thing I would add to this recipe to make them even better “witch fingers” would be a dash of green food coloring to the white chocolate!
What You’ll Need
Pretzel Rods
Sliced Almonds
White chocolate chips
How to Make “The Fingers”
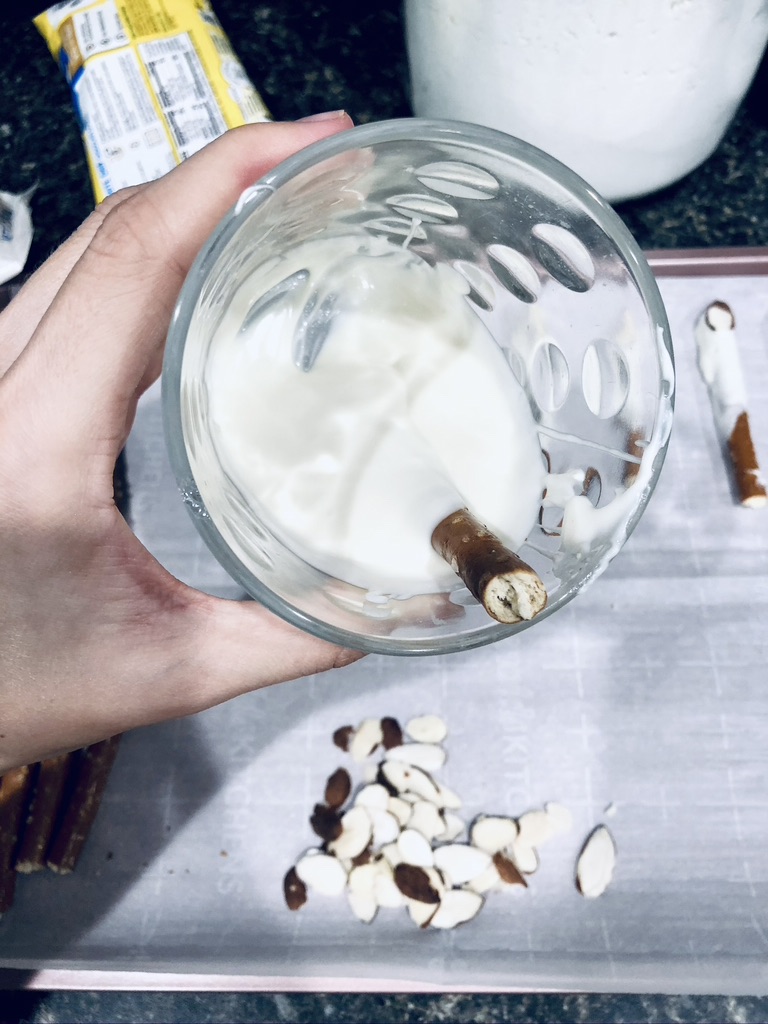
Melt white chocolate (over a double broiler or in the microwave).
2. Break the pretzel rods in half. Pour melted chocolate into a drinking glass (to make dipping the pretzels easier) and dip 3/4 of the pretzel rod into the melted chocolate (leave the broken end of the pretzel out of the chocolate).
3. Place dipped pretzels onto a baking sheet lined with a silicon baking mat or parchment paper.
4. While the chocolate is still wet, place a sliced almond (pointed side out) on the end of the pretzel. Tip: I like to use the prepackaged sliced almonds (you can find them in the baking section at your grocery store). They’re the perfect shape and the little bit of skin left on the almonds makes the nails look kind of dirty (again gross, but great).
5. To make the knuckle markings, use a toothpick or fork to make lines in the chocolate (see photo below). Tip: Wait until you put all of the almonds on and the chocolate is a little more set before making the lines–when the chocolate is still wet it tends to be way messier!
6. Allow them to dry completely before serving. If you’re not serving them right away, pop them in the fridge to prevent the chocolate from melting! Set them out a few minutes before serving, or enjoy them cold 🙂
Leave A Comment & Subscribe Below
I hope you enjoy the spooky Halloween/Harry Potter inspired treat! What’s your favorite snack to make around this time of year??
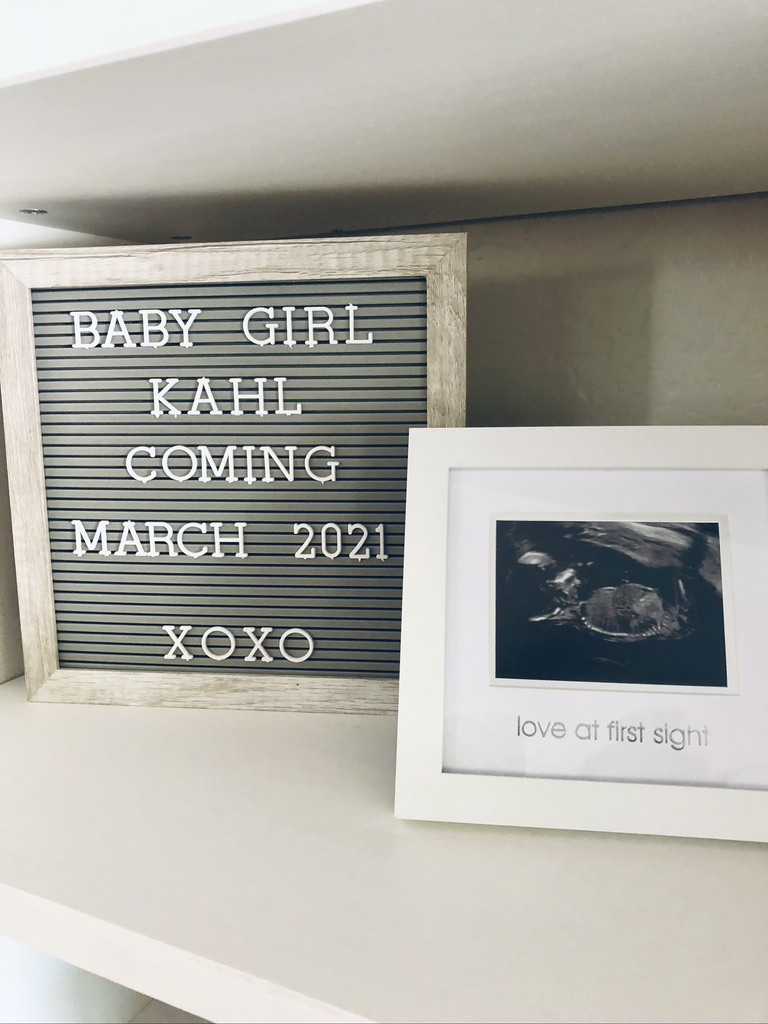
Today is my birthday 🙂 so I thought it was the right time to share the best gift that Dylan and I have ever been blessed with…
We are SO excited to finally announce that we are expecting a baby girlthis coming March ❤
One week from today marks the halfway point of my pregnancy–I seriously can’t believe it. Time is flying by!
This wonderful news is actually one of the reasons for my extended absence from Clyde’s Corner; Baby Girl Kahl was trying to kill me for the first 12 weeks or so… I’m totally kidding. BUT I was really sick and sitting at my computer blogging was absolutely the farthest thing from my brain for the entire first trimester.
Finding Out
The story of how we found out about our sweet bun in the oven is actually kind of funny.
While we were back in San Francisco packing up our apartment (the week before moving to Phoenix) Dylan kept telling me, and I quote, “girlyou pregnant”. I was like What? No I’m not.
I’ve always felt that I’m pretty in sync with myself and my body… and ABSOLUTELY would know if I were pregnant.
I told Dyl countless times over a three or four day period that I was sure I wasn’t. Because I was so sure that I wasn’t pregnant, I ordered my pregnancy tests from Amazon and waited several days for them to show up. Who does that?? This girl.
While I waited for them to arrive, I continued packing up our tiny SF apartment and completely ignored my supersonic sense of smell, on-and-off nausea and raging hormonal acne (I was convinced it was totally mask related). I’m laughing as I type this as all I can hear right now is Dylan’s voice in my head saying “girl you pregnant” because looking back it was pretty obvious.
When my tests arrived I waited until Dylan was distracted (he was on hold with U-Haul–ah the joys of moving) and snuck off to prove to him, and myself, that the stick would read “not pregnant”. As I was sitting there watching the fancy little test screen blinking (meaning it’s not ready to read yet), I grabbed my phone and started recording it. I have no idea what made me do it. Two seconds after the video recording started it flashed “Pregnant”.
I was shocked. Shocked in the best possible way. I opened the bathroom door, walked out and stood there dumbfounded, surrounded by moving boxes and just held it up to Dyl. Naturally, I forgot that my phone was recording, so I have an incredibly shaky/blurry video of our reactions that I will cherish forever ❤
Oh and in case you were wondering, he totally hung up on U-Haul 😀
Gender Reveal
Fast forwarding through the entire first trimester, because who wants to hear about my morning sickness, let’s talk gender–we found out about 3 weeks ago!
Again, I was completely wrong.
I was 100% sure this babe was a boy. Dyl and I didn’t (and don’t) have a preference but my newly-instated mommy intuition was like hey this is definitely a boy so mentally prepare for that.
With the way everything is right now Dylan still can’t come to my doctors appointments, so when they were able to tell the gender, they put the results in an envelope…which they sealed reallywell. That was the heaviest envelope I’ve ever carried. I may or may not have held it up to the light…but of course they use the expensive heavy weight envelopes so thankfully I saw nothing.
We decided to go out to dinner to one of our favorite restaurants (that we used to go to back when we first started dated) and open it together there.
The face of a VERY excited/anxious daddy-to-be!
We RIPPED the envelope open as soon as we ordered and there, on that tiny piece of paper in bold black letters, were the words “It’s A Girl“.
I. Was. Shocked. (Yet again). After that initial moment of surprise, I thought of course she’s a girl how could she be anything else ❤
We were, and still are, overjoyed.
We spent all of dinner talking about names and day dreaming about our future with our daughter.
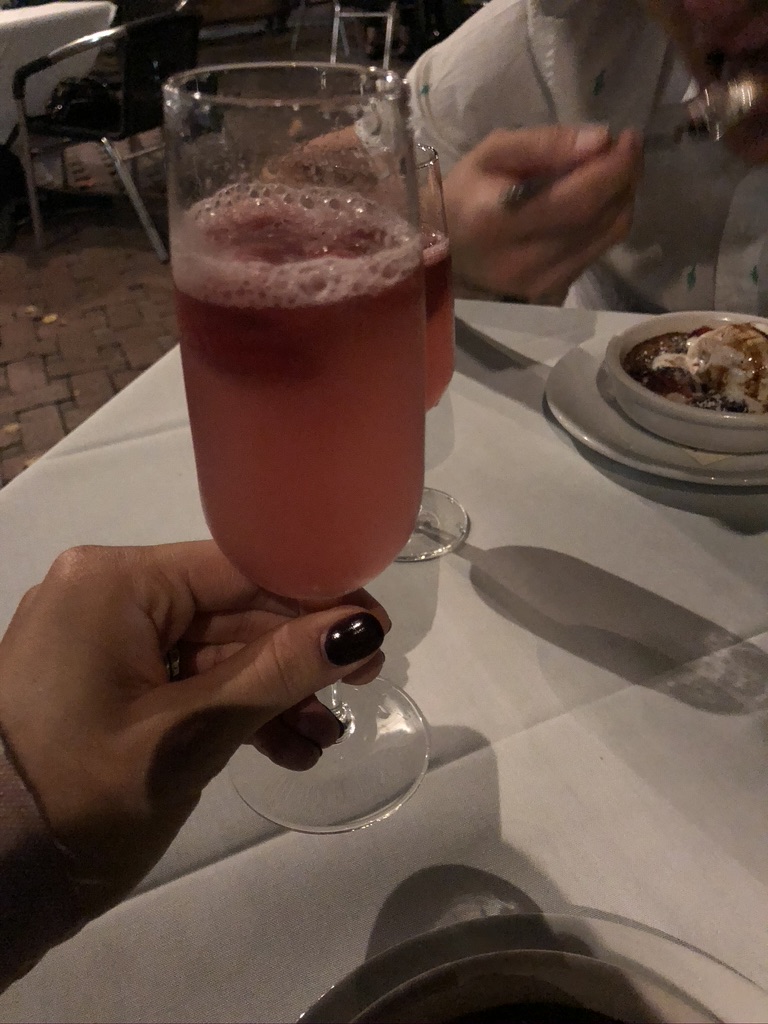
I cried (happy tears of course) about a thousand times during dinner #hellopregnancyhormones and at the end of the evening our waitress brought out sparking water with pink sorbet in it to celebrate Baby Girl Kahl!
Leave A Comment & Subscribe Below
Clyde’s Corner will continue to be a place where I share recipes, fashion finds, tips & tricks, and my favorite things but you better believe I will absolutely be sharing all the things I learn along the way to mama-hood ❤
If you know me, then you most likely know October is my favorite month. I love everything about it. I love pumpkins, crisp weather, whipped cream on my coffee, and the way my house smells from burning pumpkin scented candles 24/7. Not to mention… it’s my birthday month 😀 !
To kick the season off right we’re headed up north this weekend to enjoy some cooler weather–my vests and boots are prepped and ready to go. Who else lives for their fall wardrobe?!
Considering that it’s still 100+ degrees here in the Valley, getting my house ready for the season was a must to give me those Fall-feelings. Even though my house is still somewhat in shambles from moving, the show must go on and the holiday decor MUST go up!
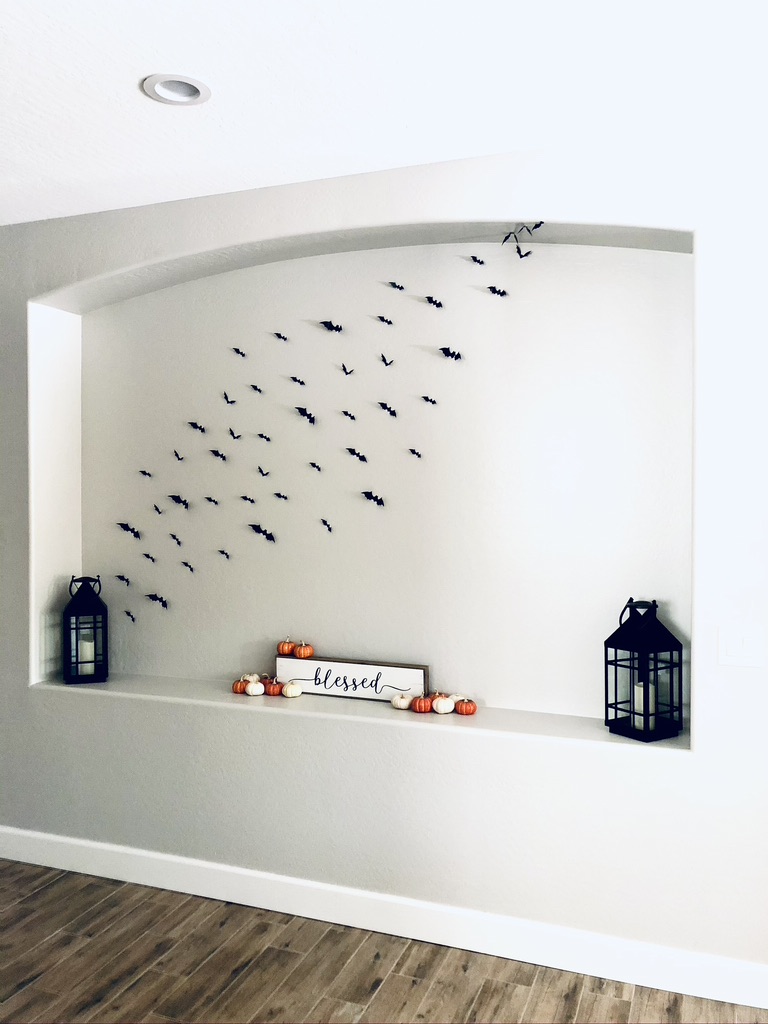
The cut out in our entry way is still a bit of a puzzle to me–I have no idea what to do with this space. So for now, and the foreseeable future, I’ll be using it to decorate for the holidays!
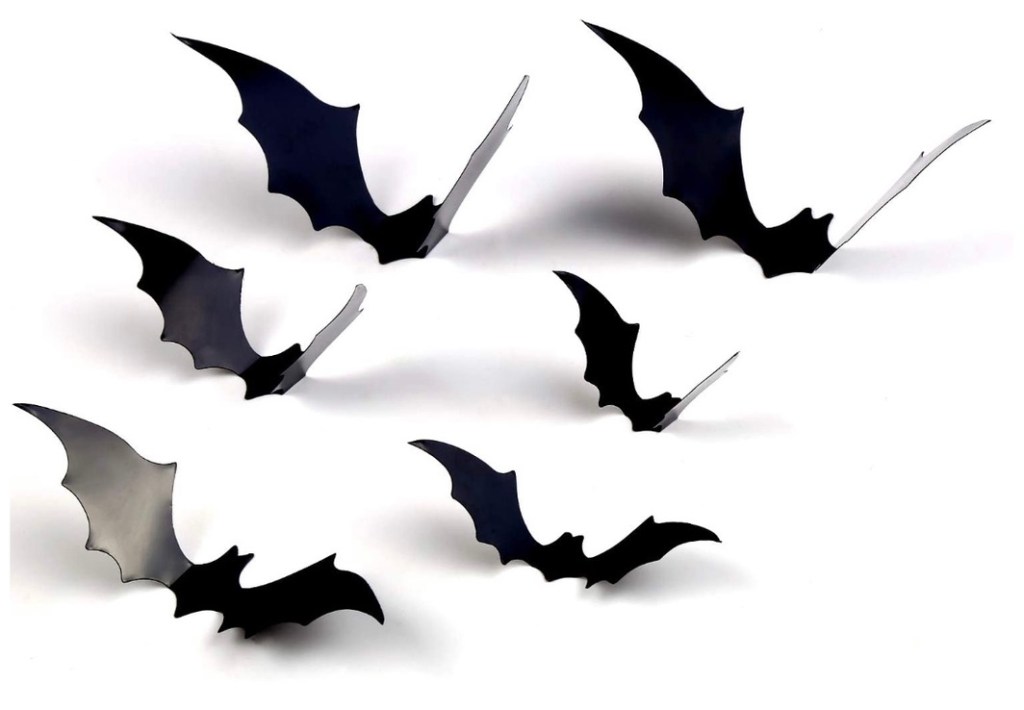
PS. I am OBSESSED with these bats ❤ Keep reading to grab some of my favorite fall items!
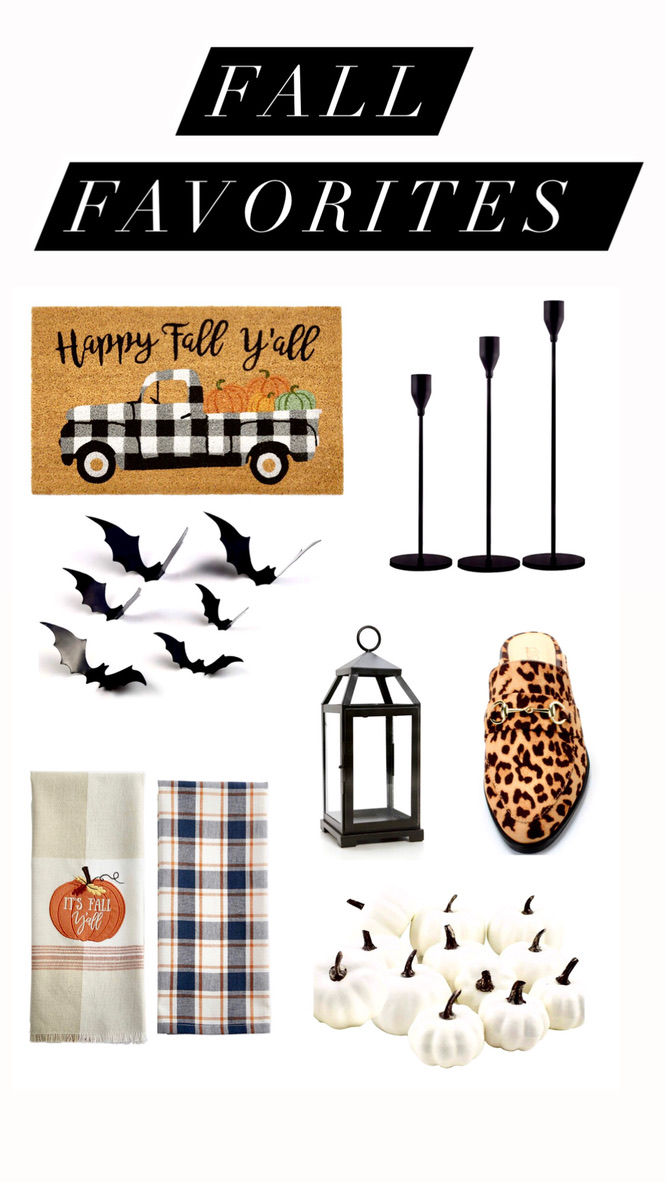
F A L L Favorites
1. Faux Pumpkins
I have reused the same faux pumpkins year after year. They can turn any space into an instant pumpkin patch or give a corner of your home a little Fall love without having to spend a lot of money or effort. You can find them here!
Tip: I mix my mini faux pumpkins in with real pumpkins and no one can tell they’re fake! I also love mixing the orange and white together
2. Halloween Bats
Okay these little guys are so freaking cute and just a tad bit spooky. They’re incredibly inexpensive and really easy to hang. I used them in the giant cutout by our entry but they would be perfect on a front door or even on a mirror in the entry or bathroom! I kept seeing these bats over and over again and finally decided to give them a try and I am so pleased–click here to check them out!
3. Fall Doormat
How will people know you’re obsessed with fall if you don’t have a fall doormat?! Okay I’m kidding, but seriously how adorable is this?? I feel like anything buffalo plaid was made for October.
4. Decorative Lanterns
I have been a little lantern obsessed recently. If you read my Home Renovations: Before & After post then you’ll notice I not only have lanterns sitting in the entryway cutout, but they’re also sitting on top of my dining table. Maybe that’s too many lanterns? Whatever I love them.
The best thing about these black lanterns is how versatile they are! You can incorporate them into each seasons decor and they are perfect for indoors or outside. Maybe set a few up by the front door next to your fall mat and pumpkins?!? Check them out here
Tip: I use LED candles that have a timer in mine. This way you set them once and they light up each evening and turn off on their own 4 hours later. Easy peasy.
5. Leopard Mules
The Fall-iest mules ever ❤ . I love these so much! Cute, comfy, and SO affordable. You may remember I shared these mules in the snakeskin print on my blog a while back, you can check that post out here, but this print just screams fall to me. Did I mention they’re under $35??
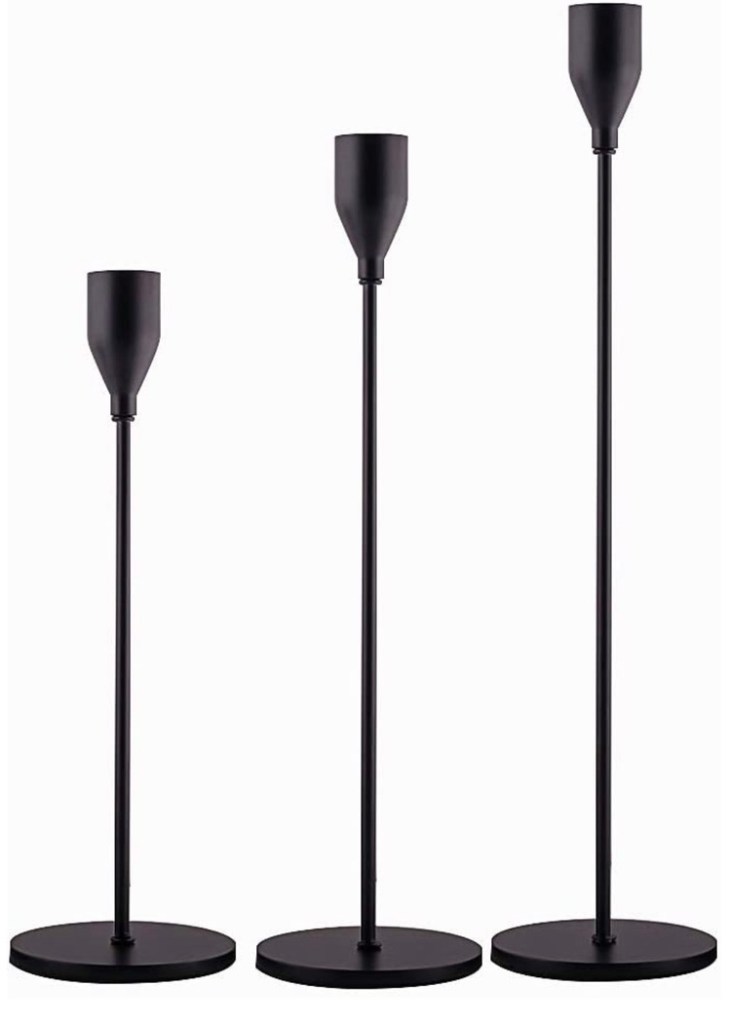
These matte black candle holders are so on trend right now–you can find similar ones at your favorite high-end store for 4x the price.
I think they’re perfect for a Halloween table setting (using 2 sets of them along the length of the dining table and mixing in some of those faux pumpkins 🙂 ) but they are also gorgeous as a decor item all year long! You can find them here
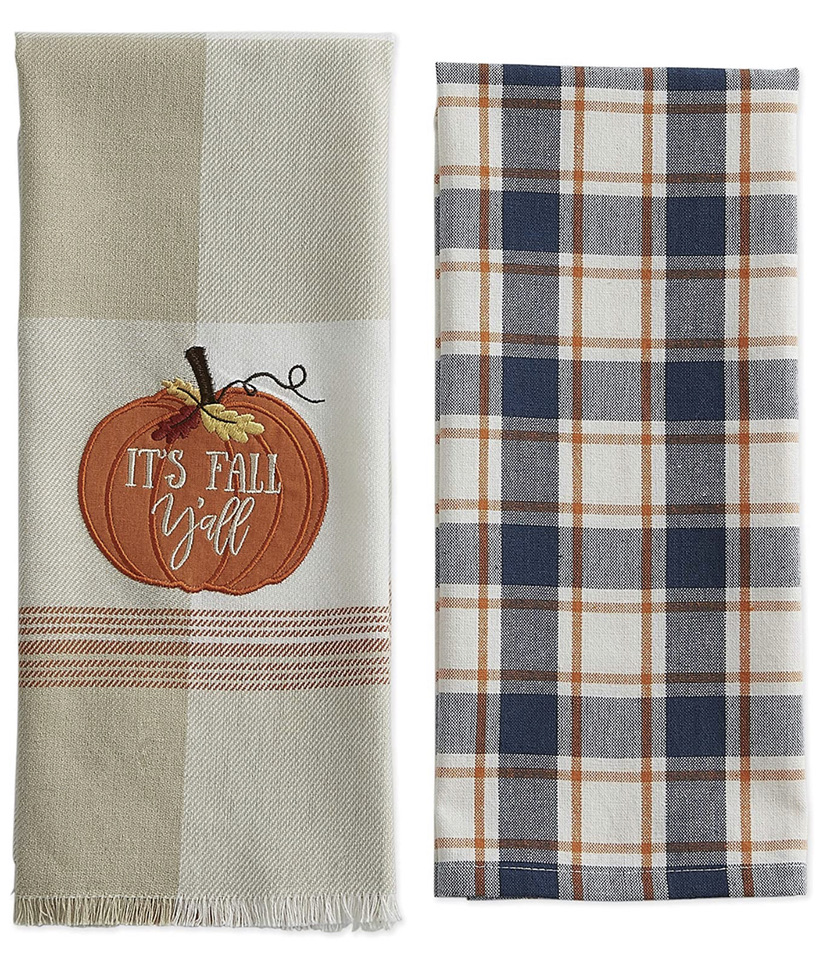
7. Fall Kitchen Towels
The easiest way to transform your kitchen for any season? A decorative dishtowel! The only thing you need to decide is if you’re going to let people use it or not 😉 . In our kitchen that towel is strictly decorative… yet it’s been getting progressively dingier, which I find interesting–how about you Dylan Kahl?? ❤ 😛
It’s time for me to go finish Harry Potter (who else loves to re-read the series when Fall hits?!) and have a second cup of coffee (with whip of course). I hope you enjoyed some of my Fall favorites ❤ Let me know some of yours in the comments below!
Guess what day is it (other than hump-day of course)?!
It’s the second day of Fall!!! If you follow me on social media, then you know I spent yesterday (which was the first official day of Fall) spreading pumpkins all over the house.
This little pumpkin patch in our entryway brings me SO much joy!
Even though the house is still a major work in progress–Dylan’s poor office is a disaster zone–I HAD to get a few festive things out 🙂
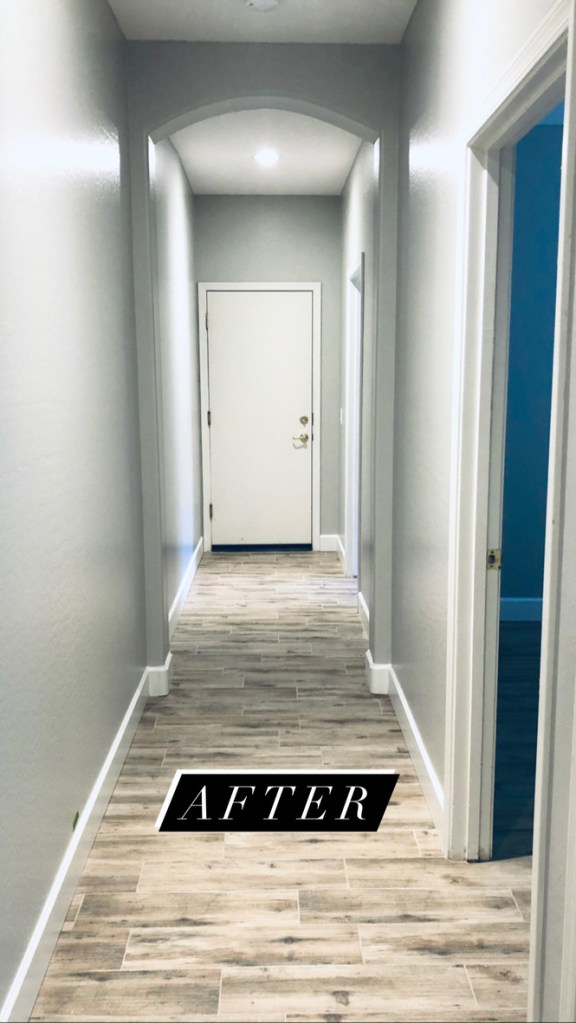
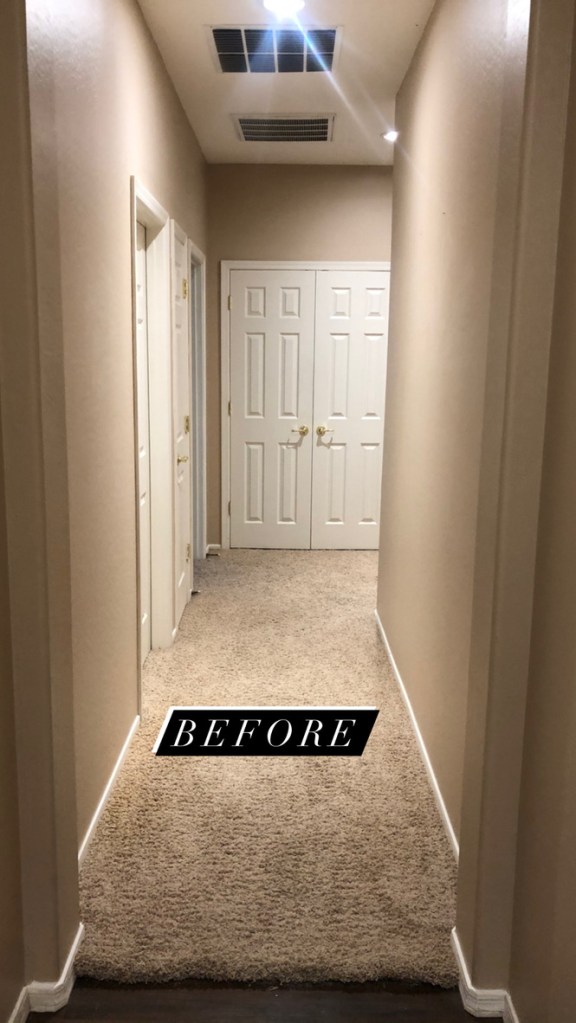
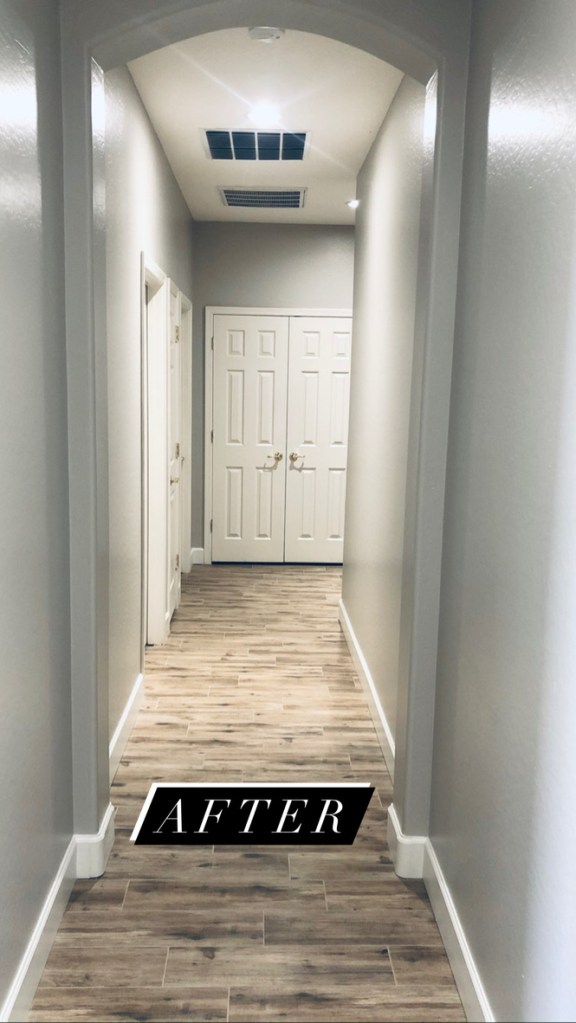
I thought today, in honor of the beginning of my favorite season ever, I would share some of the before and afters of our home renovations!
Home updating is no joke peeps. I’ve watched a whole lot of HGTV so I should have been prepared for the delays and inevitable problems that would arise but I still managed to be flabbergasted every time our project manager called me– his calls were never happy news.
In the end, everything came together and we are SO happy with how it all turned out ❤
In phase one of the remodeling (before we moved in) we had new flooring put in throughout the entire house (when we purchased the home, there was CARPET IN THE BATHROOM–ew), replaced the teeny, tinybaseboards, and had the entire interior repainted.
Details on the specific paint colors, wood tile etc. that we picked will be in an upcoming post, so if you’re interested in the deets keep an eye out for that!
Before & After
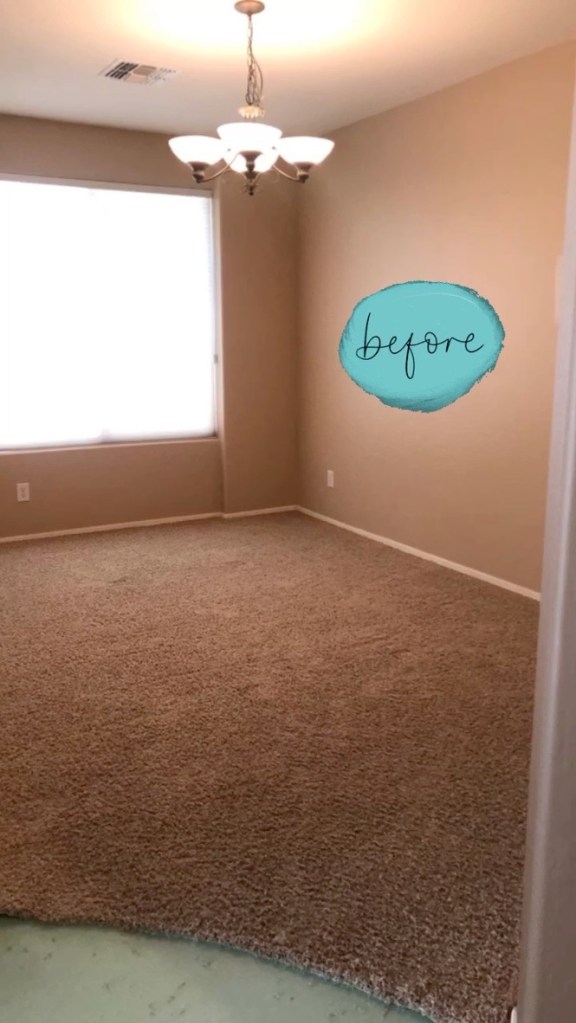
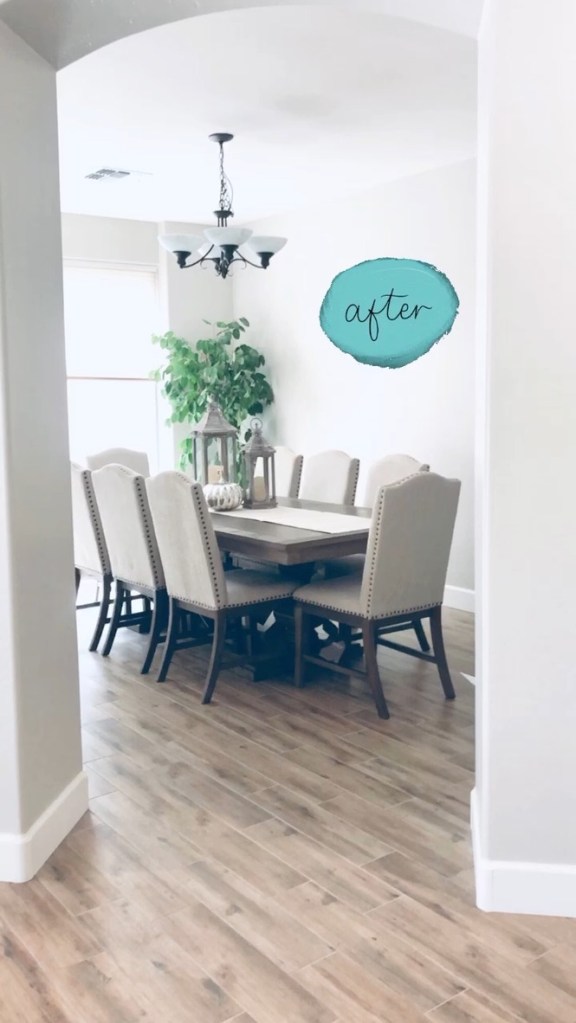
Formal Dining Room
I still can’t believe what a difference floors, paint and baseboards make to a room. Next up in here is a new light fixture and something on the walls!
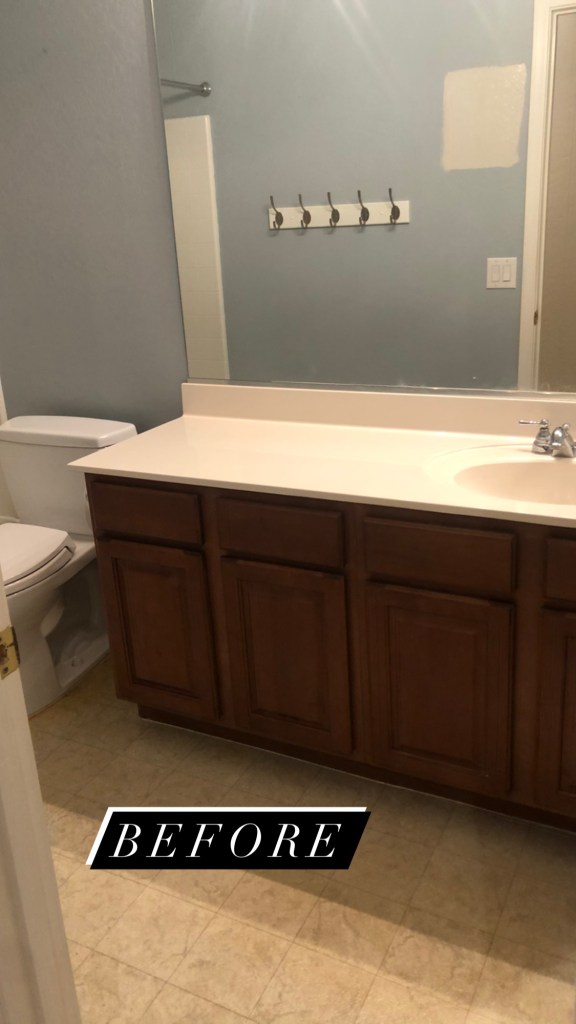
Guest Bathroom
Bye bye blue paint and laminate flooring.
Side Note: This bathroom runner is from AMAZON, I was really impressed with the quality and best part? It was such a steal; you can check it out here!
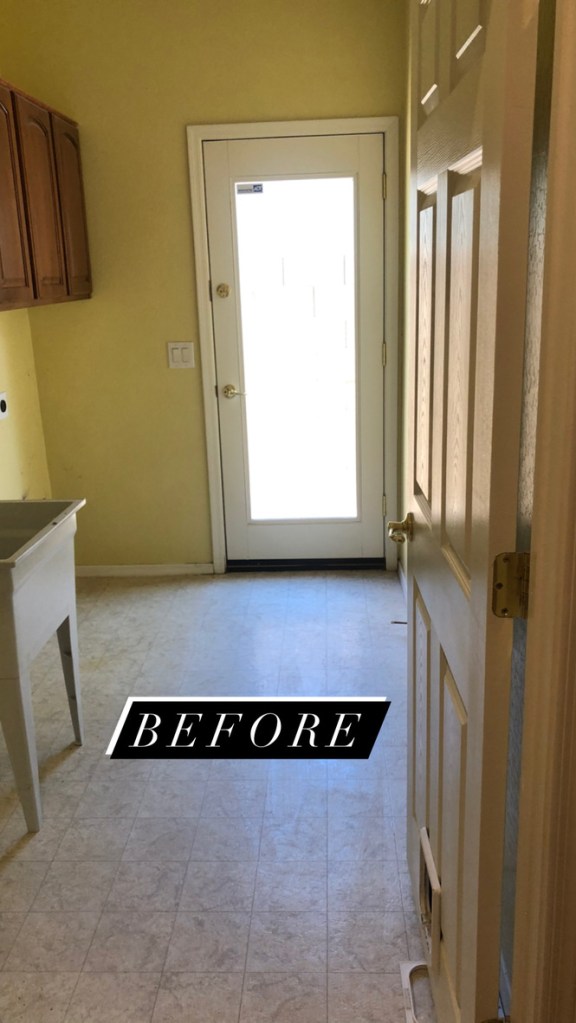
Laundry Room
We have a door in the laundry room that leads to our side yard, which is amazing, but all of that natural light coming in makes photographing it super difficult…but hopefully you get the gist.
Master Bathroom
In here we’re planning to change out the light fixtures, potentially paint the cabinets (jury’s still out on this one, what do you guys think??) and still need to decorate! And of course Wyatt wanted to show off his new haircut 😀
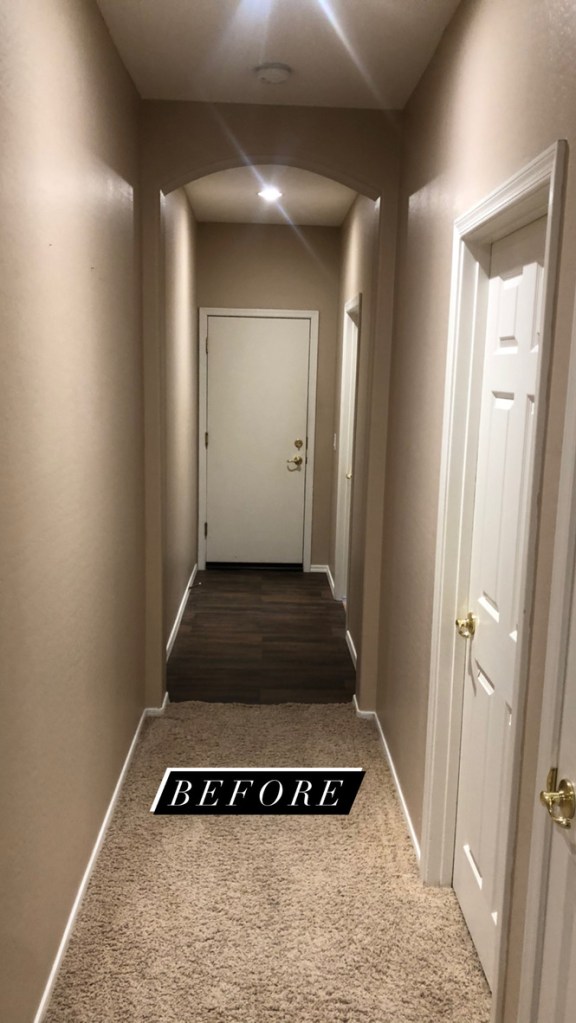
Hallways
Things I’ve learned throughout this process that may be helpful to someone thinking of redoing a home or even a single room:
Paint can make big changes. Be sure to swatch your colors on multiple walls and in different rooms to see what it looks like in different lightings. A color can look beige/grey in one room and BLUE in another.
Lighting is HUGE. We swapped out all of our recessed can lighting with white LED replacements and the impact was amazing. Our house went from a weird yellow color to bright white… it was like magic.
Big baseboards are bomb. I realize this is more of an opinion. I can honestly say baseboards are not something I’ve EVER noticed but replacing the really low ones with 5 1/4 inch bad boys made every single room look so much more elegant. We purchased and painted the boards ourselves to save money and then had them professionally installed!
Do as much of the demo as you can. We ripped out all the carpet and laminate ourselves (with help from family & friends) and we were able to save a ton. We were really lucky because the only tile in the entire house was a small patch by the front door, we left that for the flooring guys to take care of.
Don’t be afraid to tell/ask those you’ve hired to fix or redo something that wasn’t done to your standards. This was difficult for me–but we were paying a lot of money for these services and I wanted them done properly. My advice, if you’re not in the home while the renovations are being done, visit often and take tons of pictures of the progress–including before. We were so happy with the work done but did have a few touchups here and there. Everyone was really understanding about coming back out!
We still have a long ways to go but are making progress! I didn’t share pictures of our kitchen, bedrooms or family room but I promise they’ll be making an appearance soon 😉
Leave A Comment & Subscribe Below
I hope you guys enjoyed some of our before & afters! Let me know what you think of the house updates so far and leave any tips you may have for home remodeling in the comments below 🙂
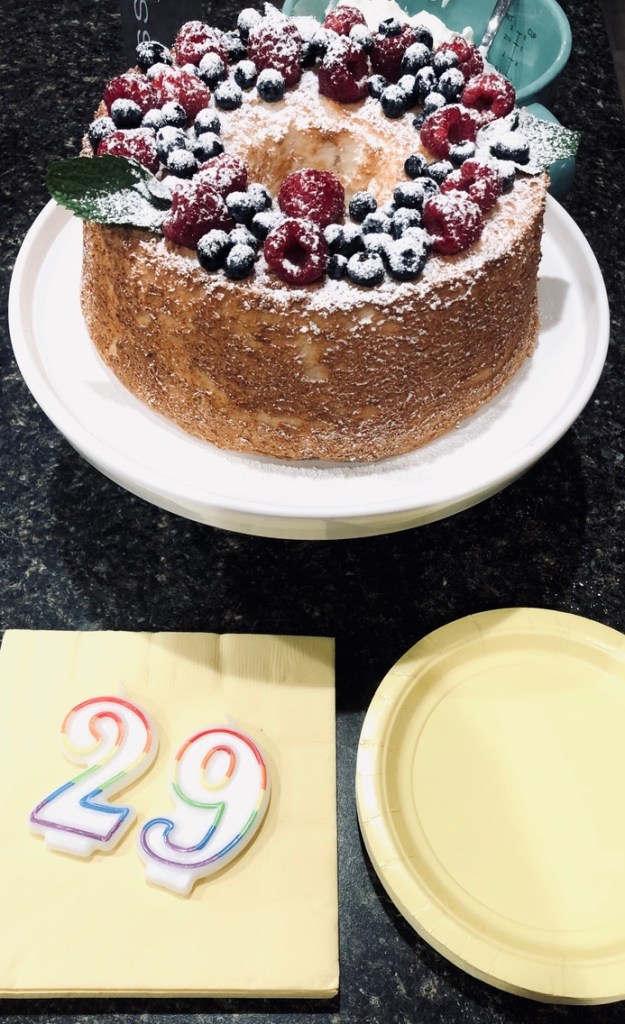
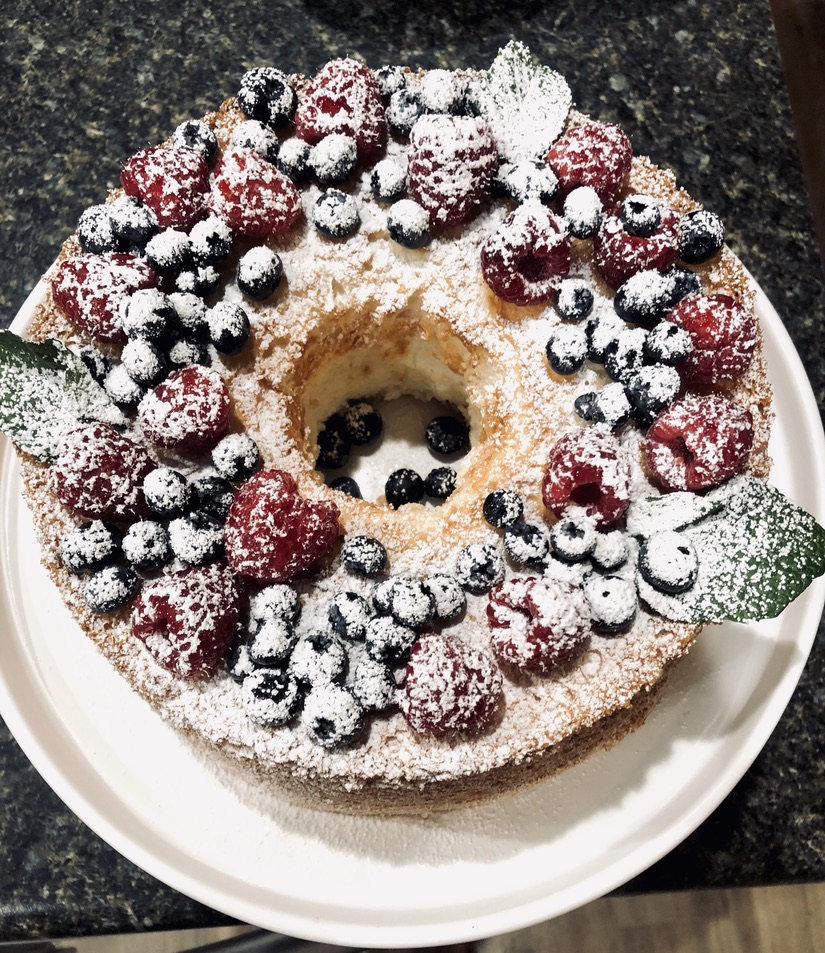
Light, airy, and so deliciously sweet. This homemade angel food cake takes the cake over any of its’ store bought counterparts and is definitely worth the extra effort. Topped with fresh berries and a dollop of freshly whipped cream, this melt-in-your-mouth cake will keep you coming back for more!
Angel food cake is one of those desserts that I really enjoy every time I have it, but it tends to slip my mind when it comes to baking–especially because they’re so easy to pick up pre-made at the grocery store. This year for Dylan’s birthday, he requested homemade angel food cake! Apparently it’s his favorite; how we’ve gone almost 8 years without me knowing this is absolutely baffling–but that’s completely off topic.
Birthday’s in the Kahl household are pretty big deals (if you know me then you know how much I love birthdays and all the holidays 🙂 ). Even if it’s just the two of us I try to make it really festive and special. Something as simple as putting up a few birthday decorations and having a fancy breakfast on the patio can make the day feel a little more magical.
And of course this year I made my hardworking hubby his angel food cake ❤
Disclaimer: I totally bought a back up dessert incase this cake failed miserably…
BUT
It turned out so delicious that I had to share with it you guys! Seriously, the entire cake was gone that evening. How many of those pieces were consumed by me is privileged info 😉
I’ve always been fond of the store-bought angel food cake (apparently true angel-food-cake-lovers find this appalling) but this was SO. MUCH. BETTER. It’s absolutely worth the extra effort in the kitchen, I promise.
I topped it with fresh berries, a heavy dusting of powdered sugar, a dollop of homemade whipped cream, and garnished with fresh mint!
A small side note that I hadn’t really thought about: Angel food cake and candles don’t really work well together. It’s such a light and fluffy cake that I didn’t want to ruin it with heavy candles. This year I carefully held them up next to his cake as we sang #dedicatedwife.
If you love angel food cake I hope you give this recipe a try!!
What you’ll need to make angel food cake
1 cup cake flour
1 1/2 cups super fine white sugar
1 1/4 cups egg whites (roughly 8-10 eggs)
1 1/4 tsp cream of tartar
1/2 tsp salt
1 1/2 tsp vanilla extract
Appliances: Sifter, food processor (this isn’t absolutely essential but REALLY helps), a stand or handheld mixer with whisk attachment, angel food cake pan.
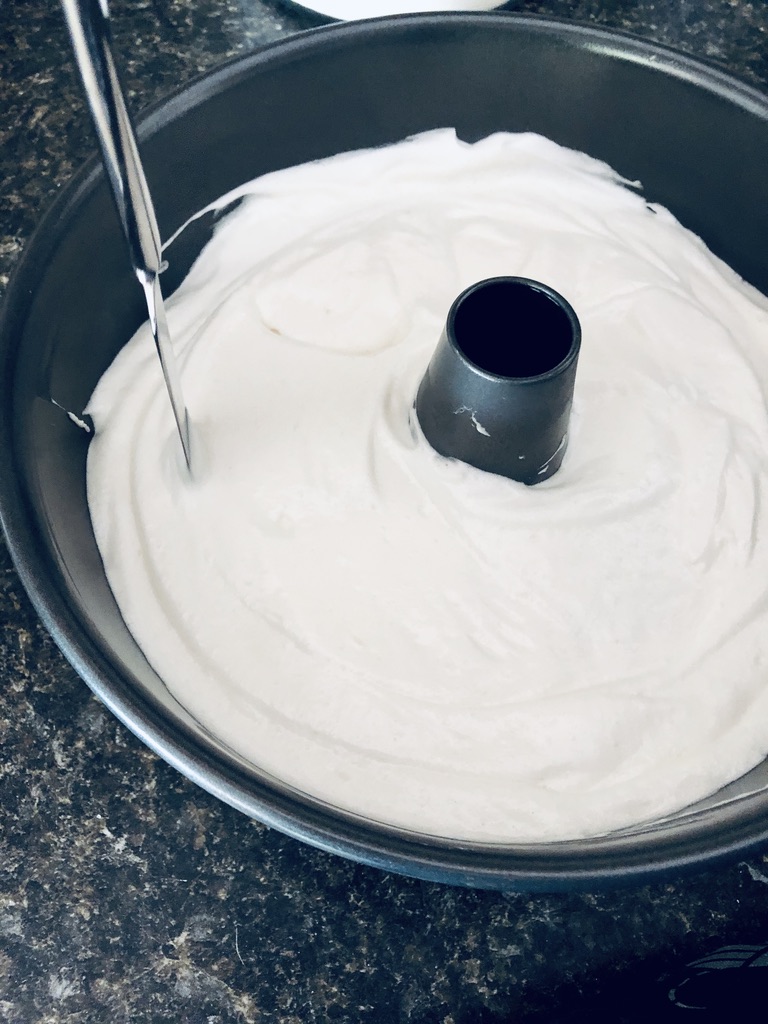
Making angel food cake step-by-step
Preheat oven to 350F and move the baking rack to the bottom third of the oven.
Separate egg whites into a liquid measuring cup, make sure to measure them (instead of just counting eggs) as the amount of egg whites varies depending on the size of the eggs! Tip: I like to separate one egg white at a time into a small dish and then pour it into the measuring cup. This prevents any accidental yolks or shells from getting into all of the egg whites!
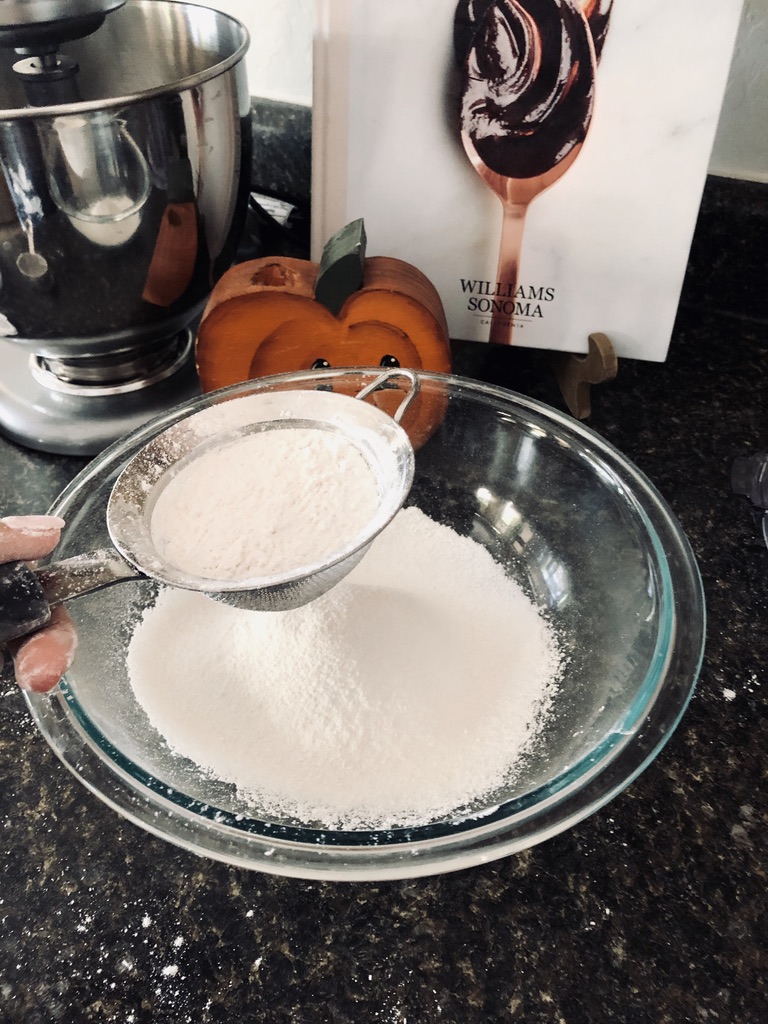
In a food processor, combine cake flour and half the amount of sugar. Pulse on high 8-10 times. Note: If you don’t have a food processor you can just sift the mixture into a large bowl 6-7 times. Also, this is one of those times when it’s best not to substitute the cake flour with all-purpose. Tip: If you don’t have super fine sugar (I didn’t) you can use granulated sugar just make sure to pulse it extra fine in the food processor!
5. Once it’s been pulsed away in the food processor, sift the dry ingredients one time into a large bowl. I clearly need to get an actual sifter because using this powdered sugar duster takes FOREVER.
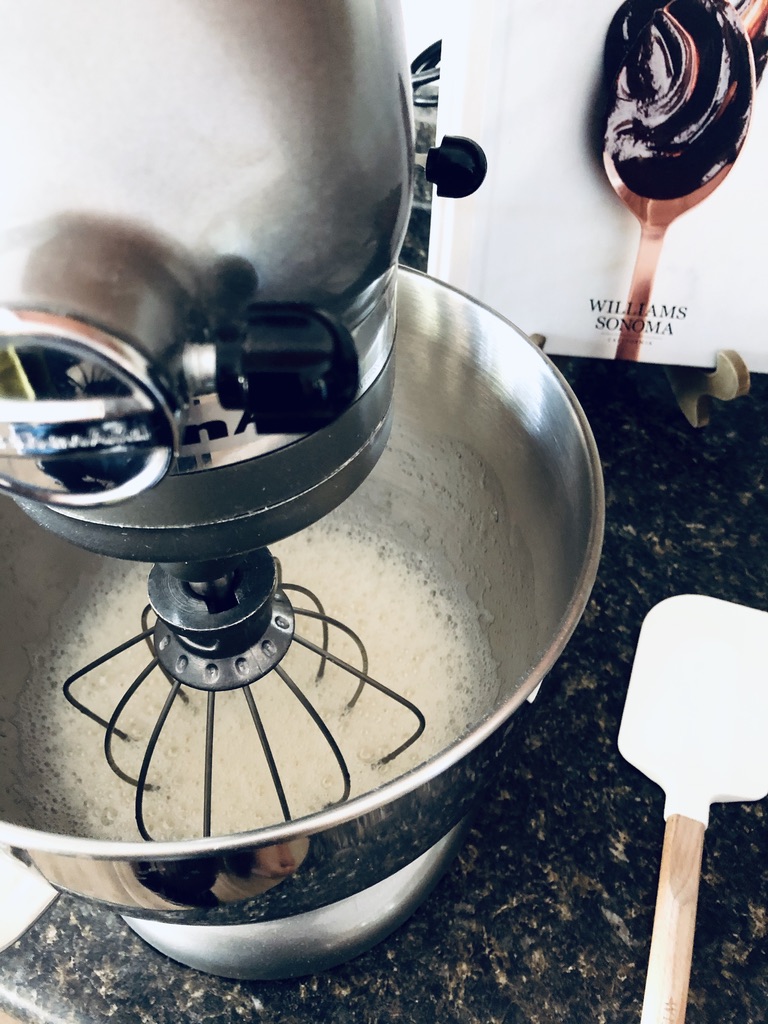
6. In a very clean stand mixer bowl, add egg whites, cream of tartar, salt, and vanilla. Fit your stand mixer with the whisk attachment and turn on low. Once mixed, increase speed to medium-high; on my mixer that’s number 6.
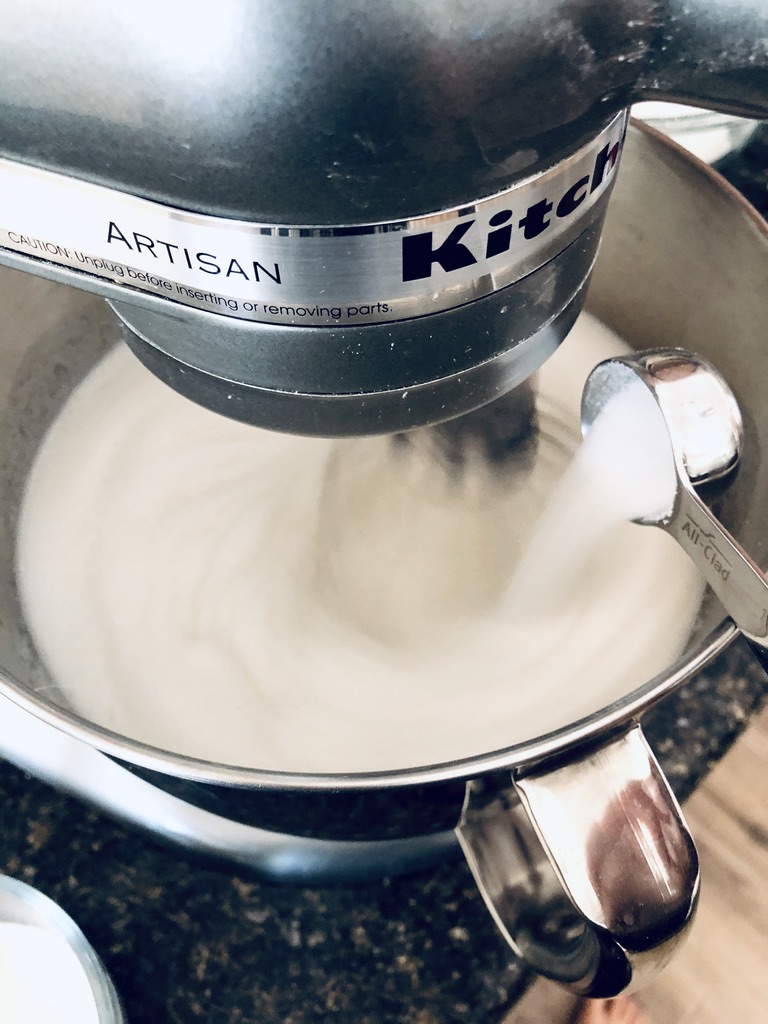
7. Once the egg white mixture begins to froth (see previous image), slowly add in remaining sugar 1 tablespoon at a time. Just as in my Vanilla Meringue Cookie recipe, adding the sugar in super slowly is crucial to obtaining thick beautiful meringue!
8. Continue whisking on medium-high until stiff peaks are formed, then turn off the mixer and remove your bowl.
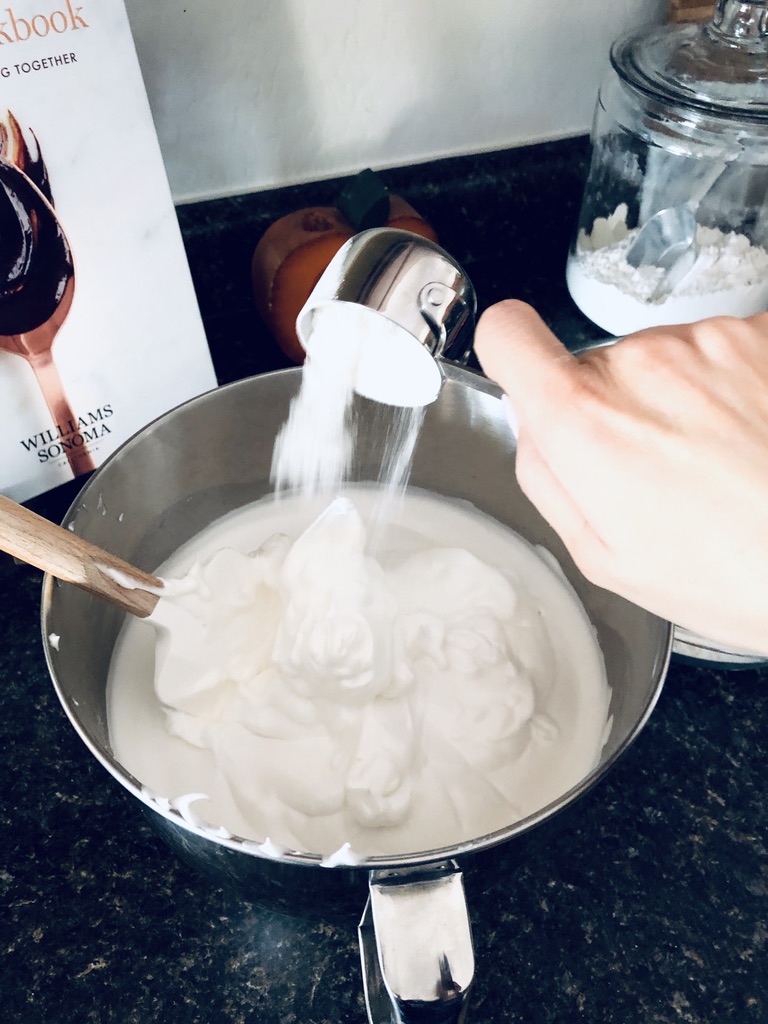
9. Now it’s time to fold in the dry ingredients with a spatula! Add in 1/4 cup of the flour/sugar mixture at a time and carefully incorporate it into your egg whites–we don’t want to lose any of that fluffiness! Repeat until all the flour mix is incorporated. Note: To “fold in” the dry ingredients use a spatula to cut down the middle of the mixture and scrape up the side of the bowl, turn the bowl and repeat until incorporated. Has anyone seen that scene from Schitt’s Creek where the mom is explaining what “folding in” means? OMG it’s hilarious.
10. Scoop or scrape your mixture into angel food cake pan. You’ll have to turn your pan as you add it in. Note: Do not grease your angel food cake pan! To be able to rise and become all cloud-like the batter has to be able to cling to the sides of the pan.
11. Gently smooth the top with a spatula. Run a long skewer or butter knife through the batter a few times to get rid of any large air pockets. We want light & airy cake, but not holey cake!
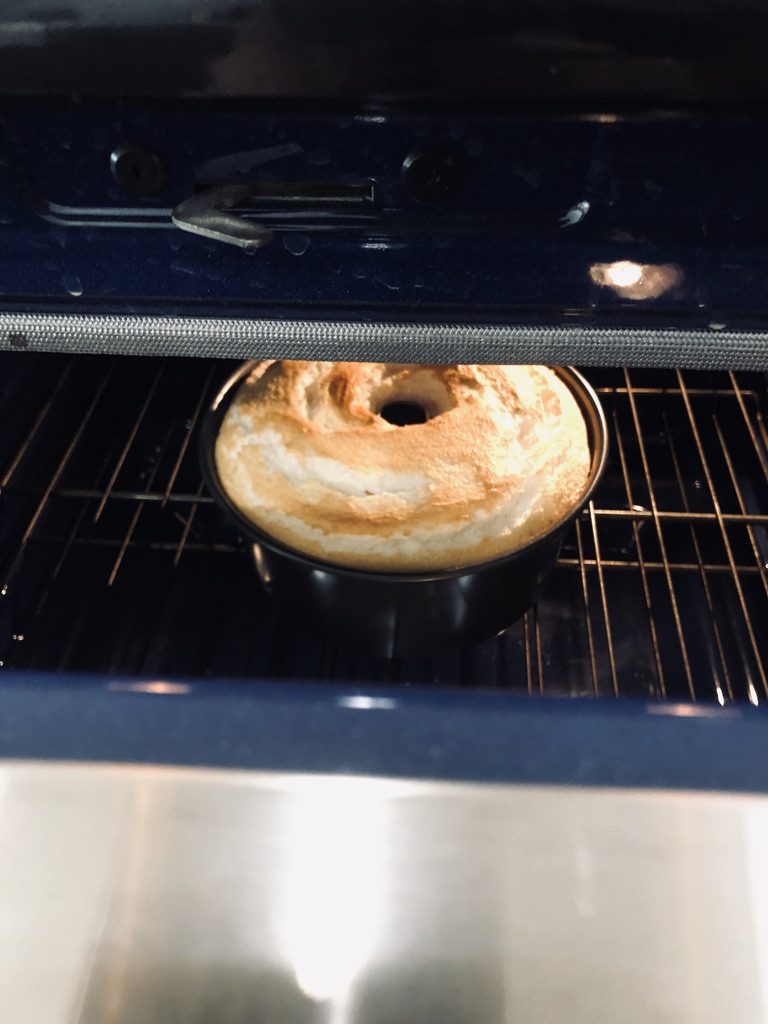
12. Bake at 350F for 35-40 minutes; until the top is golden brown and a skewer comes out clean. Flip the cake pan upside down onto a wire cooling rack for one hour. Some angel food cake pans have little feet on the bottom so using a wire cooling rack isn’t necessary! Once completely cooled, run a thin knife along the edges (both outer and inner), and pull out the center piece. Run the knife along the bottom piece of the pan and then flip the cake onto a cake stand!
13. Voilia! Your angel food cake it ready to be topped however you’d like it!
You can add fresh blueberries and strawberries…
…and lots of powdered sugar! Don’t forget to top it with a nice big dollop of whipped cream to serve 🙂
Leave A Comment & Subscribe Below
If you love angel food cake, I hope you give this recipe a try! Don’t forget to let me know how it turns out in the comments below 🙂 Thanks for stopping by Clyde’s Corner!
If you haven’t noticed, I’ve been MIA from Clyde’s Corner for the last few months. Dylan and I have had some BIG life changes that have required most of our time and efforts– I will definitely be sharing more on this in posts to come 🙂
In one of my most recent blog posts I mentioned that Dyl and I were leaving San Francisco but I didn’t share where we were headed (mainly because I didn’t want to jinx it), well…. Arizona, we’re back baby!!
Dylan and I are both from Arizona (we met at Arizona State during undergrad, go Devils!) and all of our family, excluding my sister (cue the uncontrollable sobs), live in the area. Moving back here was always in our long-term plan but due to the Covid19 Pandemic, and Dylan’s new ability to work remotely, we were able to move back much sooner than we anticipated. YAY!
We drove from San Fran to Phoenix back in June to look for houses– we actually thought we would be able to find one (make an offer, and have it accepted) in ONE week. HAHA. I’m literally laughing out loud as I type this because I now realize how absurd that thought was #firsttimehomebuyers.
Our one-week trip turned into a full month of home searching– we had to order clothes online and have them delivered because we had been living in the same five t-shirts day after day. Just to be clear…I’m not complaining about the shopping, I would never do that 😉 . On top of our unexpected trip extension, the housing market in Phoenix is INSANE right now. I’m talking hardcore sellers market with bidding wars on every. single. house. So that was fun.
Thanks to our awesome real estate agents and my incredibly patient husband (this girl can be a tad picky) we found our perfect home! Dylan and I still wake up every morning in complete shock that we get to call this place home.
Now I’m ready for the temps to cool down so we can start to enjoy the best part about living in Arizona, the nine months of perfect weather and outdoor living. Bring on the Fall weather and toasted marshmallow season!
[Side Bar] get ready for some Fall overload on Clyde’s Corner peeps. It’s happening.
Once our offer was accepted, we rushed back to SF and packed up our entire apartment in less than two weeks. If you’ve seen my Photo Tour of Our SF Apartment post, you know that we didn’t have that much to pack up–if you missed it, you can check it out HERE!
Overall, our move went pretty smoothly and we couldn’t be happier in our new home. Now that we are somewhat settled I am SO excited to be back blogging 🙂
I have a ton of fun things to share with you in the upcoming weeks! I hope you guys like home renovations 😀 We may or may not have taken on some projects with this house (spoiler alert, we totally did).
What you can expect to see coming up on Clyde’s Corner:
Before & Afters of all of our home renovations (I’m SOO excited to share with you)
How I’m decorating & organizing all of our new space– the word space is brand spanking new to our vocabulary
Tons of new recipes
And so much more ❤
Leave A Comment & Subscribe Below
Clyde’s Corner brings me so much joy and I couldn’t be happier to be back blogging! As always, if there’s anything you’d like to see more of let me know in the comments below!
These air-fried kale chips are so easy, incredibly delicious, crunchy and super healthy! They’re the perfect snack for anytime of day.
Happy Tuesday everyone!
I hope you enjoyed the long weekend ❤
The weather here in SF has been B-E-A-U-T-I-F-U-L… I’m talking 80 degree weather beautiful. We spent a majority of our weekend outside, and definitely got a little too much sun.
Dyl and I ate ribs, steak, and In and Out this weekend, sooo these kale chips are the perfect snack to balance that out. That’s how it works, right? Kale chips are delicious, crunchy and super healthy! I used to make them all the time (in the oven) but totally forget about them & what a great snack they are until recently.
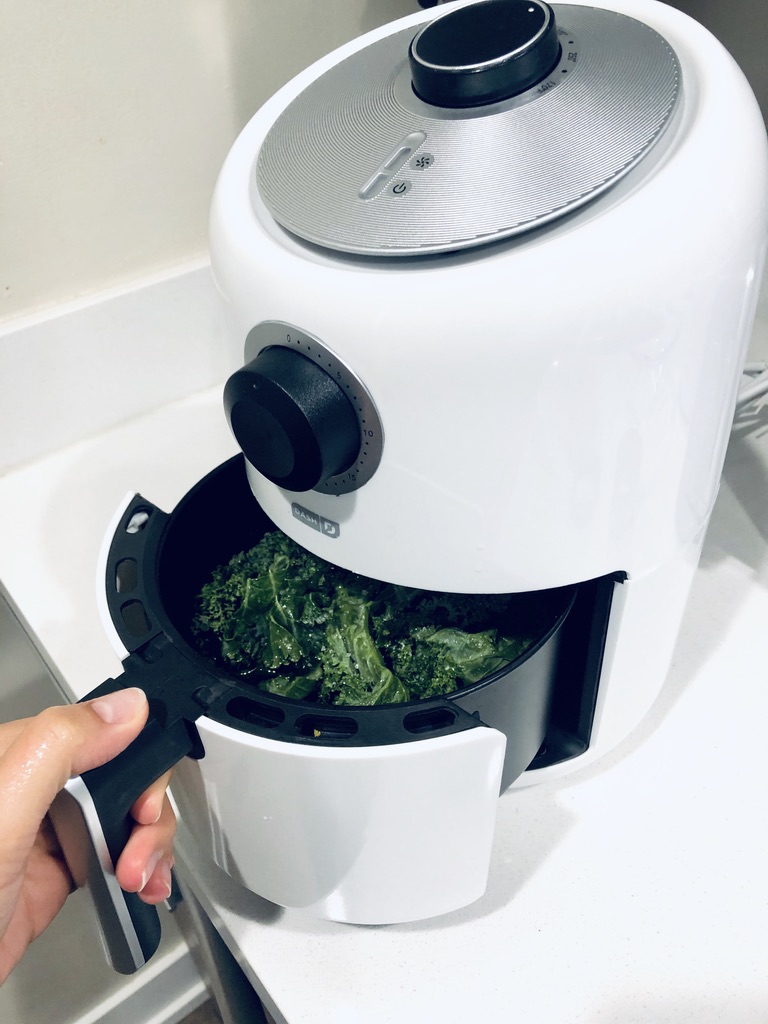
Because it has been so hot out, and our apartment gets sun most of the day (have I mentioned we don’t have AC here in the city????) I am reluctant to use the oven– my Arizona people know what I’m talking about. Enter The Air Fryer.
We got our air fryer as a wedding gift; I was so excited about it but wasn’t sure if we’d end up using it that often– you know how those trendy appliances usually end up sitting in the back of the pantry barely used. Spoiler Alert! I use it all the time. I LOVE the air fryer. If you don’t know what an air fryer is, it basically works by circulating hot air around the food using the convection mechanism– a small convection oven if you will.
The best part about air frying is it gets everything super crispy, yet requires almost no oil to do so. Using an air fryer can lighten up some of your favorite fried foods like french fries, but also makes already healthy options, like roasted veges, way easier– seriously it’s amazing.
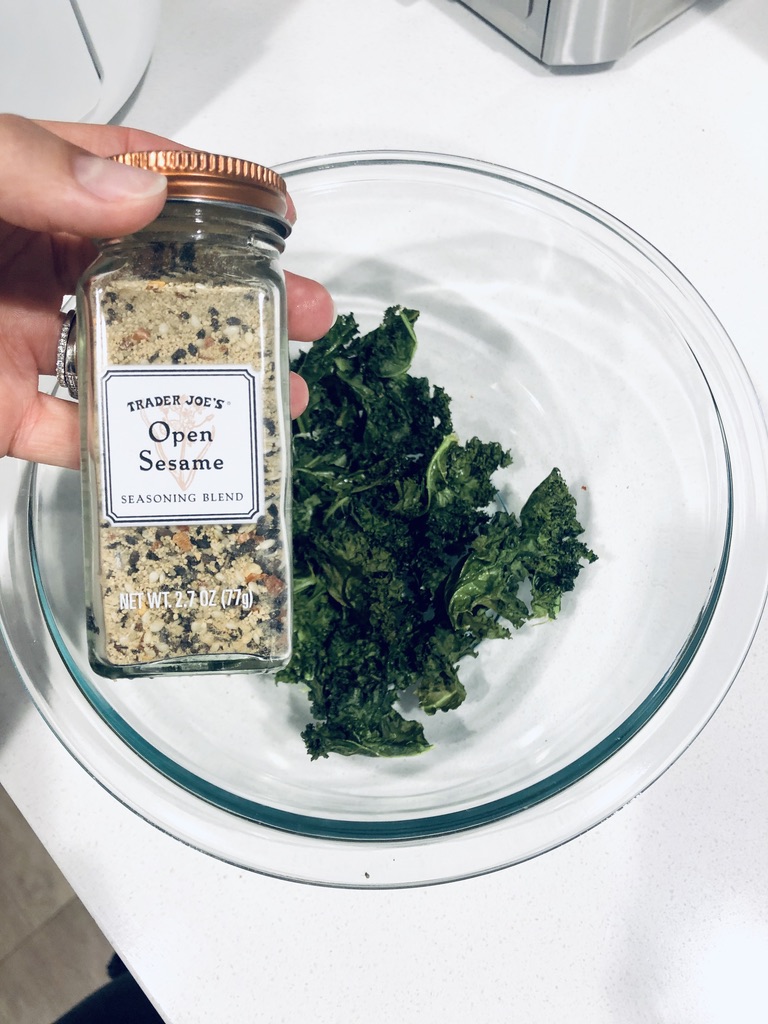
In my kale chip recipe, I prefer to use just a few sprays of Pam instead of olive oil as an even lighter option, but the recipe works great either way! You can also season your chips pretty much anyway you’d like. I am really into the Open Sesame seasoning at the moment; it’s the perfect blend of sweet and spicy.
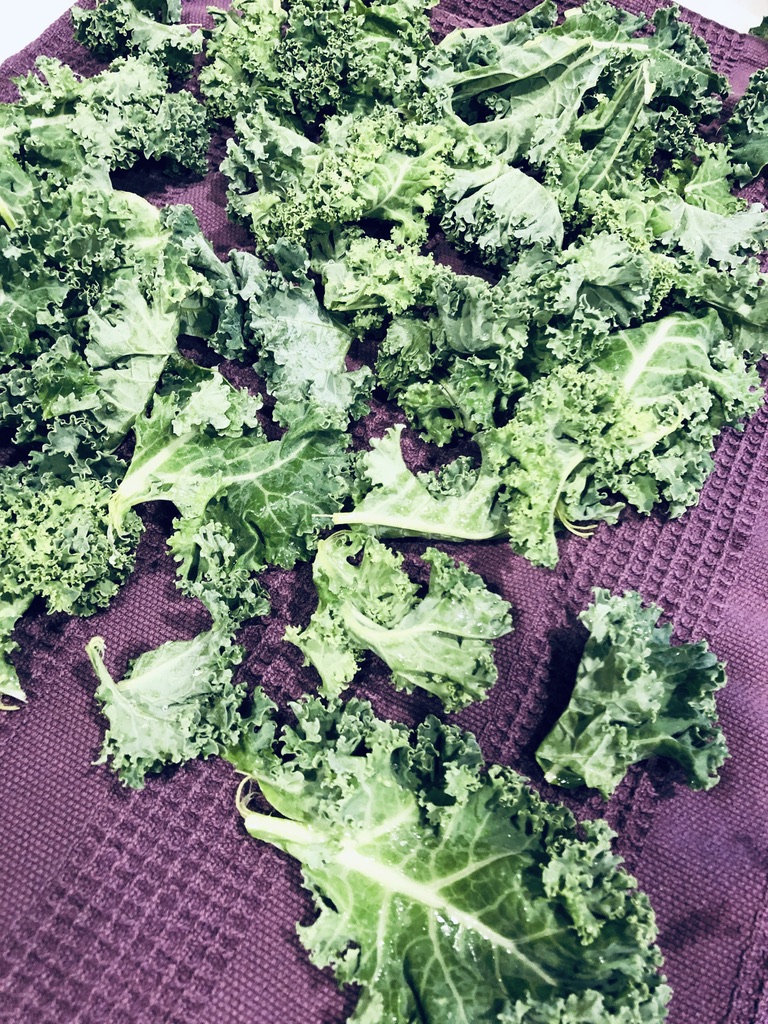
Wash kale & remove the stems– pat dry with a kitchen towel. Once dry, cut or tear into “chip-sized” pieces.
In a large bowl either spray the kale with cooking spray (I use Pam), or drizzle with 1-2 tbsp olive oil, just enough to lightly coat. Season with a large pinch of salt. You can leave them plain with just salt (they’re delicious plain), or spice them up with some extra seasoning! They taste amazing with Trader Joe’s Open Sesame seasoning but are also good with garlic powder and/or chili powder 🙂
3. Once seasoned, add kale to the air fryer basket. Be sure not to overcrowd it– you may need to do multiple batches. I use and love this air fryer! Note: I recommend the family size air fryer, even if it’s just you– the larger basket size saves a lot of time!
4. Cook at 350 for 5-7 minutes or until kale is crispy. Tip: Remove the basket and shake it a few times during cooking to help dislodge any stuck chips and to help the kale cook and crisp up evenly!
5. Once cooked, lay chips out on a baking sheet to cool slightly; if they’re crowded together immediately after being removed from the air fryer they don’t stay as crispy.
6. Repeat with remaining kale and enjoy!!
Storing Instructions:
In my opinion these chips are best enjoyed almost immediately (or at least the same day that they are made)– Dylan and I can eat an entire bundle of kale chips in one sitting. They’re healthy… don’t judge us. If you don’t plan on bingeing on kale chips like us, you can store them in an airtight container for up to 2 days 🙂
Leave A Comment Below
Thanks for stopping by Clyde’s Corner today! If you enjoyed this recipe let me know in the comments below! If you try them out, don’t forget to post a picture to your social media account and tag me 🙂
Exciting news alert!!! The Kahl’s are moving in July!
Dylan and I knew that living in San Francisco was temporary, but the last year and a half has FLOWN by. I feel like just yesterday we were sitting in this apartment on the night we moved in, surrounded by boxes, drinking a bottle of wine and looking out from our balcony, in awe of the city.
Living in SF has been an adventure for us but we are ready for the next chapter to begin! I’ll share the deets on where we are headed in a later post, but for now, before we start to pack this place up, I wanted to document our tiny city apartment… and thought I would bring you guys along for the ride 🙂
I pointed out & linked some of the items that I absolutely love throughout our home. If something catches your eye and I haven’t linked it or mentioned it, leave a comment below and I’ll be happy to share where I found it!
I also want to mention that I’m using the term tour very loosely…. basically as soon as you walk in our front door you can see 90% of our apartment, soooo it’s more like photos from different angles & not so much a photo tour haha.
Either way, I hope you enjoy getting to know me a little better by taking a peak inside of our home!
The Kitchen
One of the things I loved immediately about this apartment was the backsplash in the kitchen… how cute are those blue subway tiles!? Even though we don’t have a ton of space I’m really grateful for how big our kitchen is– a lot of pasta has been made on that island! Our front door is right behind that sleeping doodle (who I couldn’t bare to wakeup just to take a picture ❤ ).
Fun Fact: That picture hanging all the way to the right, is actually a drawing (done from a picture) of Me, Dylan, Wyatt & Toby (my little yorkie-poo that has since passed away). It was a Christmas gift from my brother and sister-in-law a few years ago ❤
This coat closet is right next to the front door and kitchen, and doubles as our pantry & shoe storage. Those grey striped baskets on top are our (nonperishable) breakfast foods/snacks/dinner items (in that order). Thank God we live above a Whole Foods. We usually just run downstairs to grab what we need for the next few days, that way we don’t have to store too many things– I honestly don’t know where we would put it #cityliving.
The Dining Room
Having an apartment with an actual dining space was supper important to me! Mostly because I have this dining table that was my Nana’s ❤ but also because Dyl and I like to sit down at a table to eat dinner– we’re crazy I know.
Our dining area doesn’t have any overhead lights (so weird), so we put up remote operated lights in all four corners! They are super easy to use and install. I highly recommend them if you have an area that needs a little extra light– you can check them out here!
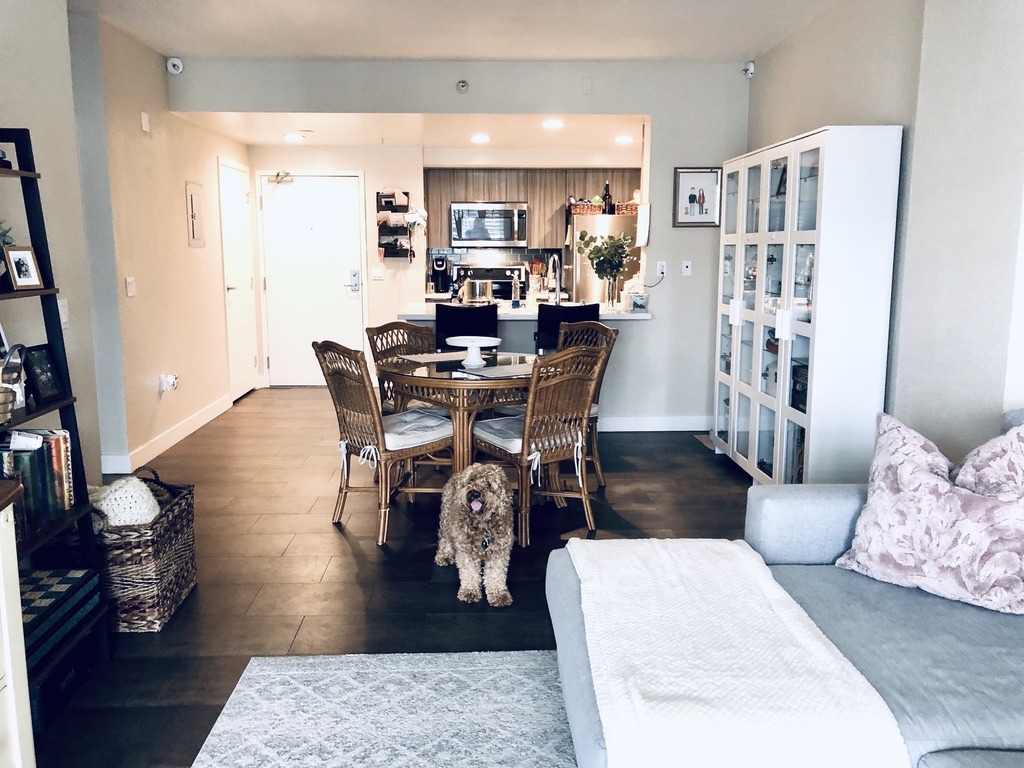
The Living Room
I love the giant window in here, it makes it feel way bigger and more open. Those shudders slide open and there is a small juliet balcony out there. Wyatt can’t even turn around on it– he can go out the door in the living room and either has to back up or come inside the other end (the door in our bedroom). SMALL.
This is the view from our living room, that tall building is the Salesforce tower. It’s particularly beautiful at night all lit up!
This entertainment center (AKA my childhood dresser) doubles as our linen storage– there’s zero room in the bedroom to store extra sheets and blankets so they live out here!
Fun Fact: All those blankets in the basket next to our bookshelf were knitted by my Momma ❤ she’s so talented.
If you couldn’t tell from our bookshelf, we are #newlyweds and huge Harry Potter fans 😀 Have you guys seen the HP illustrated books?! They’re amazing.
Ourbookshelfis from amazon and was super affordable, you can check it out here!
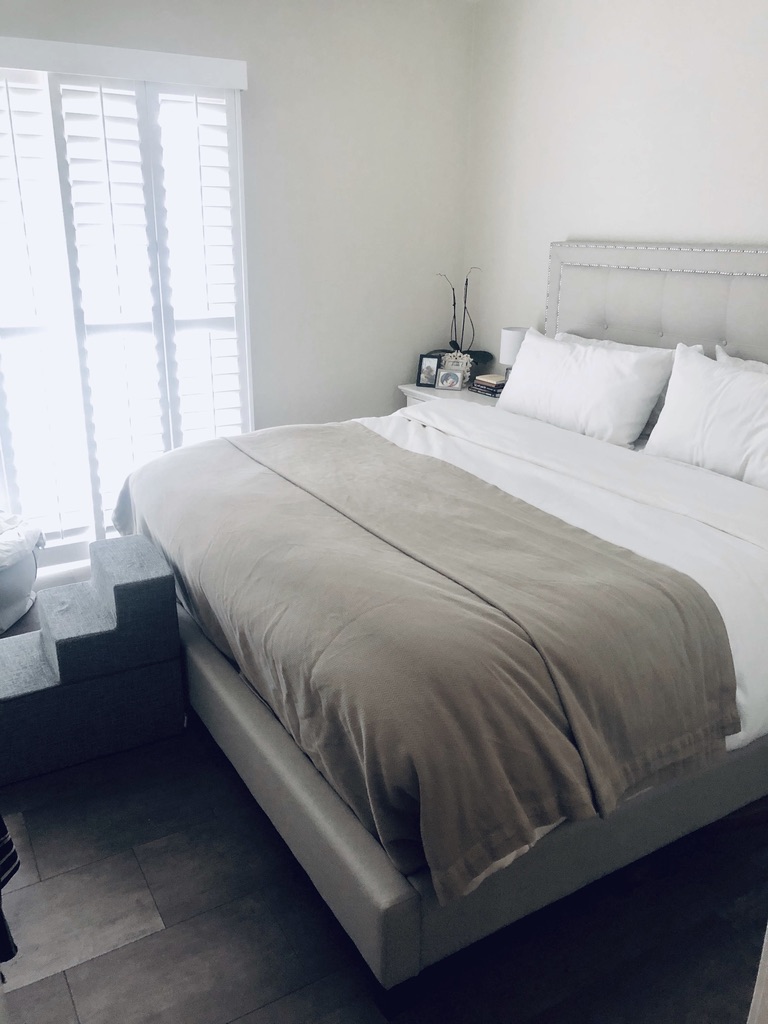
The Bedroom
Our bedroom is really small and basically just fits our king sized bed and one nightstand, but to me it feels cozy! Again, that giant window helps make the room feel bigger and more open. Just like in the living room the shudders slide open to our juliet balcony– we don’t actually go out there but I keep my plants out there 🙂
I like to keep our bedroom pretty neutral and relaxing. Our bed frame took me forever to pick out (we slept with our mattress/boxspring directly on the floor for like 3 months), but I am very happy with this one! To check out our exact bed click here!
If you’re looking at those stairs at the bottom of our bed… they’re for Wyatt.
Okay, here’s the deal– Wyatt is only 7 and he can 100% still jump on our bed (I know this because I watch him do it when he thinks I’m not looking) but most of the time he acts like he can’t. Dylan and I spent 2 whole months waking up 5-10 times each night because Wyatt would jump off the bed to get water (or a toy, or whatever it is that dogs so desperately need at 3:30 in the morning) and then he wouldn’t be able to get back on to the bed. He wouldn’t bark but he would paw at whatever body part was close enough for him to reach. It was SO annoying. We finally broke down and got him these stairs and never looked back. We no longer care that he’s a total liar because we are well rested 🙂 If you are in need of pet steps click here!
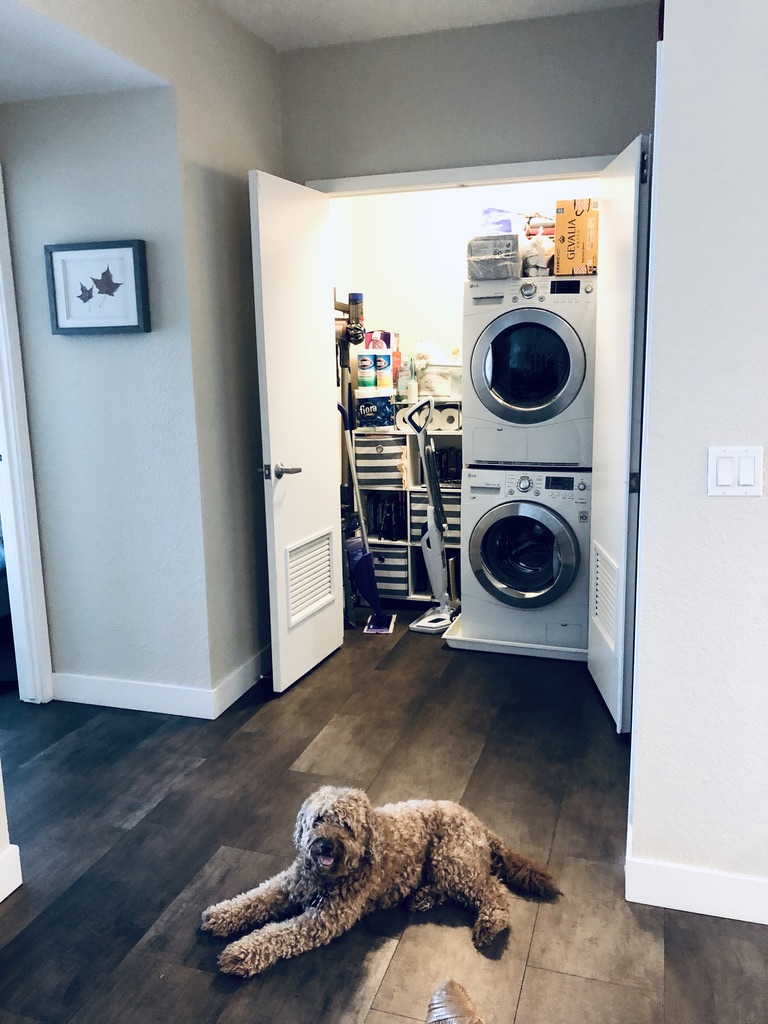
The Laundry/Storage
Our dining area is right in front of Wyatt, the bedroom is on the left and the bathroom is on the right– just for reference. Having an in-unit washer and dryer is such a luxury in SF, as is all of this storage space!!
Fun Fact: See those framed leaves on the wall? They’re from the tree that Dylan proposed to me under in Michigan. We both took a leaf from it and I preserved them and mounted them ❤ it’s one of my favorite pieces ever.
The Bathroom
Whelp, it’s a bathroom, and again very neutral and kind of boring.
How cute are these embroidered robes from Pottery Barn?! They were Christmas gifts from my parents this year ❤
These pictures of Wyatt crack me up– he looks like he is giving a tour of all of his things LOL.
Also, let’s be real, all areas of this apartment are Wyatt’s.
That wraps up our apartment “tour”! Thanks for stopping by Clyde’s Corner and peaking inside of our home. We are ready to move on (don’t worry I will bring you guys along 🙂 ) but have made amazing memories here that we will carry with us forever ❤
Leave A Comment Below
If there was something that caught your eye in my photo tour that I didn’t mention or link, drop a comment below and I will be sure to get back to you! Also, if you have any moving tips leave them in the comments!