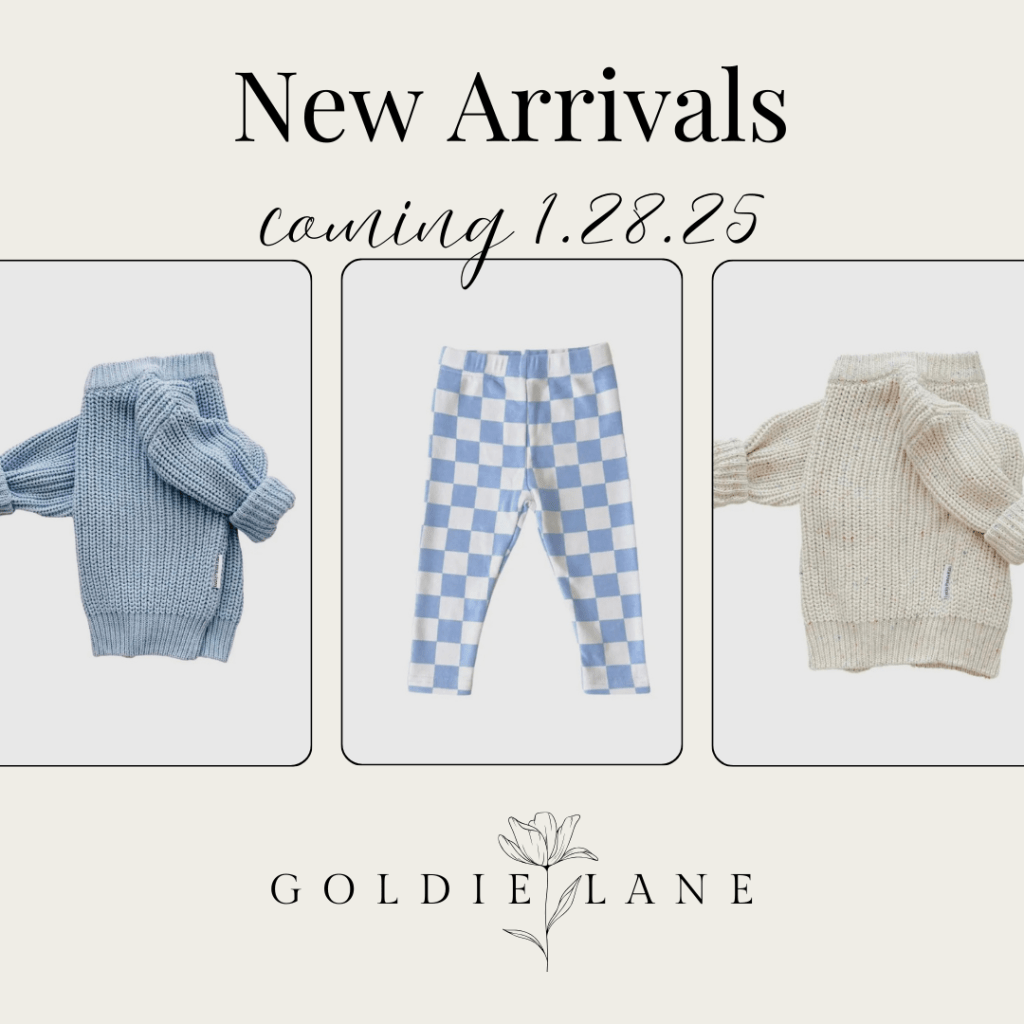
It’s been a VERY long time since I’ve been here on Clyde’s Corner & I’ve missed you! Honestly, this seems like the worst time to start blogging again considering I have less time than I’ve ever had. Like ever. BUT that’s because I started a business!!! More specifically, I started an online children’s clothing boutique called Goldie Lane.Goldie Lane carries elevated everyday styles for sizes 0-3 months all to way up to 8 years!
Goldie Lane has been such a passion project and true labor of love (not unlike Clyde’s Corner). It all started on our living room couch one night over a cup of tea, after the kids had gone to bed. Dylan and I were talking about our dreams and ambitions and what we wanted our future to look like. That night the idea of Goldie Lane was born. We sat up and talked for HOURS, and by the end, had decided to go for it. I did days and days of research and made a list of everything that I needed to do to start an LLC and to get accepted to go to the Dallas Market Center. I remember looking down at the list thinking “there’s no way I can do all of this“, but one day at a time, one thing at a time, I completed everything on the list (and so much more). I’m still at the very beginning of this journey and have so much more to learn, but wanted to bring you along with me ❤
If you want to stay up-to-date on what’s happening with Goldie Lane and have first access to new arrivals and exclusive offers, you can join the email list HERE!
Thank you so much for being a part of this community!
Happy Monday Everyone! T minus one week until Halloween.
I put together this quick bonus post in honor of one of my fav holidays 🙂 wishing you all a safe and fun Halloween!!
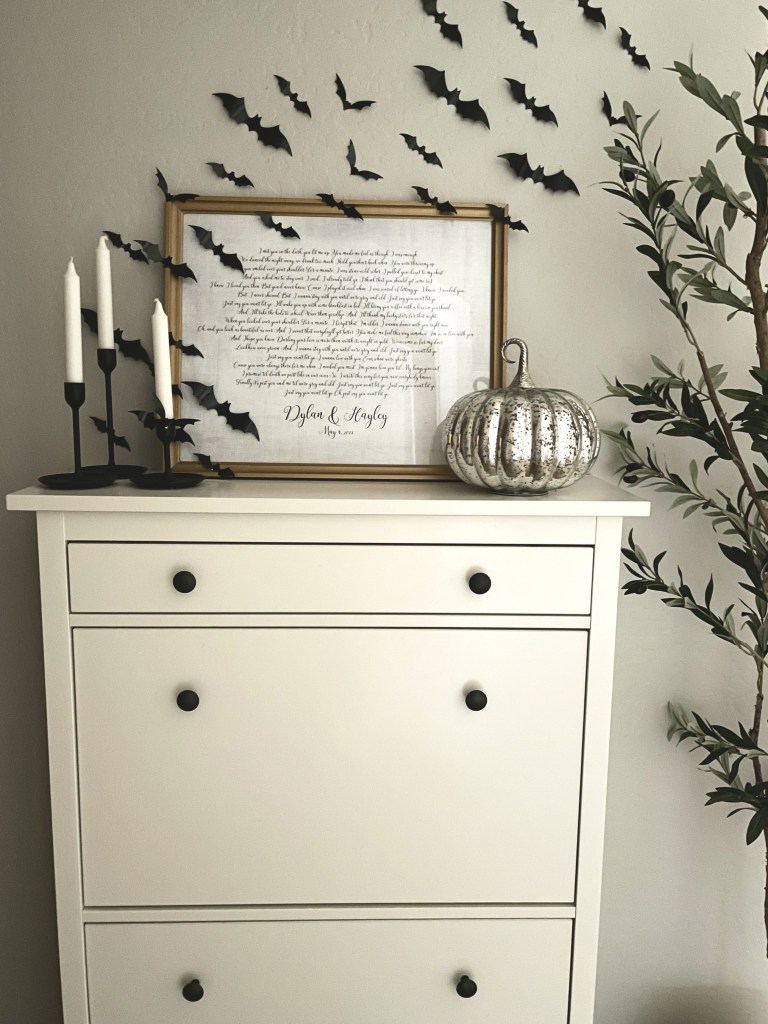
This year I may have fallen into the category of putting my Halloween decor out a little too early… like the end of September early–Dylan started noticing things randomly all over the house and bless him for not calling me out LOL. BUT there have been a few years where I was frantically decorating last minute. If that’s you this year don’t worry I have a few fun & inexpensive ideas to spook-ify your house!
All of the items from this post I also shared on my LTK page, you can follow me HERE for affordable, daily fashion, beauty & home finds!
Disclosure: Some of the link below are affiliate links, meaning at no additional cost to you, I will earn a commission if you click through and make a purchase.
Spooky Bats
This is probably my favorite Halloween decoration EVER. I’ve had these little guys all over my house over the years–on my kitchen cabinets, in our giant cutout (that we’ve finally purchased art for after 2 years), on the front door, and this year they are in our entryway! Not only are they super easy to put up, they’re only $5.99 on Amazon.
This could be the only thing you put up and this year and your house would be considered perfectly decorated for Halloween. Easy Peasy.
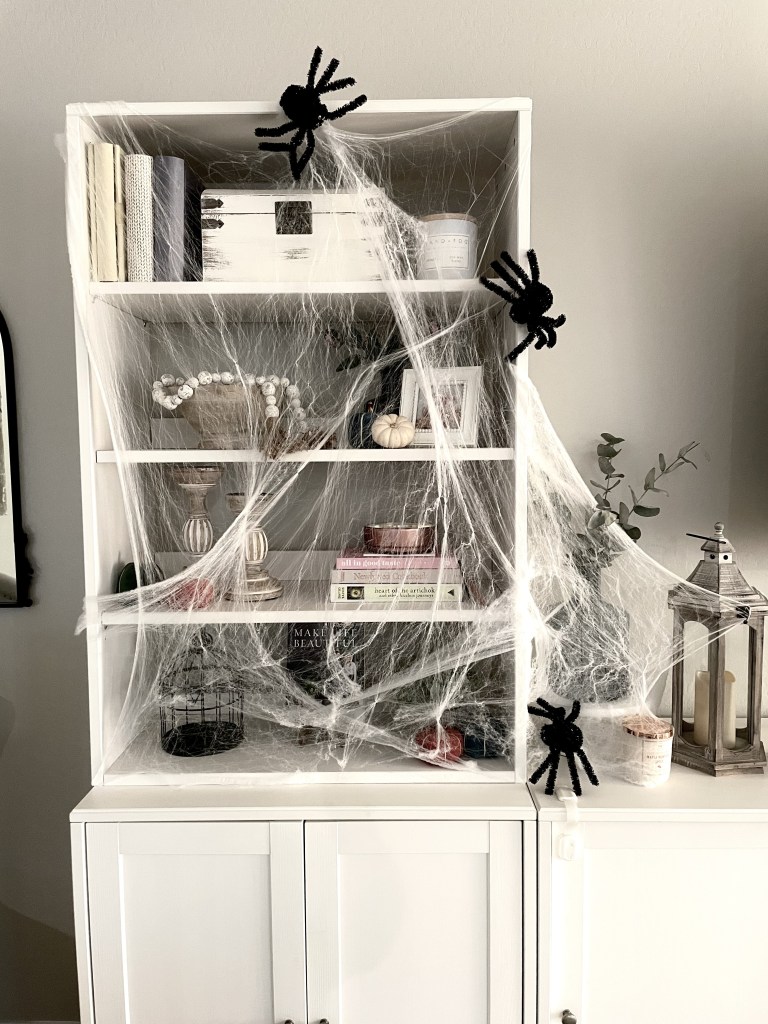
What I love most about the matte black candle sticks is that you can use them year round in your home decor, they only become spooky when need them too! My candle sticks in my entryway are from Ikea but Amazon has an awesome look alike that will arrive before Halloween!
By far the cheapest, easiest Halloween decor that will give you the most dramatic affect. I always put these in our family room on our bookshelves but you can also use them outdoors on your bushes or front door too! I like to add spiders hung with command hooks for an extra spooky vibe 🙂
This is another item that you can use to quickly transform your front door for Halloween but will totally work all year long (clearly the picture is showing it used around Christmas). SCORE. I like to layer mine with a seasonal mat on top of it but you can absolutely use it on its own. Black and white stripes are never a bad idea ❤
Throw some LED candles around your front door on your new black and white striped doormat 😉 or inside your carved pumpkins and all the kiddos will know your house is open for candy business!
Switching out the decorative dish towels in your kitchen, or even the hand towels in your powder room is super fast and instantly make the space feel ready for any holiday. It’s a great way to add a little bit of Halloween without adding any clutter!
In addition to the real pumpkins that we all already have carved and out by our front door (JUST KIDDING we absolutely still need to get, and carve pumpkins) these adorable ceramic decorative pumpkins would be perfect on a bookshelf or in the kitchen! They are super chic and add just a touch of elegance to Halloween ❤
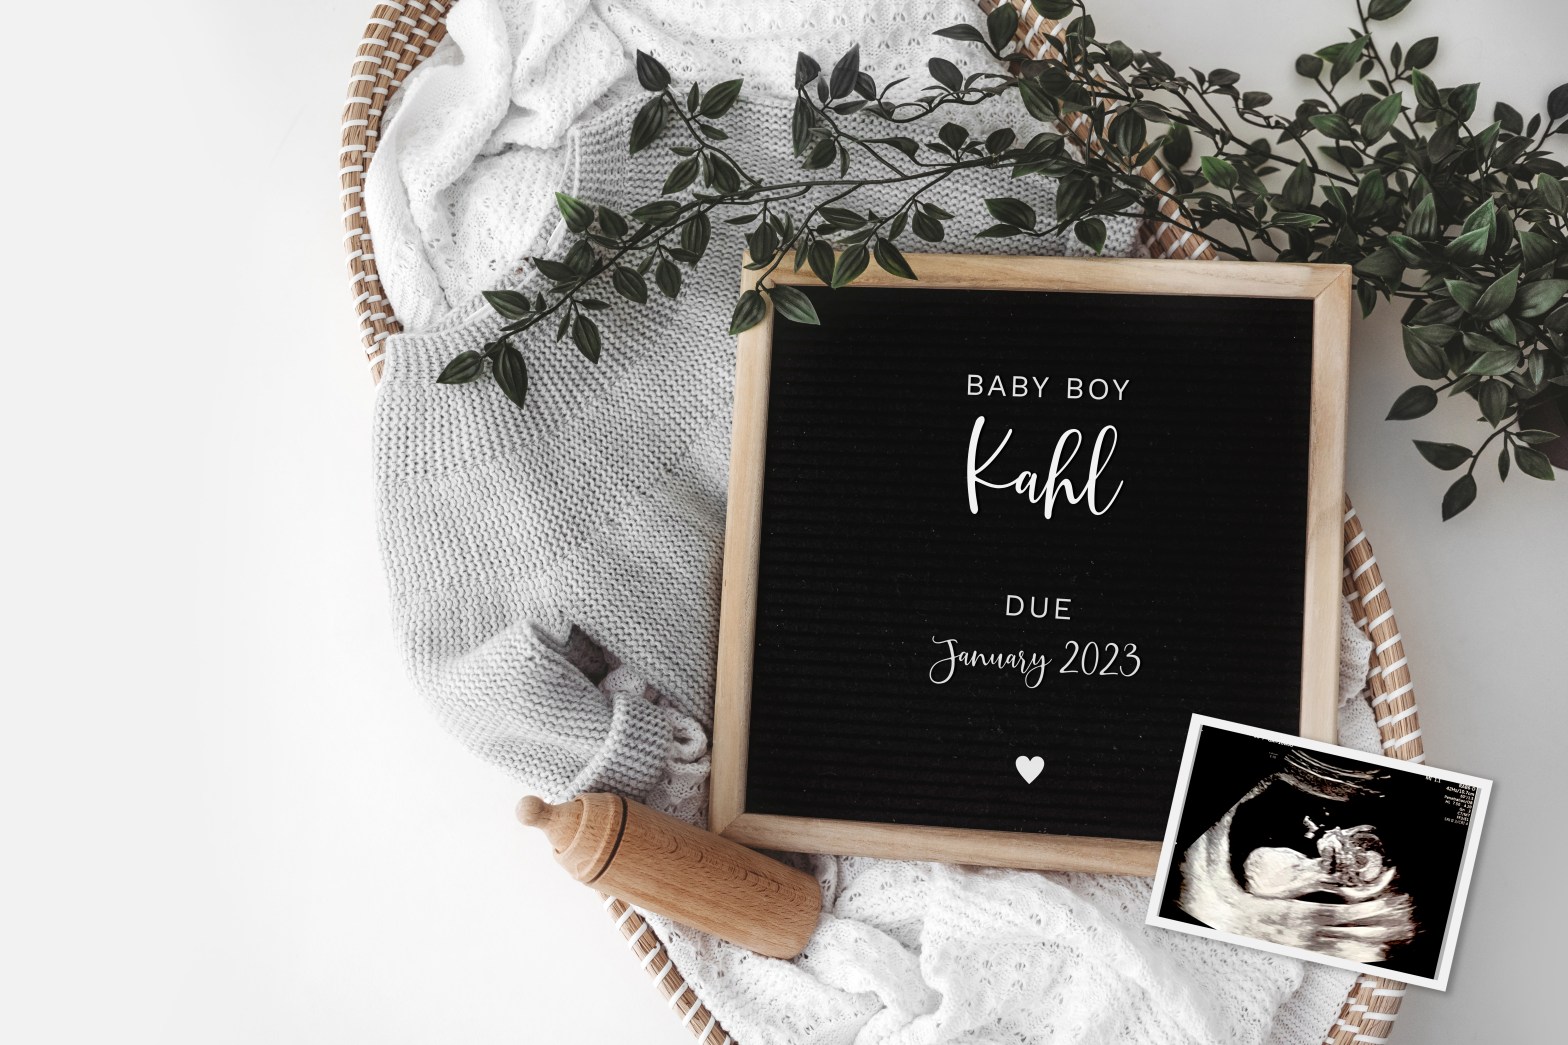
Dylan and I are so excited to share that we’re expanding our family and welcoming a baby boy in early January.
Today marks 29 weeks of pregnancy so clearly this post is LONG overdue. There’s something about being pregnant, while also staying home with an 18 month old, that makes getting even the most simplest of tasks done incredibly difficult. I’m talking just drinking water and eating regular meals LOL…so getting a blog post together has felt like a lot. But here we are and i’m so happy to finally have found the time to put some work into Clyde’s Corner because I truly love it here!!
I’m incredibly excited (and just a touch nervous) about joining the two under two club…if you’re a member please send all the tips and tricks my way please and thank you 🙂
Now that I’ve been through this whole process once before, I feel more comfortable sharing some of the things that have helped make pregnancy, labor & delivery, postpartum and life with a baby a little bit easier!
My next few posts will be all about my favorite pregnancy products and some bump-friendly outfits, so look out for those if you’re expecting or know someone who’s expecting 🙂Today’s post is just a little recap of how I found out about baby boy Clyde. It’s mainly for me so I don’t forget but I hope that you all enjoy reading along too ❤
Finding Out
Once again, Dylan called it before me. Seriously, how does he keep doing this?? (If you haven’t read the story of how I found out I was pregnant with our Goldie girl, you can check it out HERE.)
At the end of April, Dylan, Goldie and I went to Home Depot (to load up on some plants) and as we were getting out of the car I told Dyl how overwhelming the smell of all the plants was. He immediately said “I think you’re pregnant”. I truly couldn’t believe he said that, and honest to God I turned to him and said “I’ve been pregnant before I think I would know”. I am laughing out loud as I type this.
Dyl’s comment got in my head. I had been feeling more tired but Goldie had JUST turned one so that seemed pretty normal… and not a sign I was pregnant.
Needless to say as soon as we got home I took a pregnancy test. It was “negative”. It was one of those line tests that you have to wait the full amount of time to see the results and spoiler alert I definitely didn’t wait the full time amount before I threw it away.
A week later I was starting to get a little suspicious. On May 4th (our three year wedding anniversary) Dylan was in a meeting and Goldie was taking the longest nap ever and quite honestly I was a little bored, so I decided to take another test. This time it was the digital kind (in my opinion this is the way to go). Those little dots flashed for what felt like ten minutes before popping up PREGNANT.
I stood at my bathroom sink totally shocked. Elated, but SHOCKED. About two seconds later I tore our trashcan apart to see if that negative test from the week before was still at the bottom–it was. And guess what? It was definitely positive. I had gone an entire week with a positive test in my trash.
Of course that was my last test. So I ran to the store and then proceeded to take three more, all positive. Why do we do this LOL??
I decided to tell Dylan over dinner.
I truly don’t know how he knew, but he KNEW. On his lunch break he asked me if I was planning on telling him I was pregnant over dinner and I had literally JUST found out for sure. I pretended to be insulted, as one does, and he immediately dropped it…I did feel a little bad 😀
Just as Mr. Kahl predicted, I wrapped one of the tests inside of his anniversary gift that I gave him at dinner. He tore that thing open so fast, not paying any attention to the beautiful monogrammed leather dot kit I had had made for him, he was hunting for that test. He knew it. He knew it before me (again). And he was SO happy ❤
The Gender
This time around I did the genetic testing and opted to find out the gender that way–we didn’t do this with Goldie.
My pregnancy has been so similar to my first that I just assumed it was another girl. With both pregnancies I was pretty sick and lost weight in my first trimester, had lovely hormonal acne (lucky me) and was exhausted. Pregnancy looks really good on me LOL.
With both babies we didn’t have a preference either way, but with Goldie both Dylan and I thought she was a boy, and this baby felt like another girl to both of us.
The genetic testing results came in with the gender early in the morning. We had planned to go out to breakfast with Goldie and open it then but as soon as the email came in, me and Dyl both knew there was no way we were waiting.
Laying in bed with Goldie girl between us we opened the email and it said BOY. Once again we were so surprised… but over the moon 🙂
Thick, rich, chicken pot pie filling with a touch of fresh lemon, wrapped up in flaky buttery crust, makes this recipe the most comforting comfort food ever.
It’s taken me way longer than intended, but my chicken pot pie recipe is finally here!
Every time I make these individual chicken pot pies and post them on my Instagram (you can follow me here 😉 ) I get so many requests for the recipe.
I first started making these a few years ago as part of the themed food for our annual Harry Potter weekend (IYKYK)–they seemed very much like something Mrs. Weasley would have whipped up in her kitchen.
Dyl and I have been tweaking this recipe for the last two years and with the recent addition of lemon zest, I think we’ve found a WINNER!
Tips: *When I make pot pies I line the bottoms and then top them with pie dough, to lighten these bad boys up you can omit lining the bottom, & just top them with the dough (this would decrease the baking time as well). **I always use store-bought pie dough but you can totally use homemade as well (you Betty Crocker you). ***The filling can be made a few days ahead of time, just pop it in the fridge until you’re ready to make the pot pies.
Ingredients
2 chicken breasts, 1/2 inch cubes
1 medium onion, diced
6 Tbsp butter
4 Tbsp all-purpose flour
Salt & Pepper
2 cups chicken broth OR (can also substitute for 2 cups prepared chicken bouillon)
1 cup whole milk
Zest of 1 lemon
2 Tbsp sour cream
1 12oz bag frozen peas & carrots
1 14oz package of pre-made pie dough
1 egg + water (for an egg wash)
*This will make roughly 4 mini pot pies ( 3 inch/ 2.5 oz ramekins) and two medium pot pies (4 inch/ 5 oz ramekins)
RECIPE
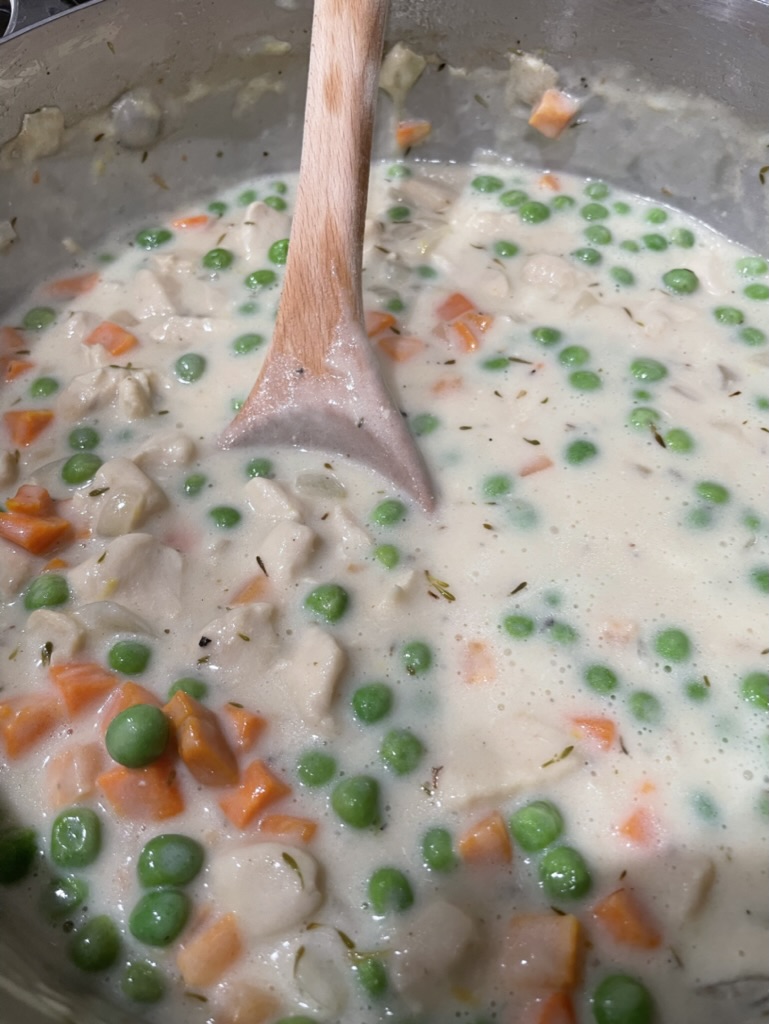
MAKE THE FILLING
In a large dutch oven heat 2 Tbsp butter over medium-high heat. Add chicken and season with salt & pepper, stir occasionally. Cook until the chicken is browned on all sides and then remove it from the pan.
Into the same pan, add 2 Tbsp butter and onion. Sauté until the onion for 2-4 minutes and then add in remaining 2 tbsp of butter and flour (making a roux), stirring constantly for 3-5 minutes.
Add in chicken broth and bring up to a low boil.
Stir in milk, lemon zest, & sour cream. Once incorporated, add chicken back in followed by frozen vegetables.
Allow filling to simmer until thick (about 15 minutes). Season to taste with salt & pepper. Take off the heat.
*You can either move on to the next step to assemble your pot pies, or put the filling into the fridge–use within 3 days for best results.
ASSEMBLE
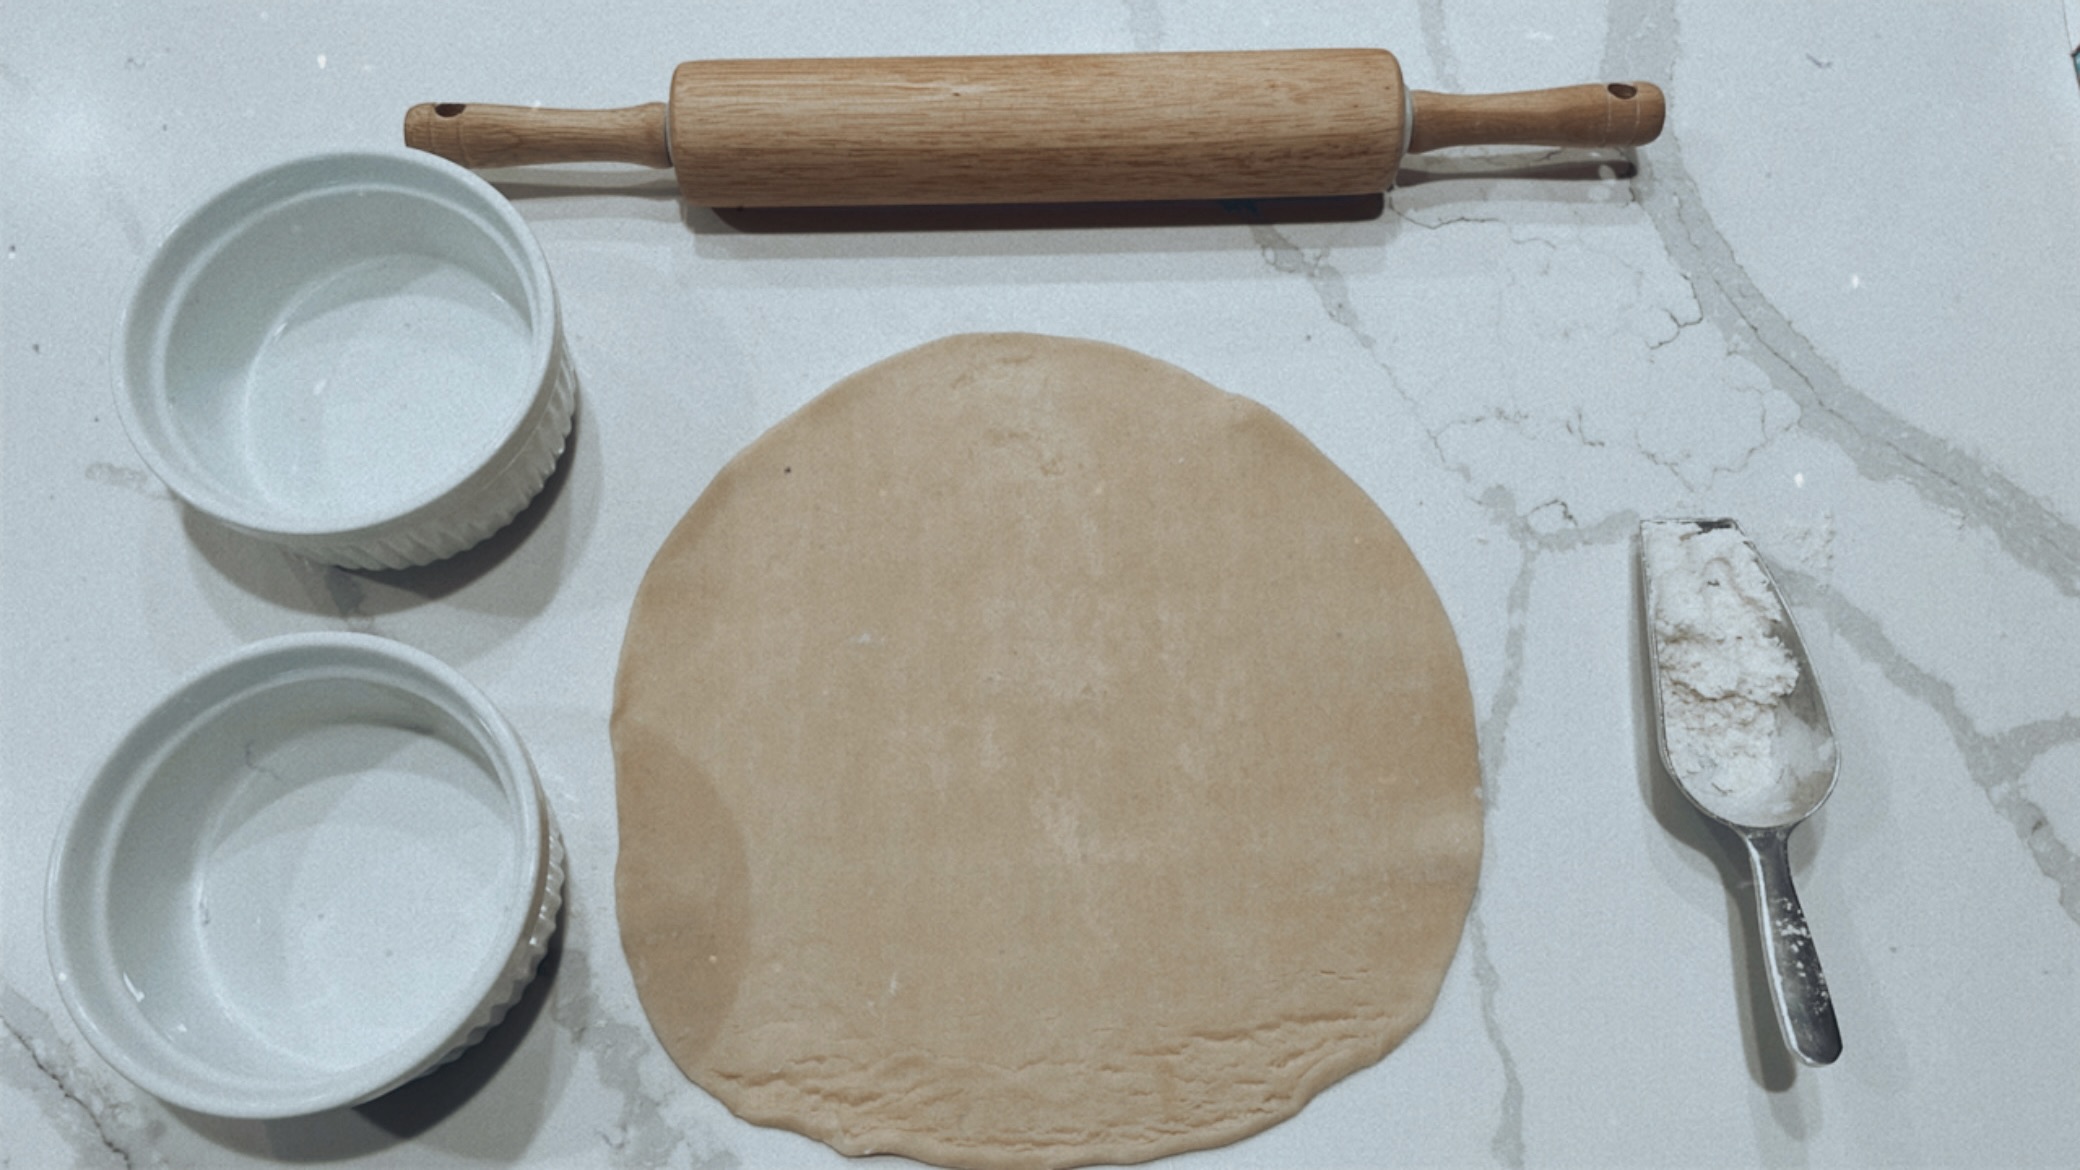
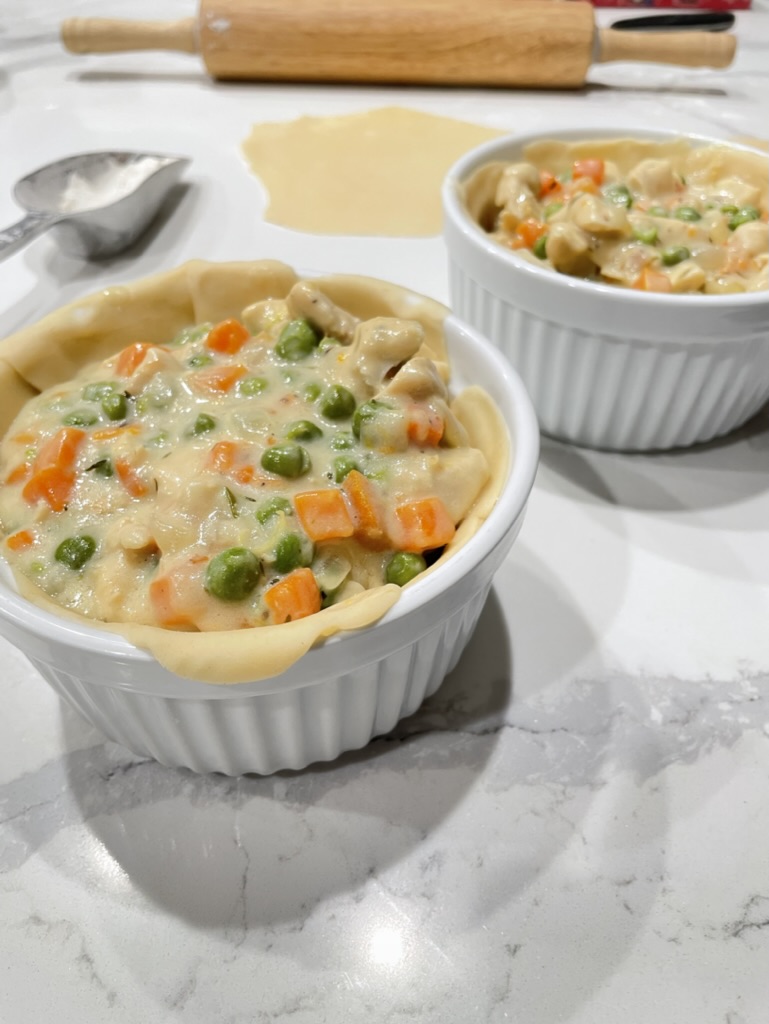
Roll out pie dough onto a lightly floured surface and cut into rounds large enough to line baking ramekins. Firmly press the dough down into the bottom and sides–if the dough doesn’t cover every inch of the ramekin that’s totally fine. **You can omit this step to lighten up this recipe.
Ladle the filling into each ramekin until just below the top.
Using the remaining pie dough, cut rounds just slightly larger than the diameter of your ramekins & top each one. You can crimp the edges or just press them down the sides for a more rustic look (this is what I prefer).
Make an egg wash using 1 egg yolk and a dash of water and generously brush the top of each pot pie.
Using a sharp knife make a slit in the top of each.
BAKE
Bake at 375 degrees F for 1 hour. If you opted to not line the bottoms of your ramekins with pie dough and just topped them make sure you decrease your baking time down to 35 minutes.
Remove from the oven and allow to sit for 10-15 minutes before eating.
ENJOY!
*Click here to see safe minimum cooking temperatures for meats and other cooked foods!
I’ve been MIA the last few weeks on Clyde’s Corner because sickness took the Kahl’s OUT. The day after Goldie girls 1st birthday party I got sick…then Dylan got sick…then Goldie got sick. She’s finally feeling better, but March ended up being slightly more exhausting than anticipated.
My house basically looks like it got hit by a tornado, soo I’ll be spending the next week tackling that.
Coming up this month, I’m sharing my all of my promised posts from last month! I know several of you were really looking forward to my individual chicken pot pie recipe (it’ll be here next week, yay!) I’m also sharing all of the details of Goldie Girls 1st birthday–it was seriously so much fun ❤
Today I’m sharing all of my March favorites! If you missed my Monthly Favs from February you can check that post out HERE.
Thanks again for being here ❤ Don’t forget to subscribe below to stay up-to-date with everything that’s happening here on Clyde’s Corner. More importantly, I hope you enjoy all of my March Favorites!
Goldie finally outgrew her infant carseat (we had the Uppababy Mesa infant carseat) so I’ve been on the hunt for the past few weeks for a replacement. I stumbled upon the Evenflo Revolve 360 carseat on instagram and after doing a bunch of comparison and research, I pulled the trigger.
WE ARE OBSESSED WITH THIS CARSEAT.
Obviously you need to do your own diligence when it comes to safety (because I’m just a mom without any professional carseat choosing qualifications…if there are any) but for us this seat has been life changing. Not only is it comfortable for Goldie girl & aesthetically pleasing for me, it swivels 360 degrees so you can load your bebe into the seat hassle-free. Once you have them strapped in, there’s a one-handed lever that allows you to rotate them either rear-facing or forward-facing (depending on your little ones age/size).
I feel like I could go on and on about this seat… and maybe I will in another post, but today it’s just getting a quick shoutout as my favorite item purchased in March!!
I ordered this long sleeve puff dressin 2 different colors and ended up keeping both because I loved it so much! I wore the yellow floral print for Goldie’s birthday party, but also ordered it in light blue. If you’re eyeing my sisters blue dress it’s from Abercrombie 😉
It’s so comfortable and light weight and was super easy to chase after a one year old in 😉 Her little feet just kill me ❤
I can’t wait to share the rest of the details from Goldie’s party later this month!
Introducing new foods has been one of our absolute favorite things to do with Goldie, and our girl LOVES to eat! As much as I love watching her eat, I feel like we clean up more food off of the floor than she actually ingests sometimes. I was considering using one of those plastic shower curtains under her high chair to make clean-ups a little easier when I saw someone using these Gathre mats!
First off they’re ADORABLE! I snagged the mini in the palm green color. Secondly, the bonded leather surface makes clean-ups a breeze. Lastly, they can be used for way more than a high chair mat! This would be perfect for a play mat under a sensory bin, a portable tummy time area, or a mat underneath messy arts and crafts . They also have a hook in one of the corners so you can hang it for quick storage (Goldies is hanging in her playroom!)
This was one of Goldie’s birthday presents from Dylan and me this year and it has been such a hit. The weather has already started heating up here in Arizona and some type of water play is essential. She loves the rainfall feature and the little frog sling shot! This bad boy keeps her entertained all morning and afternoon.
My sister recommended this Hunt A Killer game and it was a ton of fun. Basically it’s like an at-home escape room/murder mystery. There are codes that need cracked, locks that need opened and tons of different clues–literally everything is clue. I loved it.
Once you solve the game you can’t replay it, so it’s more of a stay-in date night type of game, but totally worth it!
There are several different options to choose from, we did: Hunt A Killer Death At The Dive Bar.
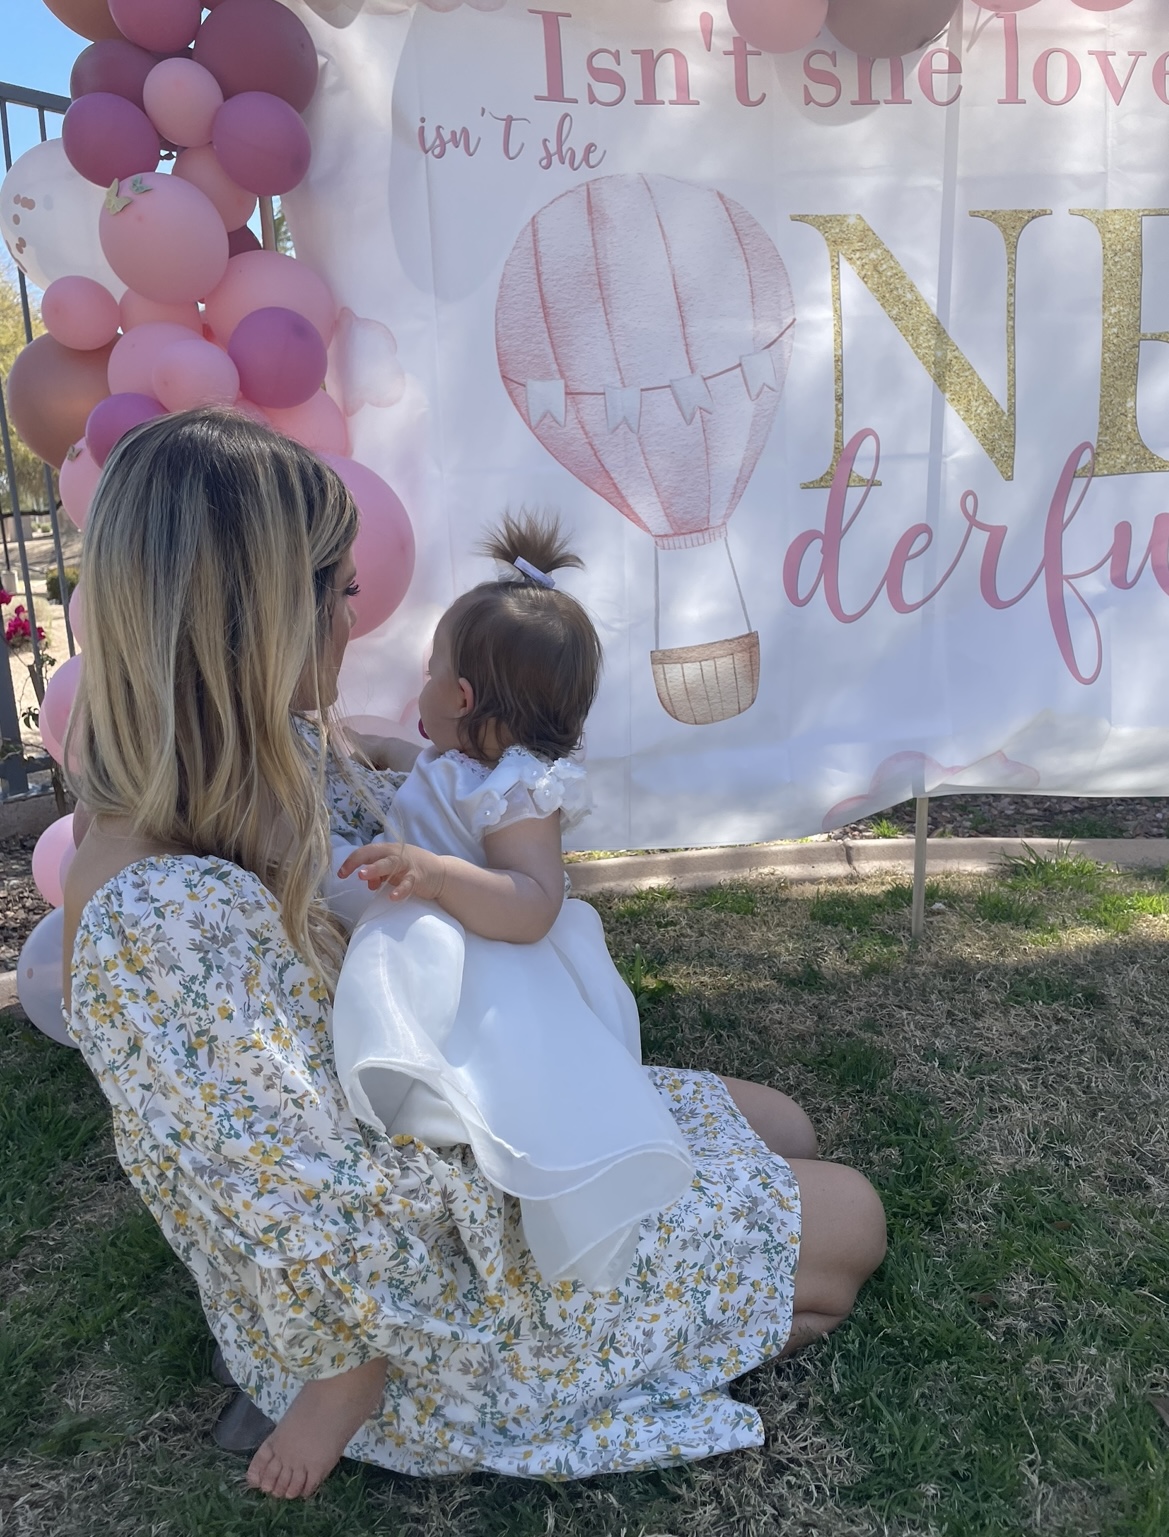
This is a huge month for us, our precious Goldie girl is turning ONE. I feel like just yesterday I was waking up in the middle of the night telling Dylan we needed to go to the hospital, then I blinked and Goldie is almost one ❤
Everyone says the days are long but the years are short and it couldn’t be more true. This has been the best year of our entire lives and we feel so blessed that we get to be Goldie’s parents **cue the uncontrollable mom crying**
We’re having a small backyard brunch to celebrate our baby girl and I can’t wait to share all the deets with you guys!
Coming up this month, I’m sharing my individual chicken pot pie recipe (you absolutely do not want to miss this one), all about Goldie Girls 1st birthday, my favorite workout outfit from Amazon & more!
Today I’m sharing all of my February favorites! If you missed my Monthly Favs from January you can check that post out HERE.
Thanks again for being here ❤ Don’t forget to subscribe below to stay up-to-date with everything that’s happening here on Clyde’s Corner. More importantly, I hope you enjoy all of my February Favorites!
This PIXI hydrating milky facial mist feels AMAZING.
It was an impulse buy while I was at Target and I’m so glad I grabbed it. It’s incredibly light and refreshing and can be used anytime of day (even in the middle of the day for a quick boost of hydration!). I’ve used a few other PIXI products in the past so I had a feeling that I’d like this one (i’m also trying out their vitamin C serum & will keep you guys posted).
I probably wouldn’t replace my moisturizer with this but it’s been a great addition–especially because it’s been so dry here lately.
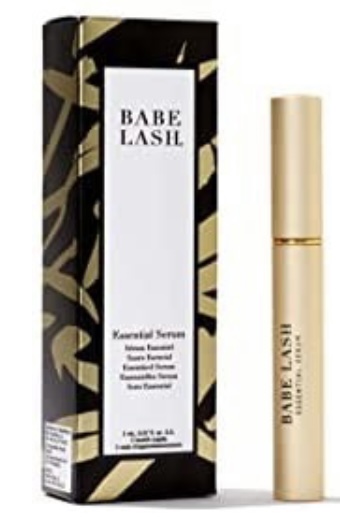
This is the best lash serum ever. It takes about a month to start seeing the results but makes my lashes so long and thick. I haven’t used it in over a year because it’s not recommended during pregnancy or while breastfeeding & I totally forgot how amazing it is!
I got influenced and tried out the DIME eyelash serum because it’s safe to use while nursing. I used an entire tube without seeing any results–I was so disappointed, I wanted to love it.
Babelash is definitely my tried and true/go-to eyelash serum. I use it in the morning and at night in the beginning and then decrease down to once a day–when my lashes are at the length I want to maintain I only use it 2-3 times per week. This stuff is the bomb.
I shared this blouse on my LTK it account last month (you can follow me HERE) because I was so excited about it. It’s just $16 and SOO cute. I wore it out for our first date night since having Goldie and it was perfect–I paired it with mom-style jeans and clear heels.
I’ve been obsessed with all of the Studio McGee home decor at Target lately. Everything from pillows to vases to lamps, I can’t get enough of their stuff! Studio McGee is a great mix of classic, modern and rustic design so their pieces are incredibly versatile–and the price point is AMAZING.
I snagged this long pillow for just $30 to warm up our bedroom (I have all white bedding in there right now).
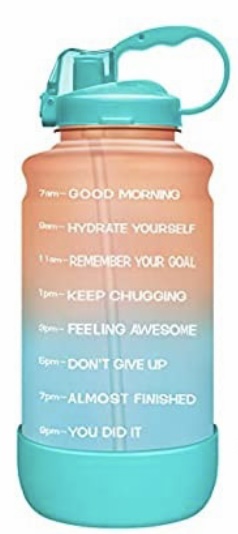
If you encountered me at all during my pregnancy then chances are you’ve seen my giant green water bottle. I carried that thing EVERYWHERE. It not only hydrated me (it’s a full gallon), but it doubled as my arm workout each day LOL.
I stopped using it once Goldie was born because it was too difficult to carry around with a newborn. I started using it again this past month and my body can feel the difference. It makes staying hydrating (which is so important here in Arizona) super easy with the times marked out on the side.
I don’t like to carry a giant jug out with me so I will pour from this big bottle into a smaller one so that I can still track my water intake. Whenever I’m able to finish (or almost finish) this I feel so much better and have significantly more energy!
This would make an awesome gift for anyone who just found out they are expecting!!
Disclosure: Some of the links above are affiliate links, meaning, at no additional cost to you, I will earn a commission if you click through and make a purchase.
Leave A Comment & Subscribe Below
Thank’s for stopping by Clyde’s Corner, I hope you enjoyed perusing my February Monthly Favs! See you guys next week 🙂
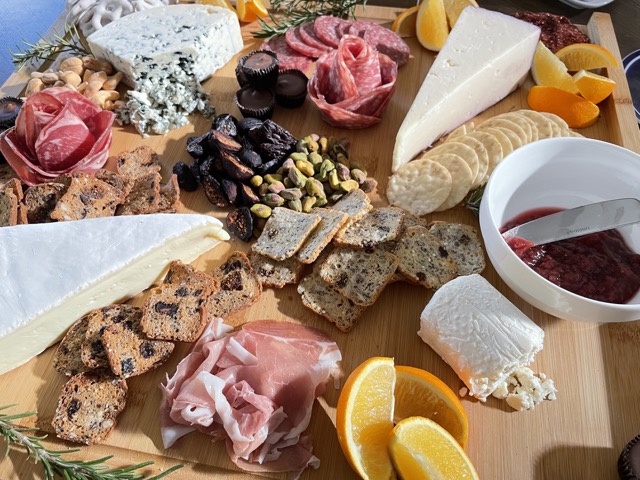
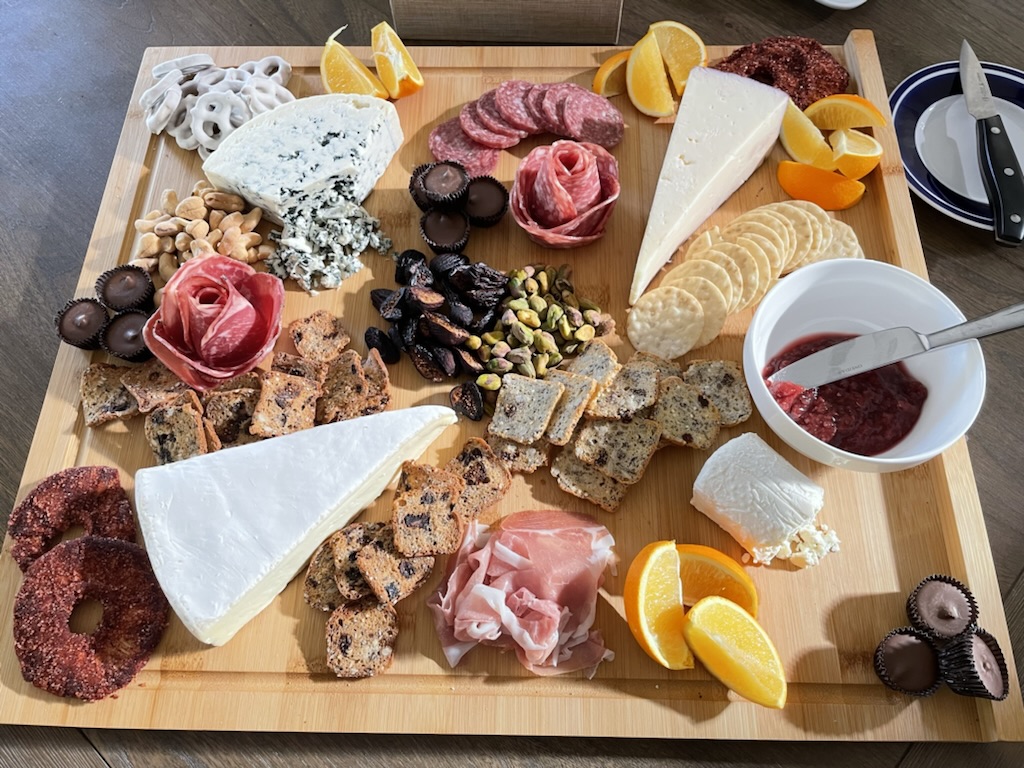
It’s 2022 so chances are you’ve heard of a charcuterie board. If not, brace yourself for the best thing ever. It’s so simple to put together, yet manages to impress people left and right.
Basically, a charcuterie board is a display of cured meats & cheeses and anything that pairs well with them (dried fruits, nuts, chocolate etc.) You can serve them on their own or pair them with other horsd’oeuvres (vegetable platters are always a nice compliment).
In San Francisco we lived above a Whole Foods (which was a literal dream) and I used to be able to run downstairs and grab everything I needed to throw a board together–it was awesome…but expensive. I was super excited to discover that Trader Joe’s has the best charcuterie board essentials, maybe even better than Whole Foods, and for a much more reasonable price!
Today’s post is super simple. I’m walking you through how I put together my charcuterie boards using all items found at Trader Joe’s 😉 If you want to skip to my video tutorial click HERE
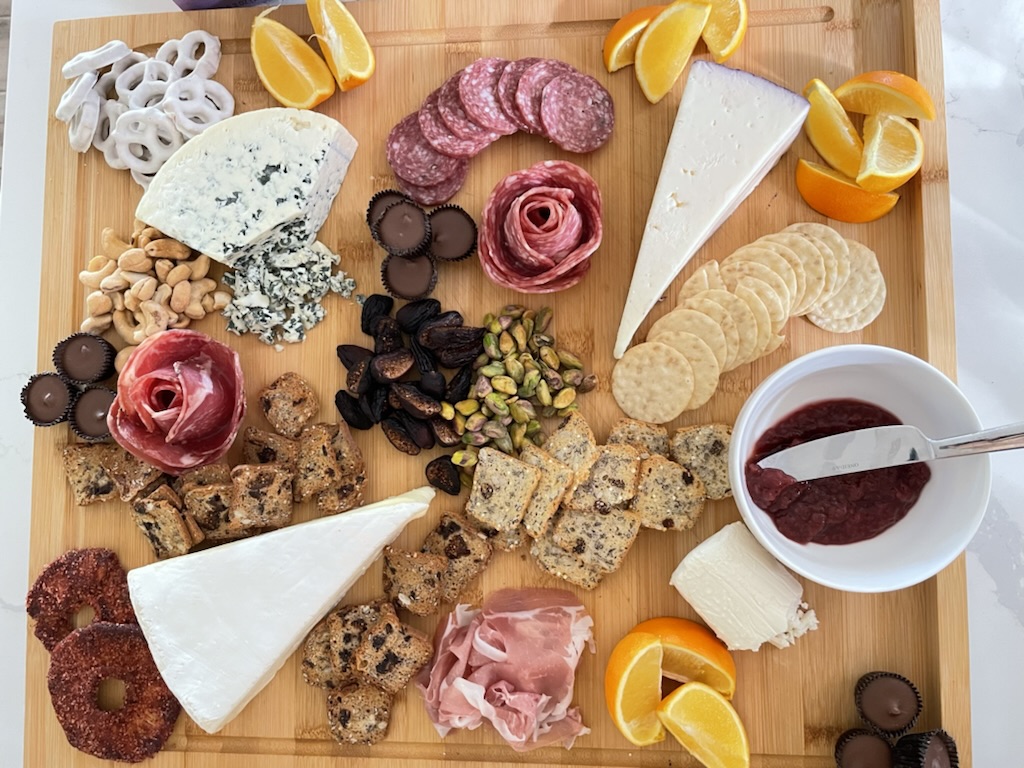
There’s no wrong way to put a charcuterie board together. I’ve seen so many different ideas on Pinterest and Instagram, really anything goes. For me, I like my boards to have meats, cheese, crackers, fruit & nuts, and something chocolatey or sweet!
Here are a few of my recent charcuterie boards!
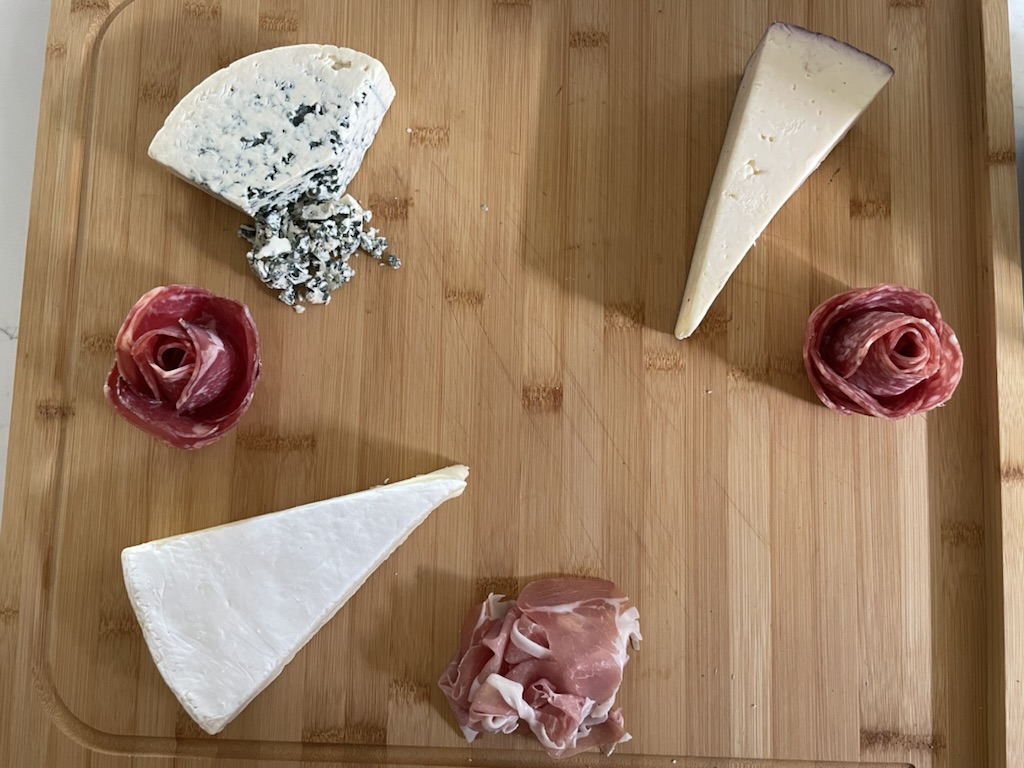
MEAT & CHEESE
I use a variety of meats and cheeses. Typically I aim for 2-3 types of cured meats (prosciutto, salami, & capocollo are my go-to’s and TJ’s has them conveniently packaged together) and 3-5 different types of cheeses depending on the number of people. For this board I used blue cheese, double cream brie, a creamy Toscana soaked in Syrah, and a honey goat (not pictured). When you’re assembling your board it’s nice to slice or crumble some of the cheeses to make it easier to eat!
Ialways start out my board by placing the bulkiest items (cheeses and meats) and then fill in the rest of the space with the remaining goodies.
These salami flowers are SO easy, you can watch how I make them HERE
CRACKERS/ FRUIT & NUTS/ CHOCOLATE & SWEETS
Trader Joe’s has the best crackers and extras for boards. My favorite crackers are the Fig & Olive crisps (the raisin rosemary crisps are awesome too, but I think they’re seasonal). I get a bunch of fresh fruit (oranges, pears, apples, are great options) and dried fruit as well (figs, apricots & dates are my go-tos). TJ’s almost always has some sort of candied fruit over the by nuts– on this board I did chili-spiced pineapple rings but I’ve used the candied orange slices in the past that you can see pictured at the top of this post! They’re delicious and make the spread look super beautiful. I also added mini peanut butter cups and yogurt covered pretzels here for extra sweetness.
I fan out the crackers and make little mounds of the fruit, nuts and sweets!
Adding a little bowl of jam or honey is always a nice touch too 😉 If you want to go the extra mile you can add some fresh sprigs of rosemary throughout for garnish–they look beautiful and smell amazing!
Watch How I Make My Charcuterie Board
Watch How I Make Salami Flowers
Charcuterie boards are ALWAYS a hit and ALWAYS get devoured.
Let me know if you try out a TJ’s Charcuterie Board!!
Happy Tuesday! If you’re like me, and LOVE the holidays, then I hope you had a magical Valentine’s Day full of love, chocolates, snuggles, diamonds (okay maybe not diamonds… but also I kind of hope your day WAS full of diamonds because that would amazing). AND if you’re someone who is revolted by Valentine’s Day and thinks it’s dumb, I hope you didn’t have to encounter a single heart-shaped anything and managed to avoid seeing anything pink or red.
Regardless of which category you fall into, I hope that some of you decided to try out my Eggplant Parm recipe from last week that I recommended for an at-home V-Day! If you missed it you can check it out here 🙂
Today, is dedicated to one of my favorite pairs of pants which just happen to be a DUPE.
Personally, I love a good dupe. I mean who doesn’t?
I promise you, this one will not disappoint.
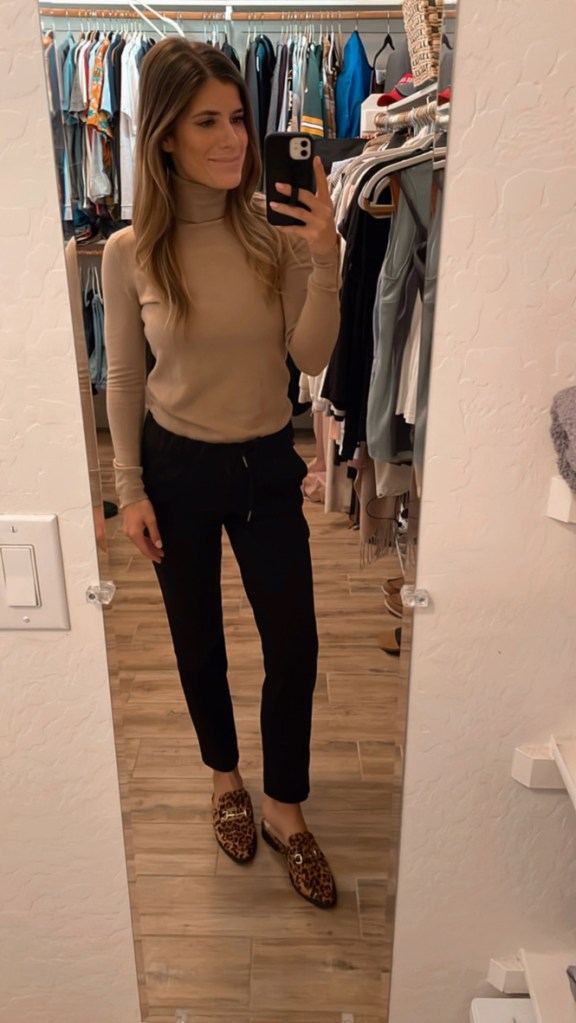
I first ordered these Lululemon High Rise pants back in 2020 and 2 years later i’m still obsessed with them. They’re great because you can wear them as athleisure or pair them with a cute top and flats and you instantly have a work-appropriate outfit.
Here’s how i styled them
If you like my animal print mules, I did an entire post on them that you can check out HERE!
Although in my opinion totally worth it, the Lululemons’ are $118, which I know is sometimes painful to spend on athleisure.
**Enter Amazon Dupe**
I was THRILLED when I stumbled upon the CRZ YOGA lounge pantson Amazon. When I tell you that these are a good dupe, I mean these are a GOOD dupe.
The black pants on the left are Lululemon and the blue pants on the right are from Amazon
Everything from the feel of the material, to the location of logo is spot on. Oh yeah, I forgot to mention the best part,these Amazon dupes are only $32. YUP, you’re welcome 😉 . [For reference, I’m wearing a size 4 in Lululemon & a small in the Amazon dupe]
Side-by-Side Comparison
LululemonAmazon Dupes
Back of the Amazon Dupe
The only differences I’ve noticed are the pants from Amazon are slightly longer and a tiny bit less fitted (potentially sizing down to an xs may have solved this!). I ordered the dupes in dark blue and the Lululemons’ are true black–but they both come in multiple colors!
Crispy, pan-fried eggplant slices layered with tomato sauce and cheesy-goodness. This is one of those recipes that makes you say “just one last bite” over and over again.
Today I’m sharing one of my favorite recipes, eggplant parmesan. Not only is it delicious, it’s perfect for an at-home Valentine’s Day dinner (which is in one week, in case you forgot).
When Dylan and I first started dating, I was living in a studio apartment in Tempe, Arizona and I invited him over for eggplant parmesan. Had I known that he was a fabulous cook…like truly his food is always amazing, I would have definitely picked something else. Maybe something I had made before perhaps. Needless to say, I served a mediocre pile of eggplant mush that Dylan so graciously consumed with a smile. Later I learned that eggplant parmesan is literally one of his specialties…LOL.
My hubby has since taught me his eggplant parm ways and I’ll never go back ❤
Eggplant parmesan, specifically this recipe, is one of my ALL-TIME favorite dishes. If you’re already an eggplant parm lover then you’re going to die for this, AND if you’re not an eggplant parm lover, then this just may be the recipe to change your mind. Usually when I order eggplant parmesan at a restaurant it’s kind of mushy and just … blah (as was my aforementioned dinner for Dylan). This is the opposite of that. Because each slice of eggplant is individually breaded and pan fried, then carefully layered with sauce and cheese, it keeps its’ texture and each bite is just about perfect 🙂
This recipe takes a little more time to whip up, but I promise you it’s SO worth it.
What You’ll Need to Make This Recipe:
1 Medium Eggplant, thinly sliced into rounds
Course salt
1 cup Italian bread crumbs
3/4 cup extra virgin olive oil
6 oz mozzarella, thinly sliced and torn up into pieces
1 24 oz tomato sauce (canned or homemade)
1/2 cup freshly grated parmesan
CUT
The key with eggplant parm is THIN THIN THIN eggplant slices. This is what helps prevent the dreaded “mush” that typically makes weird-texture-people run from eggplant parm. The thinner the slices, the better they fry up and retain that satisfying crispy texture. Mmmmm.
SWEAT
Just about anytime you cook with eggplant you’re going to want to “sweat” it first. The thought behind this preparation is that salting the eggplant and allowing it to sit for a period of time draws out the bitterness… you can actually see the greenish colored liquid that comes to the surface after about 30 minutes or so. To do this, generously salt both sides of the sliced eggplant and allow it to sit. It’s that simple.
You can use a baking rack to do this, but I’ve found that placing it right into a colander in the kitchen sink is most convenient (that way you don’t have to transfer the eggplant once it’s time to rinse). After 30 minutes, thoroughly rinse your slices and set them out on paper towels to dry.
Note: Don’t use your kitchen towel or bar mops to dry, whatever detergent you used while washing them, the eggplant will absorb… hello chemical taste. Paper towel it is!
BREAD
There’s enough moisture left in the eggplant that I omit using any kind of binder (like egg) before breading. You really just need a light crust on these bad boys. Dip both sides in a shallow bowl full of italian-style bread crumbs until fully coated!
FRY
This is the most labor intensive step of this recipe but SO worth it. In a large skillet heat up enough olive to cover the entire bottom of the pan (about a 1/4 inch high) just above medium heat–I use the number 6 on my electric stove top. Have I mentioned how much I hate cooking on electric? A lot. Anyhoo, you want your oil nice and hot before you start adding in the eggplant. Work in batches of 4-5 slices (depending on your pan size). Fry until golden brown and then flip once and brown the second side. Repeat until you’ve fried all of your eggplant.
Note: By the last batch this is what the oil looks like–it’s kind of gross…but normal 😉
ASSEMBLE
This is the fun part. If you have littles, this is the perfect job for them!
On a baking sheet put a dollop of sauce (you can use jar or homemade, check out my quick & simple tomato sauce recipe here) then an eggplant slice, more sauce, a thin slice of mozzarella, then another eggplant slice. I like to make my stacks four eggplant slices high and then top them with sauce, a small piece of mozzarella and a sprinkle of freshly grated parm.
BAKE
Bake at 400 degrees F for about 15 minutes–just long enough to heat all the way through and get the cheese nice and melty. If the cheese hasn’t browned you can turn your broiler on at the end to get that nice golden brown color!
How is it already February?! Scratch that, how is it already 2022?? I still feel like we’re in 2020.
Welcome back to Clyde’s Corner, I’m seriously so happy you stopped by. It’s been what seems like forever since I’ve been here, but I couldn’t be happier to be back in action! I have some really exciting things planned for Clyde’s Corner this year & hope you continue to follow along ❤
Coming up this month, I’m sharing THE BEST eggplant parmesan recipe (the perfect dinner for an at-home Valentine’s Day), A super affordable Lululemon dupe from Amazon, & at the end of the month I’m showing you how to throw together a simple, yet impressive, Trader Joe’s meat and cheese Charcuterie board!
Today’s post is dedicated to some of my favorite things; i’m sharing all of my most-used, and favorite items from January!
Thanks again for being here ❤
Don’t forget to subscribe below to stay up-to-date with everything that’s happening here on Clyde’s Corner. More importantly, I hope you enjoy all of my January Favorites!
I put this milk frotheron my Christmas list this year and i’m OBSESSED.
I’ve used it every. single. day. Sometimes more than once. New momma over here so obviously I can never have JUST ONE cup of coffee (It’s nice to have something to blame my obscene coffee consumption on now 😎 )
The amount of thick foamy goodness this frother makes from just a teeny tiny amount of milk or cream is impressive.
It’s stainless steal and blends into my decor seamlessly. The cleanup is a breeze and it has a pretty small footprint so even if you’re short on counter space this frother is worth the small amount of precious kitchen real estate it takes up.
Considering my makeup is roughly 50% coffee you better believe not only did this bad boy make it on to ‘My Monthly Favs‘, but it’s holding down the #1 spot. #TeamCoffeeForLife 😎
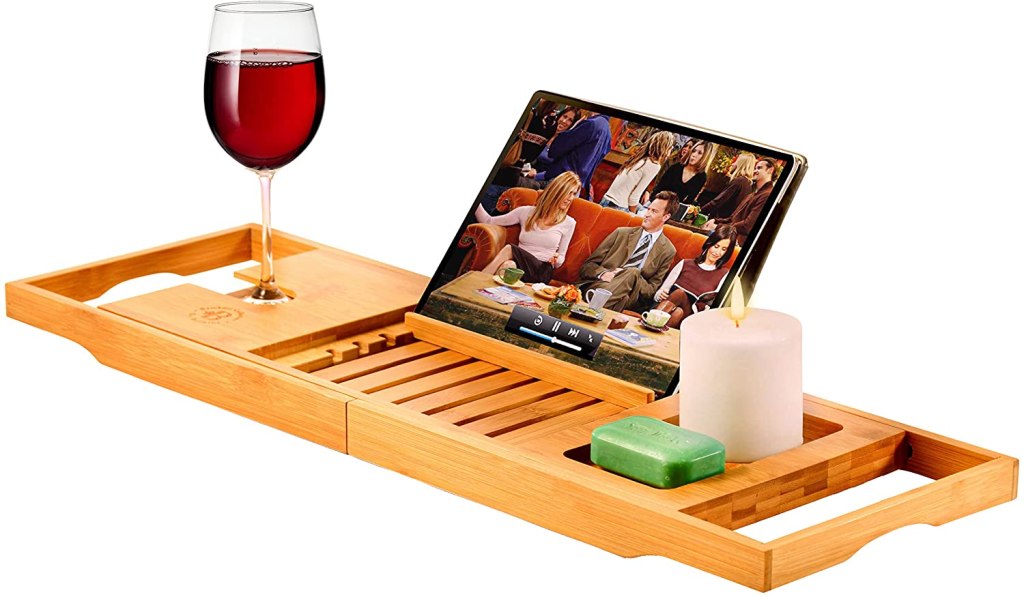
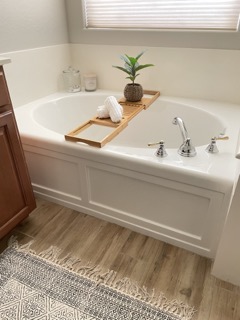
I love, love, LOVE baths. So much so that a big comfy bathtub was on my list of must-haves when we were buying our house.
BATHS ARE LIFE. **said in Dani Rojas’ voice** (Any Ted Lasso fans?)
I want bubbles, bath salts, bath bombs, candles, a glass of wine … or a cup of tea (depending on the type of day I’ve had) and this bath caddy caters to all of my bath wants & needs. Serious game changer in the bath department. It has a stand for a book/phone/ipad, a slot for a wine glass, a landing for a cup of tea or a candle or whatever you want, and let’s be honest it just looks pretty in my bathroom.
I feel like this would make an amazing Valentine’s Day gift for someone. Pair it with some bubble bath and a candle and you have yourself a truly fabulous gift. I mean or diamonds….because who doesn’t want more diamonds? Just kidding Dylan! Sort of 😉
I’ve actually had this blow dryer brush for several years–I ordered it back when we were living in San Francisco. I posted about it then, but never mentioned it again because honestly I didn’t use it that much.
I rediscovered it in my drawer around Christmas and pulled it out to try again and OH. MY. GOD.
Why have I not been using this?!?!
Becoming a mom has been the BEST THING EVER, but i’ll be honest my hair has looked terrible for the last 10 months and it’s 100% Goldie’s fault. No, i’m totally kidding haha but I really don’t have a ton of time to do my hair anymore. This Revlon brush must have been invented for mama’s because it takes maybe 5 minutes to give myself an awesome blowout!
I let my hair air-dry until it’s just a little bit damp and then use the Revlon Blow Dryer Brush– it leaves my hair smooth, voluminous and slightly curled on the ends. It definitely looks like I spent way more time on my hair that I did.
I have been dealing with postpartum breakouts (lucky me!) and a friend of mine recommended this cleansing nectar. I started using it in December and am almost done with my first bottle. At first I was a little unsure—I’ve never used a waterless cleanser before and it took a little getting used to the fact that you don’t rinse it off. But now, after about 2 months of using it, I’m obsessed. I absolutely love the way it makes my skin feel.
In addition to removing dirt and makeup, the Averr cleansing nectar reduces inflammation, helps to minimize scarring, & deposits healing nutrients/antioxidants/essential fatty acids into your skin (which is why you don’t rinse it off).
I wouldn’t say it has completely rid me of all postpartum breakouts but after almost two months of using it, I feel like I’ve noticed a decrease in blemishes and my skin feels amazing– this product has recently become my favorite step of my skincare routine!
This playpen has been AMAZING. Goldie girl is now officially on the move (and I mean cruising) which is wonderful but it also means that our entire house is needs to be 1000% childproof. We are lucky enough to have a playroom that is a child-safe space where we can plop her down and close the gate if I need to run to the bathroom or change a load of laundry during the day. Other than the play room, she pretty much has free range unless she’s in her high chair, jumper, or being held.
We ordered this oversized playpen for our living room (which is also open to the kitchen/dining). I wasn’t sure I wanted this large, obnoxious thing taking over our “adult” space but it has been LIFE CHANGING. First of all it keeps all of her toys confined to one area in the living room and not all over the place which I love. More importantly, we have a space that’s safe for her to be (that she actually loves being in) while we drink our morning coffee, cook dinner, mop the floors, workout… you get it.
She’s free to crawl around, pull herself up, & play, all while still being able to see me or Dylan and we don’t have to worry about what she’s getting into. I LOVE THIS PLAYPEN. If you have a bebe who is about to be mobile, or has recently become mobile, I highly highly recommend this bad boy–it’s given Dyl and I so much peace of mind.
Thank’s for stopping by Clyde’s Corner, I hope you enjoyed perusing my January Monthly Favs ! Make sure and bring your appetite next week because I’m sharing one of my all-time favorite recipes!… On second thought maybe you should eat something before visiting Clyde’s Corner 😉