Vanilla Meringue Cookies

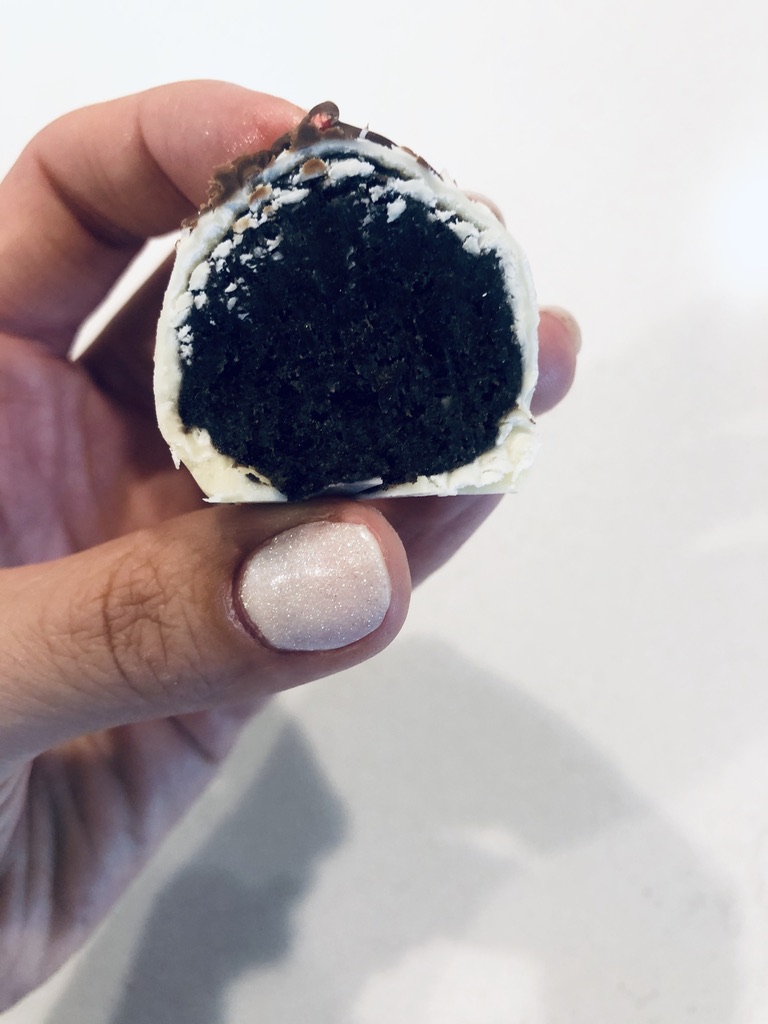
These beautifully delicate vanilla meringue cookies are perfectly sweet and melt in your mouth– enjoy them on their own or pair them with a hot cup of coffee or tea.


Happy Tuesday!!

Today I am so excited to share one of my favorite desserts: meringue cookies โค

I first started making these meringue cookies when I was in college. I stumbled upon them while searching for a lighter dessert option (I was in the process of getting rid of some extra pounds I packed on while studying abroad in Florence ๐Ÿ™‚ oooops).

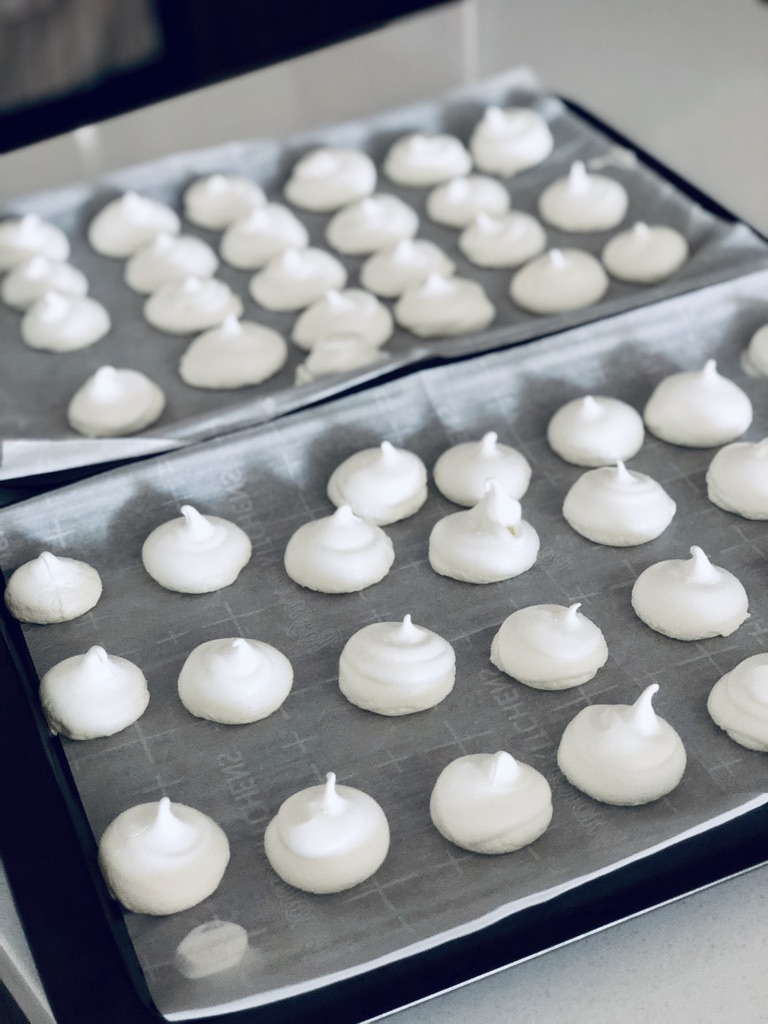
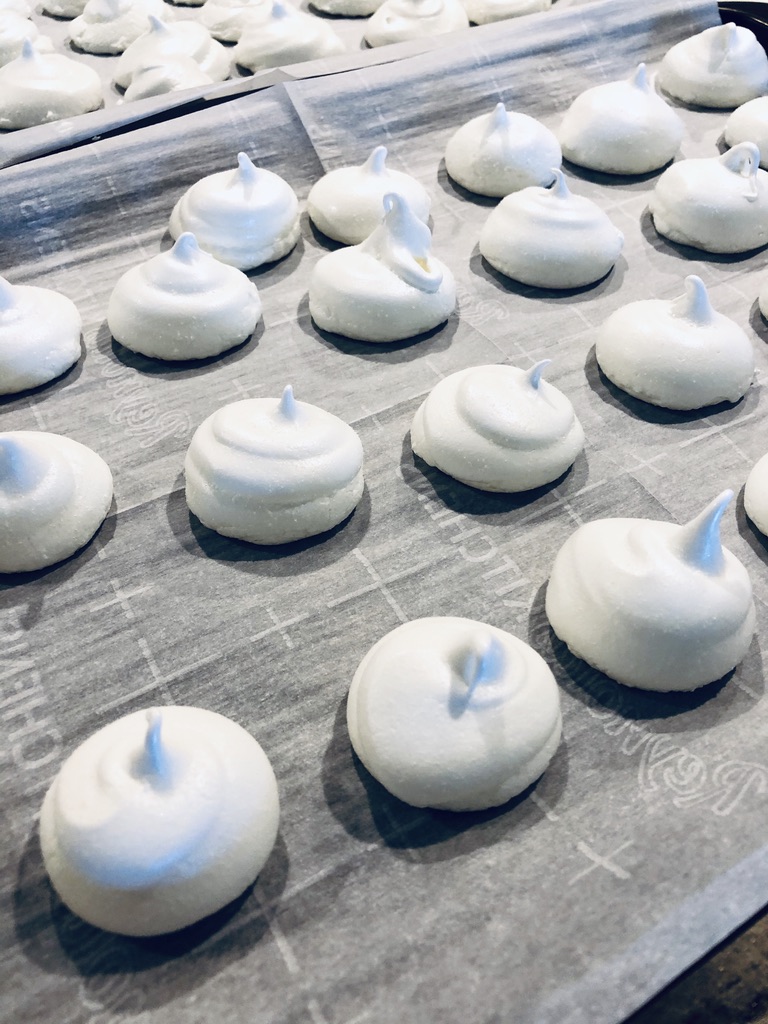
Meringue cookies have now become a staple dessert of mine and they could not be easier. These kiss shaped cookies are so incredibly light and airy, and melt as soon as they touch your tongue.

This recipe uses vanilla extract but you can swap the vanilla for almond or even peppermint extract! When I was making this batch for my blog I accidentally grabbed the almond extract instead of vanilla and was pleasantly surprised by how delicious they turned out. Swapping the vanilla out for peppermint would make the perfect holiday treat (you can add in a drop of red or green food coloring to get really festive!).

When making meringue it’s important to add the sugar in slowly and to make sure it’s fully dissolved before piping your cookies. They bake at a low temperature for a long period of time– depending on the humidity it can sometimes take a little longer in the oven. The goal is to dry them out completely so that they aren’t chewy on the inside! If you don’t have a piping bag, no worries! I use a large ziplock bag to pipe my cookies; in the past I’ve just spooned the meringue onto the cookie sheet and they have turned out just as well.

These cookies are delicious but also beautiful and dainty– they really elevate any cookie tray or make such a lovely gift!


What you’ll need to make the meringue:

  • 4 egg whites, room temp
  • 1/4 tsp cream of tartar
  • pinch of salt
  • 1 cup sugar
  • 1 tsp vanilla extract

Servings: This recipe makes about 50 small cookies

Recipe:

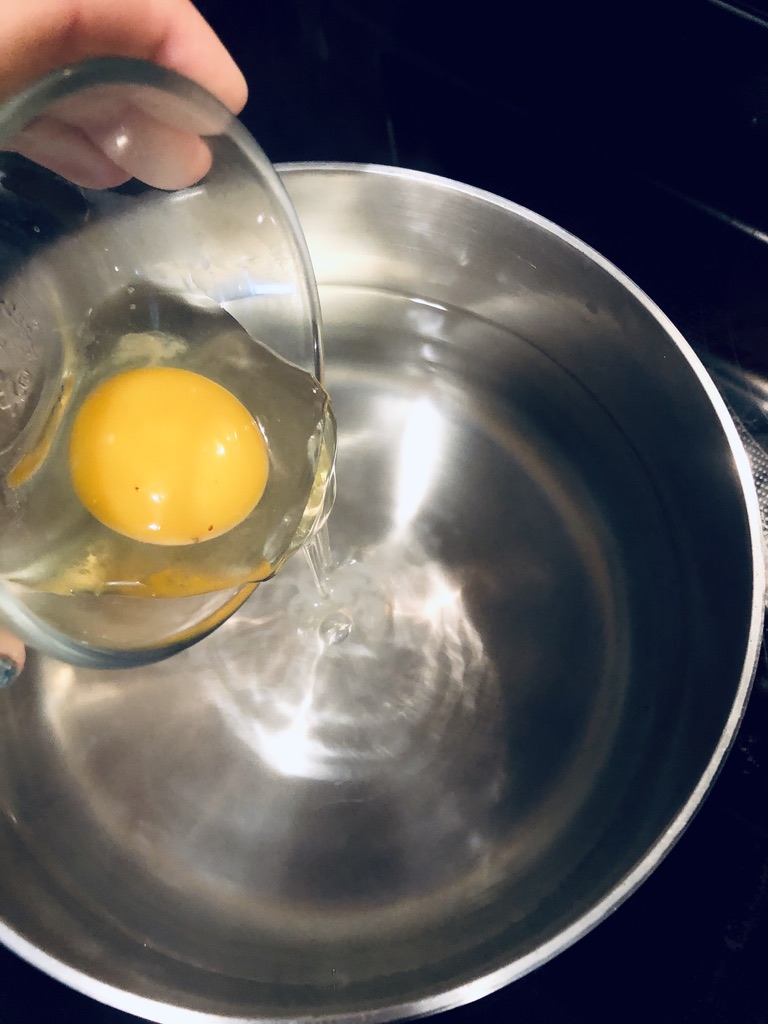
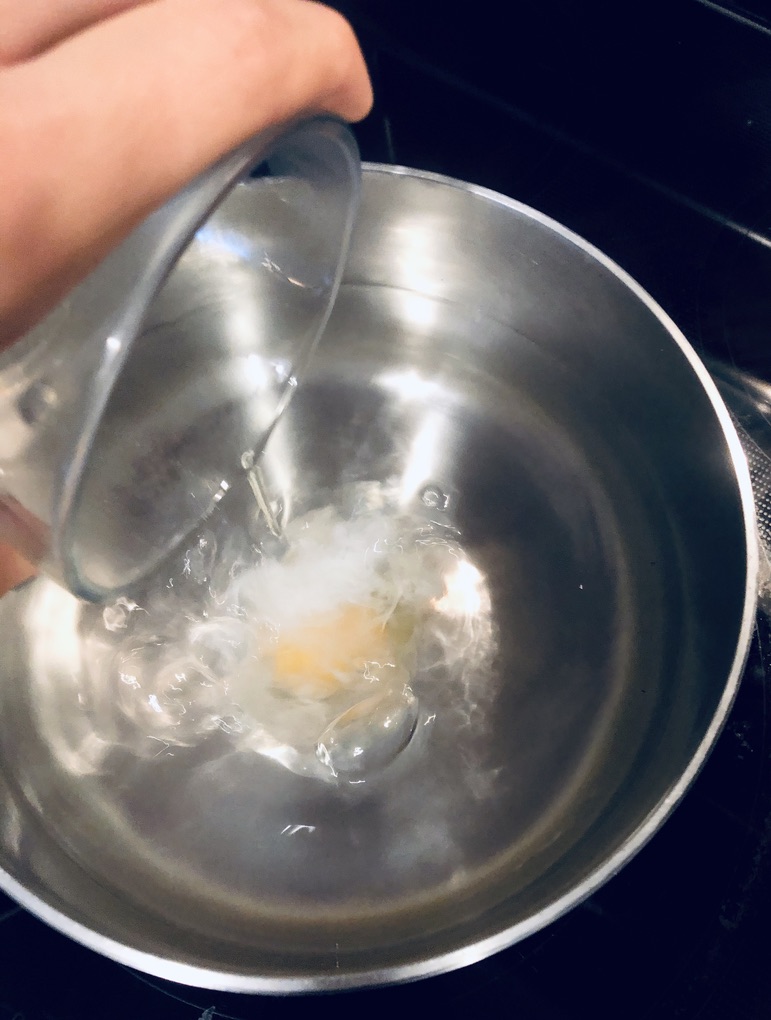
  1. Preheat oven to 200 degrees F and line 2 baking sheets with parchment paper. Separate egg whites into a mixing bowl (be sure no yolk gets in with the whites as this will affect your meringue). Set up mixer using the whisk attachment (a stand or hand mixer can be used). Tip: I save the yolks and use them to make hollandaise sauce– yolks can be stored in an air-tight container in the fridge for up to 3 days.

2. Add in cream of tartar and salt. Turn mixer on to medium-low speed and whisk until the egg whites start to bubble and become frothy.

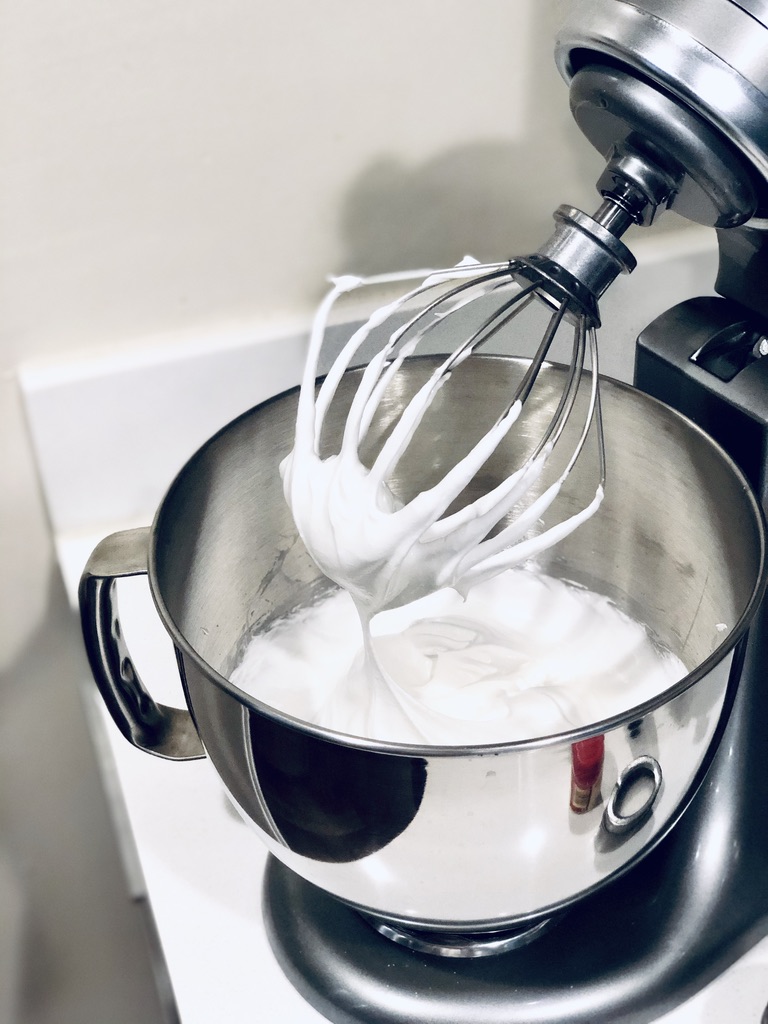
3. Increase speed to medium-high and begin to slowly add in the sugar 1 tbsp at a time. Whisk until stiff peaks form, the sugar is fully dissolved, & the meringue is glossy. This part may take 5-10 minutes– don’t rush adding in your sugar!

4. Add in vanilla and continue to whisk until fully incorporated and then stop the mixer. Tip: If you want really bright white meringue cookies make sure to use the clear vanilla extract. I typically use the darker vanilla extract so my meringue gets slightly darker… today I accidentally used the almond extract (which is clear), hence my bright white meringue! If you are planning to add color to your meringue, add it in now!

Don’t mind my random bowl of cheerios in the back…

5. You can either pipe the meringue cookies, or just spoon them into dollops. I’m piping mine using a large Ziplock bag with the corner cut off. To fill the bag, place one corner into a glass and spoon the meringue in– wait to cut the corner until you’re ready to start piping. Tip: Pipe a small dot of meringue into each corner of your baking sheet and place the parchment paper on top to keep the parchment paper from sliding around while you pipe the cookies!

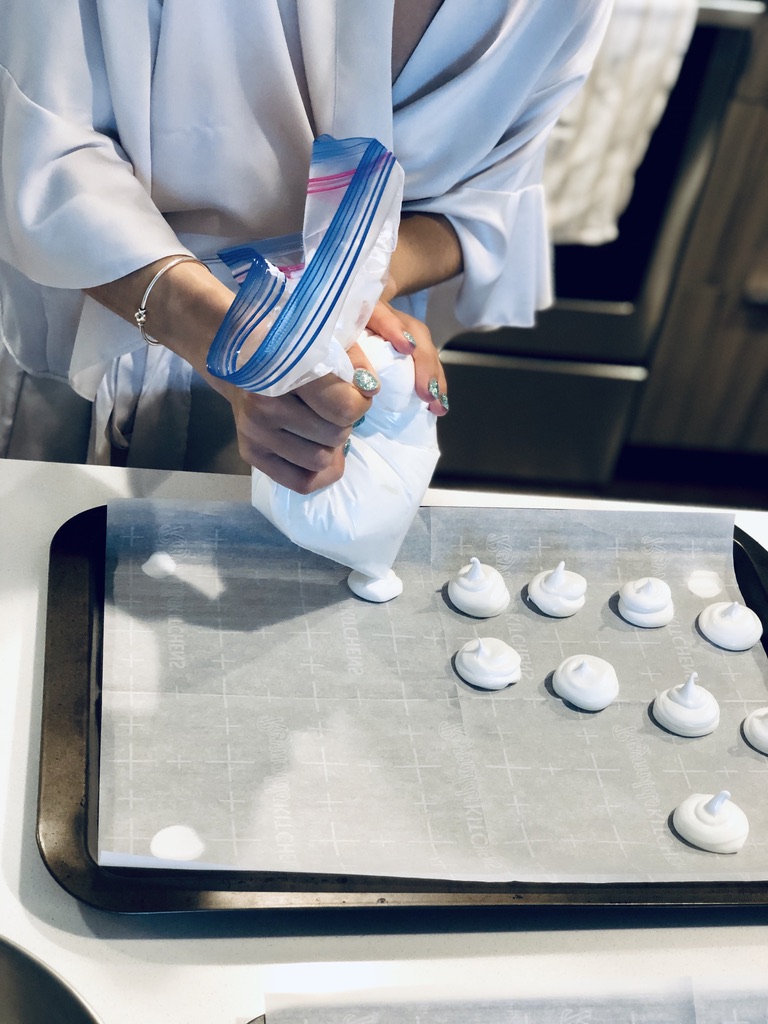
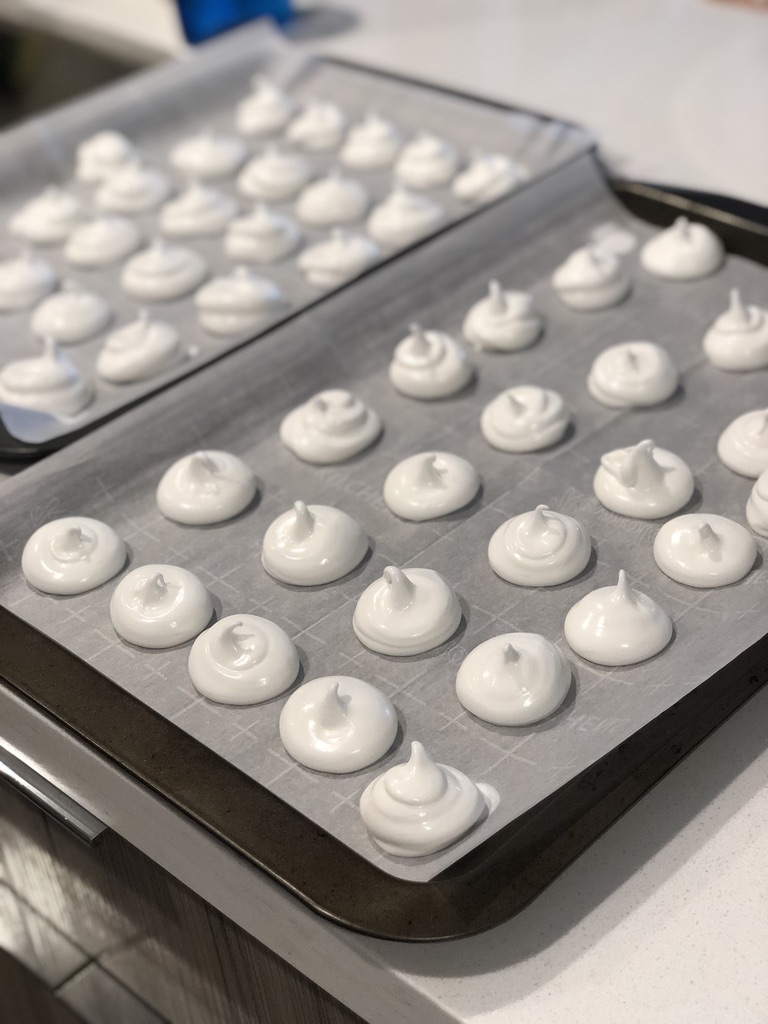
5. Pipe (or spoon) your meringue into small dollops on a baking sheet about 1 inch apart. The cookies won’t increase in size but you want a little bit of space between them to allow for airflow (to make sure they fully dry out).

6. Bake on the middle rack at 200 degrees F for 1 & 1/2 hours. Once done baking, turn off the oven, and leave them inside with the door closed for 1-2 hours.

Finally, enjoy!! Let me know if you’re able to stop at just one… I’m pretty sure that classifies as a superpower.

Storing Instructions:

Store in an air tight container at room temperature for up to two weeks (they won’t last that long, but just in case ๐Ÿ™‚ ). Make sure to keep them away from any moisture. If you notice that your meringue cookies are a little chewy on the inside you can pop them back into the oven (200 degrees F) for about 10 minutes to dry them back out!


Leave A Comment Below

If you try out these meringue cookies drop a comment below and let me know what you think ๐Ÿ™‚

XOXO Hayley


Friday Amazon Find: Ultrasonic Jewelry Cleaner & On-The-Go Pen

It’s FRIDAY!!!

I love, LOVE, love these two products. Today is all about how to keep those diamond rings (or any jewelry) clean and SUPER sparkly โค

Is it just me, or do other people have their rings cleaned every time they go to the mall? I always stop in a Kay Jewelers, or whatever’s nearest, and ask them to clean my rings– if you’ve never done this you should, it’s free and your ring looks brand new!

When I got engaged my sister gifted me this professional ultrasonic jewelry cleaner which uses the same technology (ultrasonic sound waves) as those big fancy cleaners at the jewelers– best gift ever. I clean my rings once every 1-2 weeks and I’m amazed at how clean and how much they sparkle every time. This is one of those things you don’t realize you need until you try it; you never really notice that your jewelry is a little lackluster until it’s clean. Am I right?!

This cleaner is kind of addicting…

The machine is pretty small and stores easily and only requires tap water to run (I also add in a dash of this gemstone cleaner). It comes with a little basket inside to easily remove your jewelry and it’s automatic– it’s as simple as pressing start and letting it do its’ thing!

DISCLAIMER: The basket is awesome for taking jewelry out but DO NOT hold it over your sink… speaking from experience over here, trust me. I was cleaning my tiny Tiffany’s bean necklace (the necklace Dyl gave me on our wedding day, so it’s incredibly special to me) and I lifted the basket out right over the sink, the necklace fell through the slots and down the drain. Cue the panic. Jewelry and Murphy’s Law really love to go hand and hand, don’t they? Thankfully it was caught in the u-drain (I’m pretty sure that’s not actually what it’s called) but we were able to get it back. Thank God.

On a happier note, if you know anyone that just got engaged, this would make an awesome engagement gift! If you don’t wear a lot of jewelry you may still like this, the description says that it can be used to clean eyeglasses, watches (I don’t know about this one), utensils & “more”.

Okay, moving on to my other favorite way to keep my rings clean: The Diamond Dazzle Stik.

I found this diamond cleaning pen on Amazon and pretty much send it to anyone that gets engaged. I love it. I keep it in my purse always, so if I’m traveling, or just on-the-go, and notice my rings look a little dull I can quickly clean them. I don’t even take my rings off (mainly because taking them off in a public restroom scares me… a drain + murphy’s law = nightmare) but it works perfectly fine with them still on your hand.

The pen has a little brush at the end that you twist and jewelry cleaner comes out. I wet my ring under the sink and then brush it with the pen, rinse, and pat dry with a paper towel. Voila! Sparkly clean rings on-the-go! Whoever invented this is a genius.


Happy Friday guys! Me and my freshly cleaned and sparkly rings are taking a hard seltzer out to the patio to enjoy the sun before it’s gone– you never know in San Francisco.

XO Hayley


Leave A Comment Below

I hope you enjoyed todays’ Friday Finds. If you have a jewelry cleaner that you love and swear by leave it in the comments below!


How To Poach An Egg

Learn how to make perfectly poached eggs in just a few simple steps!


I love adding a fried or poached egg to just about everything.

Having a salad? Let’s add an egg.

Making turkey burgers? Add an egg.

Being basic and making avocado toast? Egg it up.

One of my favorite things to eat for breakfast is two poached eggs topped with salt, pepper and Franks Hot Sauce, served over a piece of thick crusty toast! Mmmmmmm.

I never had any issue making dippy eggs (most adults call these “over easy”), but didn’t learn how to poach an egg until last year. For some reason poaching an egg sounded really intimidating.

I took to the internet and also asked my husband (he’s like my cooking encyclopedia.. he knows what’s up in the kitchen) to learn how to poach an egg!

There are a bunch of different methods out there, and I tried most of them. Some were really easy and some went kind of wrong… but now I can confidently say I know how to poach an egg and it’s really easy. I promise ๐Ÿ˜‰

In my opinion, the easiest way, and the one that most consistently gives me a beautifully poached egg, is “the swirl method”. Okay that’s a made up name… but I think it’s fitting. Follow these simple instructions and you’ll be making perfectly poached eggs– just like the ones you see at all of your favorite brunch spots โค


How I Make Perfectly Poached Eggs:

  • Bring a pot of water up to a simmer (not a roiling boil) and add in a dash of white vinegar
  • Crack egg into a small bowl or ramekin– this makes adding it to the water much easier
  • Gently swirl the simmering water with a spoon (creating a gentle whirlpool) and add the egg directly into the center of the pot
  • Leave the egg untouched and allow to cook for 3-4 minutes (or until the whites are set)
  • Remove the egg from the water using a slotted spoon and place onto a plate lined with a paper towel
  • Season & serve!
My set up!
Swirl water & and add in your egg!
Make sure to add it directly into the center! The gentle whirlpool will help wrap the whites around the yolk
Let it cook for 3-4 minutes. Your egg should not be bouncing around, if it is, the water is too hot
Use a slotted spoon to carefully remove the egg
Place in a bowl or on plate lined with a paper towel
Season and serve! I like salt, pepper, & some hot sauce on mine ๐Ÿ™‚
Enjoy!!

Notes:

  1. The swirling of the water helps to keep the whites together but it’s normal to have some egg whites separate and float to the top
  2. If your egg has really runny whites pour off some of the whites before adding it to the water
  3. Use fresh eggs
  4. Don’t add any salt to the water
  5. I prefer to poach just one egg at a time and skim off the top of the water between batches

A great dish to top with a poached egg is my Ground Turkey Bibimbap, you can see that recipe here!


Leave A Comment Below

Thanks for stopping by Clyde’s Corner today! Leave a comment below and let me know what you think about today’s post ๐Ÿ™‚

I have a few recipes coming up that I top with poached eggs and I wanted to have a quick and simple method available for you guys, so I hope this was helpful!

XOXO Hayley


Super Simple Trader Joe’s Beef Tacos

Homemade tacos are the perfect way to spice up a week-night dinner. This ground beef taco recipe is super simple, quick, & definitely packs a little heat!


What day is it? HUMP DAY!

Happy Wednesday everyone!

Hopefully you were able to devour some delicious tacos yesterday for Cinco de Mayo AND Taco Tuesday ๐Ÿ™‚ . If not, donโ€™t worry you can eat tacos any dayโ€“ Iโ€™ve got you covered.

Dylan and I were both raised in Arizona and so naturally are big taco people. This taco recipe may not be exactly the same as some of our favorites back home, but it definitely holds up in taste (and weโ€™re both pretty picky). This recipe is quick, delicious and super simpleโ€“ perfect for a week-night dinner!

I used to season my taco meat with individual spices (and still do if Iโ€™m out of my packet mix), but I was so happy to discover thisย Trader Joeโ€™s Taco Seasoning.

Itโ€™s flavors are spot on and has a nice kick! If you like your meat really spicy (Dyl and I do) add in the entire packet, if you like a little less spice, only add in half. The seasoning costs less than $2โ€“ hello Trader Joeโ€™s steal. I usually buy 2-3 packets at a time so I always have some on hand.

I also tried the Trader Joeโ€™s yellow corn hard taco shells and was really impressed! We didnโ€™t have any broken shells and no cracking down the middle when biting into them! Warming them up enough definitely helps so donโ€™t skip this step ๐Ÿ™‚


What you’ll need to make the tacos:

For the taco meat-

  • 1 lb ground beef (I used 80% lean)
  • 1 packet Trader Joeโ€™s Taco Seasoning
  • 1 15oz can crushed tomatoes
  • 1 medium onion, diced
  • 1 small lime
  • 1 package of Trader Joeโ€™s Taco Shells (you can use any brand hard or soft taco shells!)
  • 1 tbsp canola oil

Toppings-

  • 1 15oz can black beans, drained & rinsed
  • Shredded cheese (I use the shredded Lite Mexican Blend from Trader Joeโ€™s)
  • Shredded lettuce (Iโ€™m using romaine)
  • Sour cream or plain non-fat greek yogurt
  • Avocado, diced
  • Lime
  • Cilantro (Iโ€™m just putting this here for you guysโ€ฆ I HATE cilantro)

*All the toppings are optional, add in or leave out any of the toppings based on what you like on your taco!

Note: If you donโ€™t eat beef, this recipe is really delicious with ground turkey too!

Recipe:

  1. Over medium-high heat,ย sautรฉ diced onionย in canola oil for about 2 minutes, or until it begins to brown. Add inย ground beef and Trader Joeโ€™s taco seasoning. Continue cooking meat for 5-7 minutes.ย Note: If you like it really spicy add in the entire packet, for less spice, only add in half!

2. Add inย crushed tomatoes, andย reduce heatย to low. Cook for another 10 minutes, stirring occasionally. Stir in theย lime juiceย right before serving!

3. While the meat is cooking, prepare all of your toppings! Today we decided to addย black beansย to the base of our taco.ย To make the black beans:ย In a sautรฉ pan combine 1 can rinsed black beans with 1 tbsp of canola oil and a pinch of salt, cook over medium heat for 5-7 minutes!

4. Warm up your taco shells! If using hard shells, fan them out on a microwave-safe plate and warm them in the microwave for 30-45 seconds. For soft shells, wrap them in damp paper towels and microwave for 30-45 seconds.ย Note: Of course if you have all the time in the world you can heat the hard shells in the oven and the soft shells on the stove ๐Ÿ™‚

5. Build your taco!

Today, I did a layer of black beans, taco meat, cheese, shredded lettuce, plain non-fat greek yogurt and lots of fresh lime!

Does anyone else intensely watch how their spouse or significant other is building their taco before you make yours? I always let Dylan go first so I can see how heโ€™s layering everything. I get serious FOMO when it comes to food so I want to make sure I make mine just as delicious as hisโ€ฆ maybe Iโ€™m the only one who does this. #FoodFOMO

I hope you try out & love this recipe on your next taco night!


Leave a Comment Below

Whatโ€™s your favorite taco topping?! If you try out these super simple Trader Joeโ€™s tacos, leave a comment below and let me know what you think! Follow me on instagram @hayleykahl for some ideas on how to use your left over taco meat.

XOXO Hayley


*Click here to see safe minimum cooking temperatures for meats and other cooked foods!

Amazon Find: Silky 2-Piece Pajama Set


Happy Taco Tuesday!!

If you hadn’t noticed, I took a little hiatus from blogging the past few days– me and my hubby were celebrating!

Yesterday was our one year wedding anniversary โค

We were married in Riviera Maya, Mexico on May 4th last year and it was the best day EVER. Dyl and I still talk about our wedding weekend all the time… there’s nothing we would have changed or done differently, it was perfect.

Here are a few pictures from the pier we were married on, and of course one with Lupito– the cutest donkey ever (he came to our cocktail hour)!

We were supposed to be celebrating in Cabo this year but obviously due to Coronavirus our trip was postponed.

Instead, yesterday, Dylan took the whole day off and we spent it together doing a bunch of things we love: we made brunch & had mimosas, watched our wedding video (and I sobbed), took Wyatt on a long walk to the bay & around the AT&T baseball stadium, played Monopoly Deal (if you don’t know about this game, I highly recommend you try it), had frozen strawberry margaritas out on our patio and did a little daydreaming about our future, we ended the night picking up dinner from our favorite Italian restaurant around the corner. We were asleep by 8:30 PM– probably because of our intense carb-loading all day.


The Most Luxurious & Silky PJ’s

Okay, now let’s talk about these silky PJ’s… I just discovered them a few weeks ago, and they are SO comfortable.

I wore them in my skincare post last week (if you missed that one you can check it out here), and a few people commented on how cute they were! I promised I would share them, so here I am ๐Ÿ™‚

A good friend of mine wears them all the time (to sleep in of course)– I always thought that they looked adorable but I wasn’t sure I’d like to sleep in them myself. Have you ever slept on sheets that are way too slippery and it drives you insane because you can’t fall asleep because your sliding all over the place? Yeah, that’s what I was concerned about with sleeping in silky PJ’s. Spoiler alert: these jammies are nothing like that.

Luckily for me, my friend gifted me a pair, and I am so grateful that she did!! As soon as I put them on I was sold. I never want to sleep in anything other than silky jammies โค

These PJ’s come in a ton of different colors and patterns– I’m currently typing this post in a pair of blue stripes (pictured below).

Tie up the shirt for a more fitted, cute look!

These luxurious feeling PJ’s are really affordable, they all cost less than $35!

The sizing is a slightly strange– I am wearing a size small but the tag reads (L), there’s a conversion chart on the Amazon post itself. I could probably wear an XS if I wanted them to be more fitted, but I like them a little baggy for sleeping! You can see in the picture above that the pants are high waisted, which makes this set really versatile– you can wear the top long or tie it up!

Also, how adorable are these zebras?!

I have basically been living in these PJ’s for the past few weeks, so I hope you all love them as much as I do!

Click here to grab a pair for yourself, happy shopping ๐Ÿ™‚


Leave a Comment Below

If you end up purchasing these silky pajama’s, leave a comment below and tell me what you think โค

XOXO Hayley


Wedding Photos by Emma Quinn

My 5-Step Morning Skincare Routine

Cleanse. Serums. Eye Cream. Moisturize. Sunscreen. Learn how I wake-up my skin in the mornings!


Skincare is my jam!!! Seriously, if you know me chances are we’ve talked skincare, products, & treatments before.

I feel incredibly lucky to have had the chance to work in dermatology and learn so much from such an amazing team of dermatologists and derm PA’s. One of the dermatologists used to tell our patients that you can’t undo the damage already done to your skin but you can start today taking better care of it. I absolutely love this!

It’s never too late to start taking better care of our skin. Do I wish that I didn’t spend my high school summers as a lifeguard not wearing sunscreen? Mhmm, I regret that. Do I wish that I didn’t use a tanning bed as soon as summer was over to get rid of my one-piece lifeguard bathing suit tan lines? 100%. But that totally happened and all I can do now is wear sunscreen, try to stay out of the sun, and have a solid skincare routine.

The whole world of skincare can be totally overwhelming. Between eye creams, retinol’s, laser treatments and botox, there’s enough info out there to keep you reading for years. My goal is to share some of the things I’ve learned along the way and hopefully make this giant world of skincare a little simpler for you.

My morning skincare routine is 5-steps, and pretty straightforward; I cleanse, apply a hyaluronic acid & vitamin C serum, use an eye cream and brightening moisturizer, and always, always, end with sunscreen.

This may sound like a lot of steps if you’re new to skincare, but it only takes a few minutes to do it all– I promise. If you’re starting at square one & don’t have a skincare regimen at all, trying to get everything at once is a little overwhelming. A good place to start (other than sunscreen, because we all already wear it everyday, right?!) is with a moisturizer and an eye cream!

Eye cream is a crucial element to have in your skincare arsenal. It may be tempting to skip this step and use just your daily moisturizer, but eye creams are specifically formulated for the delicate skin around your eyes.

Once you get comfortable with the products that you’re using, and know for sure that your skin is tolerating them well, add in another step to your routine! Another reason for slowly building a skincare regimen and adding products in one-by-one, is incase you have a sensitivity to a particular product. This way, you’ll know exactly which product caused it, and can stop that one immediately!

If you’re using any medications for skin conditions (acne, rosacea, melasma etc.) make sure to speak with your dermatologist about how & when to use them, and what other products you should be using in your skincare routine ๐Ÿ™‚


My Morning Skincare Routine:

Step 1: Cleanse

Today I’m using Neutrogena Hydro Boost Hydrating Gel Cleanser.

I love this cleanser. It’s really affordable yet still feels amazing AND is perfect for sensitive or acne-prone skin. Another favorite of mine is Origins Checks and Balances!

Step 2: Serums

I mix 2 pumps of Neutrogena Hydro Boost Hyaluronic Acid Serum (one of my top 10 beauty must-haves) & 2 drops of Paula’s Choice Vitamin C serum.

To apply, I put them both in my palm, rub my hands together very briefly and then gently pat my face with the serums! Let’s be gentle with our skin, shall we?

Note: If you use a toner in your morning routine, apply it after cleansing, before your serums!

Step 3: Eye Cream

I’m currently using and loving Origins Plantscription Anti-aging eye cream.

I apply a small amount with my middle finger– make sure to dab, don’t rub! Remember this skin is ultra delicate.

Step 4: Moisturizer

Today I’m using Neutrogena Bright Boost Gel Cream. I really like this cream as a less expensive option, but my favorite is the Mega-Bright from Origins— I’m just currently out of that one!

Step 5: Sunscreen

The last and MOST important step of my morning skincare routine (and yours too)– SUNSCREEN!!

Today I mixed together my L’Orรฉal Lumi Glotion (a top 10 beauty must-have) and Rodan + Fields Radiant Defense. These two products together give me a little bit of coverage and a natural looking glow– perfect for no makeup days! I guess all days these days, are no makeup days… wow what did I even just say??

Normally, my go-to sunscreen is Elta MD UV Clear (tinted), but this girl is apparently out of a lot stuff right now.

Post morning skincare! Feeling so fresh and so clean, clean. PS. If you like my silky zebra PJ’s, you’ll love tomorrows post โค

Leave A Comment Below

What is your morning skincare routine? Do we use any of the same products? Is there something you use and love that I should know about?! Leave a comment below and tell me all the things โค

XOXO Hayley


10 Minute Creamy Cashew Pasta

This creamy cashew tomato sauce is so decadent that you won’t believe it’s healthy.


Do you like creamy, rich, and decadent pasta sauces? If yes (and I’m pretty sure it’s a yes), you’re going to love this, & I bet you won’t even notice that it’s healthy.

This cashew cream tomato sauce takes only a few minutes to whip up and can easily be made vegan if that’s your thing (just leave out the parm ๐Ÿ™‚ ).

This dish is SO fast & easy– seriously, once your pasta water starts to boil it takes 10 minutes and it’s on the table! There’s no prep, no chopping, and no soaking the cashews ahead of time.

I used regular store bought penne pasta but this sauce would be delicious with whole wheat or gluten-free options as well! For how creamy this sauce tastes, you would never guess in a million years that there’s zero milk… or cream… or butter… or dairy of any kind (if you leave out the parm of course).

Dyl and I devoured this for dinner last night, and both agreed it was one of the best things we’ve had in a while. That’s saying something because we’re big foodies here in the Kahl household โค !

This sauce would also pair well with a fettuccine or spaghetti, you can check out my homemade pasta recipe here!

If you end up trying this delicious sauce, let me know what you think in the comments below โค !


Ingredients:

  • 1 lb box of penne pasta
  • 1 cup of raw cashews
  • 1 and 1/2 cups crushed canned tomatoes
  • 2 whole garlic cloves, peeled
  • 2 Tbsp parmesan cheese
  • Salt & pepper to taste
  • 1/2 cup hot pasta water

Servings: 4 servings

Recipe:

  1. Cook penne pasta in salted water according to package directions. This creamy cashew tomato sauce takes just a few minutes to whip up, so wait to start it until the pasta is almost ready.

2. In a blender (I’m using the Ninja smoothie attachment–mine is oversized so you may need to use your regular blender) combine cashews, crushed tomato, oregano, parmesan cheese, & pasta water– wait to take the pasta water until the pasta is almost finished cooking (you want the water to be starchy).

3. Puree the mixture (this should only take a few seconds). Taste for seasoning; add salt & pepper as needed and then mix by hand or pulse a few times in the blender. Note: Be careful when removing the the lid and pouring, as the sauce may be hot from the pasta water. Tip: If your sauce seems too thick, add in a little more pasta water or crushed tomatoes!

4. Pour sauce into a large microwave-safe serving dish (big enough to hold the pasta). If you want your sauce to be extra hot (like me) put it in the microwave for 30-45 seconds prior to adding in the pasta (hence the microwave safe dish). Alternatively, you can heat it up on the stove in a sauce pan for a few minutes (though this takes longer and uses more dishes… just saying).

5. Mix in penne pasta to the sauce & serve!

6. Top with a little parm …

… or A lot!

ENJOY!!!

Can you guess which bowl is Dylan’s and which is mine?


Watch How I Made This Recipe


Leave A Comment & Subscribe Below

If you try out this creamy cashew tomato penne pasta recipe let me know what you think in the comments below!

xoxo Hayley


This recipe was adapted and modified from Walder Wellness

Spring Cleaning Tips

Learn how to keep your stainless steel sparkling, your tub & shower soap scum-free, & your floors clean and disinfected all year long… with minimal effort!


I love cleaning. I know some people HATE to clean, but maybe that’s because they’re making it harder on themselves than they need to.

If you let messes and dirt build up and you have to spend hours cleaning, you’re doing it wrong– no offense. The trick is to spend a few minutes here and there and stay on top of it, and then it no longer feels like this big daunting task, it’s totally manageable!

Don’t get me wrong, my apartment isn’t spotless and completely tidy 24/7. I sometimes wait to do laundry a day or two longer than I should, and occasionally leave Wyatt’s toys all over the carpet (where he insists they stay) before going to bed at night (amongst many other things), but for the most part I stay on top of the dirt and mess!

Today I’m sharing a few of the things I do on a regular basis that help me stay on top of things, so that spring cleaning doesn’t become the worst thing ever. I hope these tips are helpful ๐Ÿ™‚ !


How to keep your stainless steel sparkling all year long:

Do you have stainless steel just about EVERYWHERE? Yeah, same. The appliances in my kitchen. My faucets. The cabinet door handles. My toaster. It’s all over the place. Stainless steel LOVES to get smudged and hold on to fingerprints…. so CSI of it.

Don’t worry I’m here to help! I use Weiman Stainless Steel wipes and they are THE BEST.

I use these wipes on all of my stainless steel once a week. It takes about 10 minutes to do it all & is incredibly easy. You wipe the surface using a stainless steel wipe and then buff it in with a paper towel or microfiber towel. It’s that simple.

Here is a before and after, using the wipes, of our toaster! It’s seriously like magic.

BEFORE
AFTER


How to keep your tub and shower soap scum-free:

One thing I used to hate cleaning was my shower and tub. Why is mildew and soap scum a thing?? It’s gross– especially when it’s in a place where you’re supposed to be getting clean.

Back in the day (okay really this was only like two years ago), I would wait until I started to notice build-up in my shower to deep clean it. By that point it would require some serious elbow grease and a solid investment of my time– making it feel like a HUGE task that I didn’t want to do.

In addition to washing the shower curtain AND liner (I think people often forget that these also need to be cleaned), these two simple things that I started doing on a regular basis saved me from letting my shower ever get to that point again!

  1. I keep Method Daily Shower Cleaner IN my shower caddy and spray down the entire shower and inside the tub after every use.

By keeping it in the shower, I never have to think about it (and it takes just a few seconds). This spray is non-toxic, plant-based, and cleans without having to rinse! The bottle really says it best:

A spray a day keeps the scrubbing away. Effortlessly maintain the gleam on your clean tiles with our daily shower spray. With powergreen technology, it dissolves and prevents soap scum while leaving behind a wildly fresh scent. Very little exertion required. We should say “no exertion required” but you do have to engage your trigger finger“,

2. I keep a Mr Clean Magic Eraser in the shower on the soap dish to spot clean while I’m in the shower.

I hope by now you have discovered the magic that is Mr Clean Magic Erasers and all of the crazy things that they can clean (I won’t list them all here, but seriously they clean everything). Keeping a magic eraser in my shower helps me to stay on top of any spot cleaning and it only takes a few seconds. I mean, I’m already in the shower why not kill two birds??

By using these two simple tricks, I never have the need for true elbow grease just to clean my shower. If I do want to get a deeper clean, I spray it down with a stronger spray and call it a day! No intense scrubbing and no wasted time ๐Ÿ™‚

How many times can a girl write in the shower? Any Legally Blonde fans reading? Every time I type it out I’m picturing Elle Woods during her first trial saying “so, you were in the shower?” over and over again and can’t stop laughing. If you don’t know what I’m talking about, do yourself a favor and go watch Legally Blonde.


How to keep your floors clean & disinfected:

Living in San Francisco has made me slightly paranoid about the cleanliness of our floors. The streets here in SF are disgusting and the thought of tracking any of that inside of our home makes me sick to my stomach. Dylan and I take our shoes off as soon as we come inside and always wipe off Wyatt’s paws if he’s been down to the street or on a walk through the city. Even still, I felt I needed a solid floor cleaning/disinfecting strategy.

Cue the music, and welcome my holy trinity of floor cleaning!

  1. Dyson V8 Vacuum
  2. Swiffer Wet Jet
  3. Bissel Steamer

I use these three products about once a week to help make my floor look and feel clean. I start out by vacuuming, then use the Swiffer Wet Jet, and finish by steaming.

All 3 are SO easy to use and clean the floors quickly… something very important to me! I love that the Dyson and the Swifter are cordless; I use them a little more frequently throughout the week to spot clean. The Bissell steamer uses machine washable pads and the best part? Steam cleaning kills 99.9% of germs and bacteria! Take that San Fran street germs!

This may seem like a lot of steps (and will take longer depending on the size of your home) but it takes me about 20 minutes total to use all three!

*Our Bissell Powerfresh Steamer was from Amazon and is currently unavailable. There are several other great options from different brands! This one is highly rated on Amazon, but I haven’t used it myself so make sure to do a little research on your own.


Thanks for stopping by Clyde’s Corner today! I hope that you found some of these cleaning tips helpful and if you decide to implement any of them let me know ๐Ÿ™‚ . For more spring cleaning tips, check out my post on how to organize your bathroom cabinets and drawers!

Leave a comment below with some of your favorite cleaning tips and tricks!


My Top 10 Beauty Must-Haves

This week on my instagram I asked what you guys wanted to see here on Clyde’s Corner and a lot of you responded with skincare & makeup– two of my favorite things!

If you don’t already know, during the time that Dyl and I lived in Michigan, I spent half that time working in the Emergency Department and the other half working in Dermatology. I was a medical assistant and Derm tech and absolutely loved learning about dermatology– medical and cosmetic! My dream job is to become a Derm PA ๐Ÿ™‚ , so naturally anything skincare is right up my alley!

I thought a good place to start, before getting into specific skincare or makeup routines, would be to share some of my current favorite beauty products! I am constantly trying new products so my favorites change from time to time. I am a little cautious when it comes to trying out new skincare products as I have sensitive and acne-prone skin, so I make sure to do my research first!

Let’s jump right into it; below are 10 of my favorite tried and true beauty products (in no particular order). If you have a favorite product, let me know in the comments below ๐Ÿ™‚ !


1. Babe Lash

I have been using Babe Lash for a few years now and will probably use it for years to come! This is an eyelash serum that not only works but is way more affordable than some of the other options out there. One thing to note from my own experience, and several others that I know who use this product, is that Babe Lash will definitely increase the length of your lashes but doesn’t do much for the thickness– so keep that in mind if you decide to try it! I order mine directly from Babelash.com

2. Better Than Sex Mascara

This is my favorite mascara ever! I have tried so many mascaras looking for one that beats this (or that is less expensive) and I have yet to find one. If you like big bold lashes and haven’t tried Better Than Sex, you’re missing out! It comes in a mini, which is great for sampling! I buy mine from Ulta or Sephora.

3. Neutrogena Hydro Boost Hydrating Serum

As I mentioned above, I have sensitive, acne-prone skin, so this hydrating serum is PERFECT for me. It’s oil free and non-comedogenic, meaning it won’t clog your pores! It is very light but incredibly hydrating AND has purified hyaluronic acid. This serum feels amazing. In the world of skincare and serums this one is so affordable! You can buy Hydro Boost serum at most places that sell Neutrogena products– I buy mine from Amazon! Check it out here ๐Ÿ™‚

4. Facial Steamer

If you’ve been keeping up with Clyde’s Corner you may recognize this facial steamer ๐Ÿ™‚ I mentioned it in my 6 Activities to Help with Quarantined-Induced Cabin Fever post. I use this steamer to do at-home facials but also use it periodically throughout the week at bedtime. I keep it out on my bathroom counter and use it when my skin is feeling a little extra clogged– I steam for just a few minutes after cleansing, before I put on my serums and moisturizer and it feels amazing!

5. Elta MD UV Clear Tinted Sunscreen

I use this elta MD sunscreen every single day; I never leave the house without it on. After working in dermatology protecting my skin has become a high priority for me and this product does it well! There are several different facial sunscreen options from this line but the UV Clear is my fav (and great for acne-prone skin). It has a high SPF but is ultra light weight and can be worn under makeup! I buy mine from either Amazon or The Derm Store.

6. L’Orรฉal Lumi Glotion

If you love the natural, dewy, glowing skin look and haven’t tried this Lumi Glotion, GO GET IT NOW. I am obsessed with this product and have been for about a year now; I wear it just about everyday. If I’m not wearing makeup, I throw this on (on top of my sunscreen of course) and it transforms my skin, smoothing everything out and giving me a glow. It also layers great underneath makeup or mixed together with foundation to add a little extra dewy glow to your skin… who doesn’t want that?? I buy mine here but you can find L’Orรฉal Lumi Glotion anywhere that carries L’Orรฉal!

7. Dry Bar Prep and Prime Detangler

Prep Rally is a Dry Bar product, so it has a slightly higher price point, but to me it’s definitely worth it. This detangler is formulated with biotin, Vitamins B & C and has UV blockers. It also acts as a heat protectant for blow drying and styling! You can find it at Dry Bar, Sephora or Ulta.

8. Isle of Paradise Self Tanning Drops

I am 100% on team STAY-OUT-OF-THE-SUN and NO-MORE-TANNING-BEDS… a side effect of having worked in dermatology. If you won’t give up sun-worshiping and tanning beds for the high associated risk of skin cancer, do it for the prevention of wrinkles and aging of your skin. Isle of Paradise tanning drops are a great alternative to laying out, and my personal favorite self tanner. You mix these drops with your regular body and face lotion for a streak-free natural looking tan! You can find them at Sephora ๐Ÿ™‚

9. Not Your Mother’s Dry Shampoo

I go through this product faster than I care to admit… anyone else addicted to dry shampoo? I love the smell of this one and how affordable it is! It works as both a dry shampoo and a texturing spray. You can get two big bottles for less than $10 on Amazon!!

10. 3D Brow Tones by Benefit

Anyone else feel like they always need to brush out their brows before they leave the house? Just me? Either way, this product is awesome. I use it even on days that I’m rocking a bare face– I quickly brush through my brows with this product and they look tamed and full with no hassle! You can find it at Ulta or Sephora ๐Ÿ™‚


I hope you enjoyed reading about some of my favorite beauty products! Leave a comment below and tell me what your favorites are โค


The Easiest & Most Delicious 3-Ingredient Oreo Balls

Oreo balls are the best no-bake dessert ever and require just 3 ingredients: Oreo’s, cream cheese and chocolate! This is one of my all-time favorite holiday treats but is delicious anytime– especially when you need to satisfy a chocolatey craving ๐Ÿ™‚


If you love Oreo cookies, you will LOVE this dessert! Oreo balls are life changing– that sounds dramatic, but they are. How can a dessert SO easy be this mouthwatering?! If you’ve ever been to one of my holiday or white elephant parties, chances are you’ve definitely had these. I make them every year around Christmas because I can prepare a ton of them in no time at all and every year they FLY off the serving platters. People rave about these little chocolate balls of heaven that are so easy to make (& even easier to eat)!

An Oreo cream cheese filling, rolled and dipped in chocolate… seriously, what could be better? I learned this recipe from my best friend’s momma when we were younger and have been making them ever since!

You can change out the toppings to fit any occasion! I made this batch for a friends birthday; I topped half with rainbow sprinkles and drizzled the other half in milk chocolate. I haven’t met anyone who doesn’t love these truffles. Do yourself a favor and give this recipe a try! I promise you won’t be disappointed โค


What you’ll need to make the Oreo balls:

  • 1 package of Oreo cookies
  • 1 8oz package of cream cheese, cubed and softened
  • 1-2 cups of melting chocolate (white, milk, semi-sweet)
  • Optional toppings: sprinkles, crushed Oreo cookie, candy cane pieces, melted chocolate, or whatever your heart desires!

Recipe:

  1. In a food processor pulse together the entire package of Oreo cookies until smooth cookie crumbs. Note: If you don’t have a food processor you can put the cookies in a Ziplock bag and crush with a rolling pin! Also, if you plan to top your truffles with crushed cookie make sure to keep some off to the side.

2. In a mixing bowl combine cream cheese and Oreo crumbs together– you can also use a stand or hand-mixer for this step, but I typically do it by hand!

3. Mix together until smooth and no clumps of cream cheese remain.

4. Roll mixture into small balls (about 1 tbsp), and set on a baking sheet lined with a baking mat or parchment paper. I use these baking mats and love them! Place the baking sheets in the freezer for 15 minutes. If you don’t have room in the freezer you can chill them in the fridge for 30 minutes. Don’t skip this step or else dipping them in chocolate will be A MESS!

5. Melt chocolate either over a double broiler or in the microwave– I use the microwave because to me it’s way easier. You want your chocolate to be smooth and runny! Today I dipped all of my Oreo balls in white chocolate, but typically I dip half in white and half in milk chocolate.

6. Dip Oreo balls into chocolate, coating all sides. I like to do this using a fork so that all the excess chocolate can drip off over the bowl.

7. If you plan on using a topping other than chocolate drizzles on top of your Oreo balls (sprinkles, cookie crumbs etc.) the topping needs to be added while the chocolate is still wet. I am doing half rainbow sprinkles and half milk chocolate drizzle– the sprinkles are being added immediately after dipping.

If you plan on doing a chocolate drizzle, pop the tray back in to the fridge for 5 minutes to allow the truffles to set.

8. Using a spoon drizzle the tops of the truffles with chocolate! Note: If you dipped the Oreo balls in milk chocolate, drizzle the tops with white chocolate.

9. Put truffles back into the fridge until the toppings have set.

Finally, ENJOY!! I prefer to eat my Oreo balls nice and chilled, straight from the fridge; Dylan prefers to set his out and allow them to come to room temperature. When serving at a party I usually set them out just as everyone is arriving!

Storing Instructions: Although these may be served at room temp, because of the cream cheese they must be stored in the fridge. For longer storage they can be put in the freezer in a freezer-safe bag or container. Transfer them to the fridge the day before (or at least a few hours before) you plan to eat them!

If you end up making these, leave a comment below and let me know what you think! If you post a picture to your social media, don’t forget to tag me and mention #clydescorner ๐Ÿ™‚