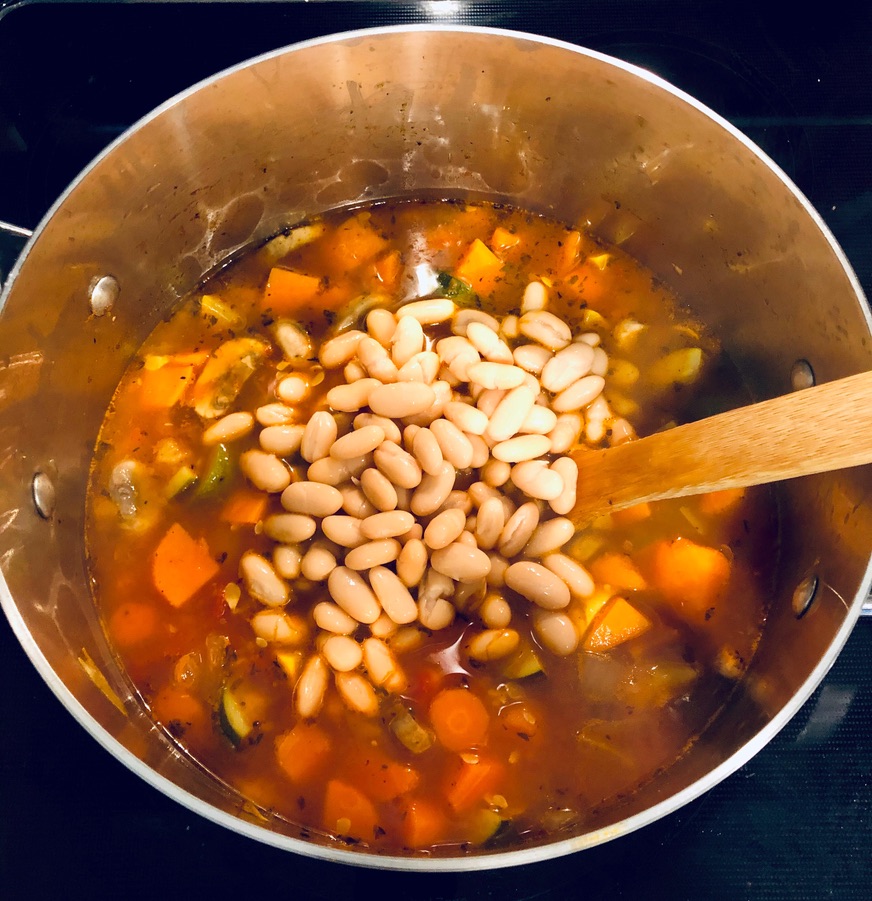
Carrots. Sweet potatoes. Onion. Zucchini. Mushrooms. Squash. Tomatoes. This soup is packed full of nutritious vegetables and is oh so tasty!
I don’t know about you, but I love soup. I realize it’s not the most glamorous meal out there but it’s delicious, easy, and extremely budget friendly. For instance, if you break down this vegetable soup it costs MAYBE $1 per serving. Where can you go and eat a healthy, satisfying, delicious meal for one dollar? Nowhere, that’s where.
Every time I make homemade vegetable soup it reminds me of my days working in the Emergency Department in Michigan. During just about every shift, I would run to the cafeteria (before it closed for the night), grab a big styrofoam container of vegetable soup and eat it throughout the evening. One of the physician assistants that I scribed for was on the vege soup train too and she told me to try adding Franks Hot Sauce and either feta or parmesan cheese to it. Best advice EVER. Now, whether I’m eating homemade vegetable soup or running down to Whole Foods’ hot bar for a cup on the go, I always add Franks Hot Sauce and parm to it. Always.
If you don’t have these exact vegetables, no worries– use what you already have. Swap out an ingredient that you don’t like with something that you do! This soup is very forgiving, I promise. One of the best things about making a big pot of soup is that you can enjoy it for lunch and/or dinner all week long 🙂 . This soup pairs delectably with a piece of freshly baked, buttered bread; try out my 5-ingredient white bread recipe!
*Herbs & Seasoning: 1 Tbsp each of thyme, parsley, chili powder, garlic powder, onion salt
*You can add or substitute any herbs or spices you want in this recipe, and by all means add more of one or all of them!
Servings: This recipe makings about 8-10 servings.
Recipe:
Prepare vegetables: wash, peel and then chop into relatively equal sizes. Note: The vegetables will be added into the soup at different times (based on how quickly they cook) but having them all prepared ahead of time makes it much easier!
2. In a large pot, over medium-high heat, sauté carrot, sweet potato, & onion in olive oil for about 5-8 minutes. Tip: I like to lightly salt and pepper each step of the soup instead of trying to season the entire pot at once!
3. Stir in tomatoes (with the juice) and herbs/spices. Allow to cook for 2-3 minutes.
4. Add in vegetable broth.
5. Stir in squash, zucchini and mushrooms.
6. Bring soup up to a boil and allow the vegetables to cook down, then reduced to a simmer and cook uncovered for 15-20 minutes.
7. Add in white kidney beans and continue cooking uncovered for 5 minutes or until the beans are hot.
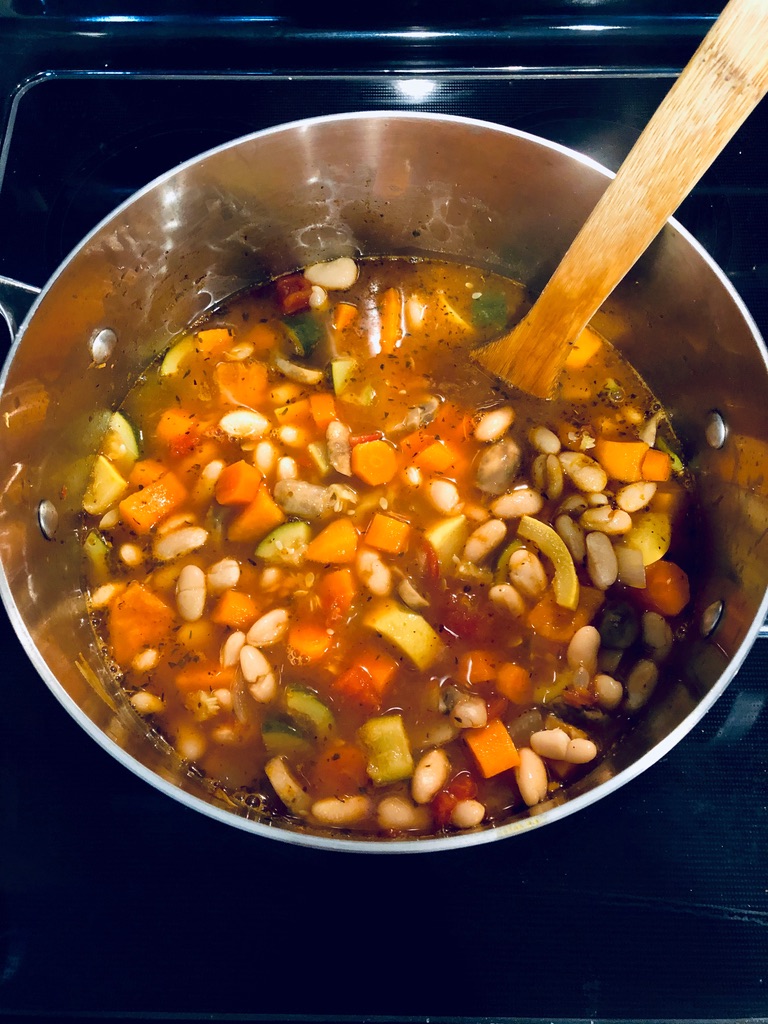
8. Taste for seasoning, and if needed, add salt/pepper!
I like to top my soup with some Franks Hot Sauce and a little sprinkle of parmesan cheese!
If you try this vege soup, leave a comment below and let me know what you think! If you post a picture to your social media, don’t forget to tag me and use #clydescorner ❤
Up until the stay-at-home orders were issued I had never baked a loaf of bread in my life. I adore fresh bread (who doesn’t), I just never really had the urge to try and make it myself. When everything first began shutting down here in the city, and toilet paper was near impossible to find, our local groceries stores were also low or completely out of bread– another hoarding necessity I suppose. A good friend of mine sent me a super simple, classic white sandwich bread recipe that I couldn’t wait to try! It was incredibly quick and only required 5 ingredients (unlike most of the sandwich bread recipes I was finding online).
This recipe was DELICIOUS. Not only did my house smell amazing (why is this not a candle scent??) but I had successfully baked my first loaf of bread! For my first attempt, I followed the recipe exactly as Chicken Scratch Diaries had written it– the taste was amazing but there were so many air pockets and it wasn’t quite sturdy enough to use for sandwiches. I began tweaking the recipe and rising times and voila! Five loaves and 10 pounds later (just kidding…sort of) I think I have finally perfected it! By using canola oil & bread flour, decreasing the second rising time and increasing the baking time by just a few minutes this white bread is absolutely perfect! It’s so simple that a beginner (like me) can do it. One of the best parts is it requires ingredients most people already have stored in their pantry!
Even if bread is fully stocked at your local grocery store, I highly recommend giving this homemade bread a try! If you do, let me know what you think in the comments below. Share your pictures to your social media, don’t forget to tag me and mention #Clydescorner 🙂
1. Combine hot water (not scalding, but hot), yeast, & sugar; stir well. Allow the mixture to “bloom” for about 8-10 minutes– the mixture will begin to bubble or foam up. See imagine above for reference! Note: If you’re using old yeast and it doesn’t bloom during this step, this probably means that your yeast has died and your bread won’t rise!
2. Pour yeast mixture into a stand mixer, add in canola (or vegetable) oil & salt. Using the dough hook attachment (on low speed), add in flour one cup at a time. Note: If you don’t have a stand mixer, you can use a hand mixture and then kneed the dough by hand!
3. Mix on low until the dough comes together and is no longer sticking to the sides of the bowl. Once this point is reached, continue mixing for another 4-5 minutes, it should look similar to the image above!
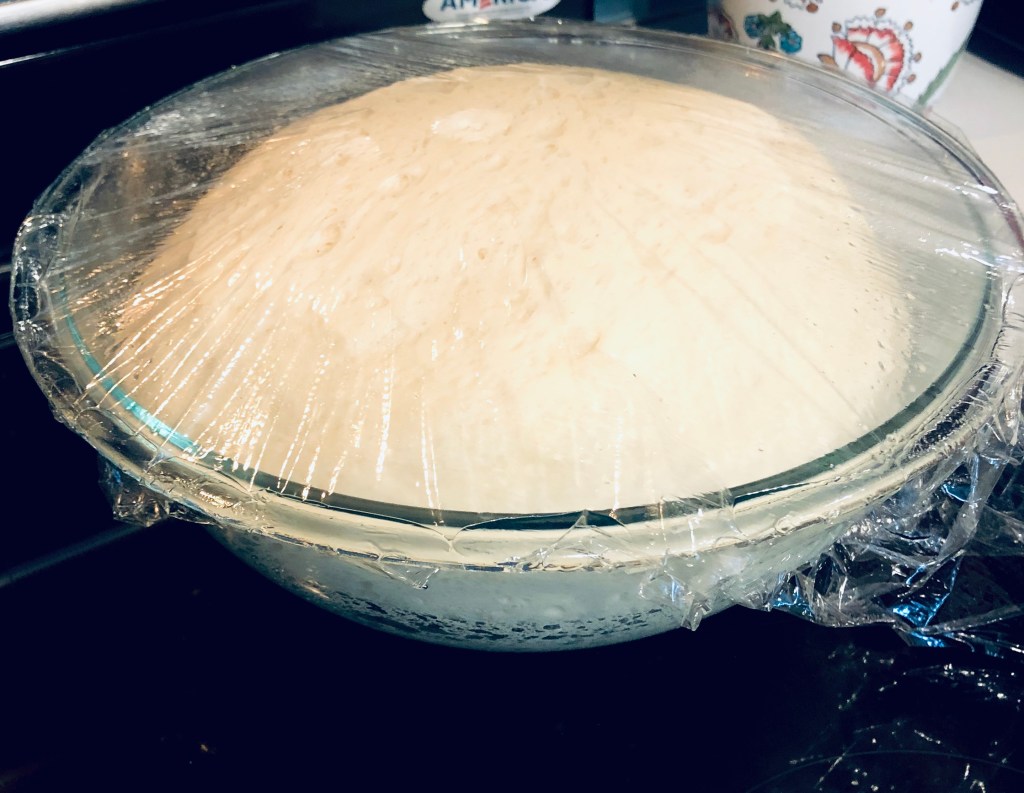
4. Transfer dough ball into a large bowl and cover with a kitchen towel or plastic wrap (loosely placed) and set aside in a non-drafty area. Allow the dough to rise for 1 to 1 and 1/2 hours (only until the dough has doubled in size).
5. Once doubled in size, punch down the dough (this is SO satisfying), shape it into a loaf and transfer to a lightly greased loaf pan. Tip: I punch my dough down multiple times to get out as many air pockets as possible. Additionally, when shaping the dough into a loaf, tuck the sides under so that the top is smooth– don’t be afraid to handle the dough, it’s not fragile.
6. Lightly cover with plastic wrap and allow to rise a second time for about 40 minutes (again until it has doubled in size). Tip: Rising times will vary but only allow the bread to rise to just above the top of the loaf pan– see images below. The loaf will continue to rise in the oven.
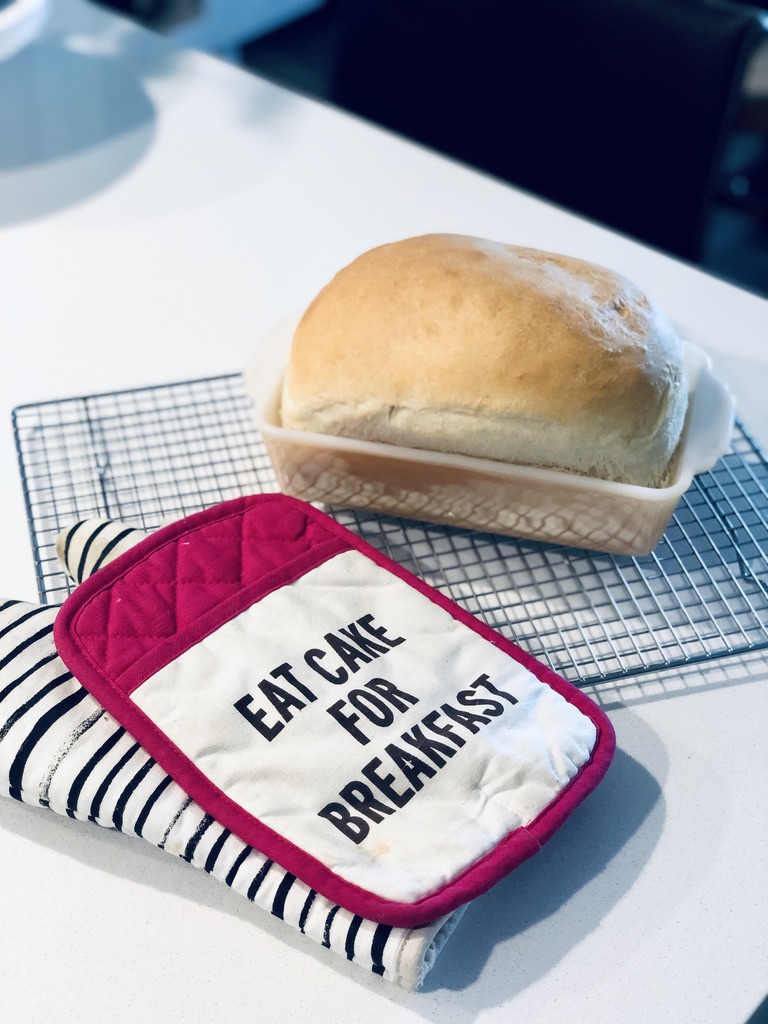
7. Bake at 350 degrees for about 25-28 minutes or until the top is golden brown.
9. Allow the bread to cool in the pan for about 10 minutes, then turn out onto a wire cooling wrack to finishing cooling. Allow the bread to cool completely before slicing!
I hope you enjoy this recipe (and the amazing aroma that comes with it) as much as we did!
If you made this, let me know what you think in the comments below. Share a picture to your social media account and mention #Clydescorner, don’t forget to tag me ❤
Storing Instructions:This bread can be stored in a Ziplock bag on the counter or in the fridge. For longer storage, it can also be placed in a freezer-safe ziplock and put into the freezer!
Happy Friday! We made it through yet another week– go us! It’s hard to believe that Easter is behind us and April is already half way over. Time flies when you’re in isolation??? Not a whole lot has changed here in San Fran for us, we’re still just hanging out in 750 sq ft, all day… everyday. It’s totally fine, I’m fine. The other day I moved one of the chairs from our dining table over by the window so that I could look out at the city while I wrote. I kid you not it was the most exciting thing that happened all day. Having a new vantage point of our apartment made it seem bigger somehow or maybe a new view is all it takes these days for a little excitement. I left the chair there. Now when I need a change of scenery I walk over and sit in the dining chair (that has been moved LITERALLY 15 feet) and voila, cue Aladdin’s A whole New World theme song. See I told you I’M FINE. Totally fine. Any-who, who’s ready to not think about isolation and do some shopping?!
This Friday I decided to share one of my favorite graphic tee’s! I ordered this T-shirt last November and it has become one of my go-to items. It’s so soft & comfortable, and pairs perfectly with joggers or leggings to lounge around the house– comfy clothes are basically all I wear these days. It can also be paired with jeans & sneakers and you have yourself a super chic & casually cute outfit (one that you can rock post-quarantine of course)! The versatility of this tee is great, but the best part about it is the price– it’s $11.99!! It comes in three different colors and is true to size. I’ve washed it probably 15 times and it still looks brand new; I wash it inside-out and hang to dry. A killer deal like this one is just too good not to share 🙂 .
If you want to grab one for yourself, you can check it out here. I can’t wait to twin with you guys ❤ Happy shopping!!
How I’m wearing it:
I swear not all of my denim is distressed…
*Keep an eye out for an upcoming post on these Lululemon dupe pants!!!
I hope you guys have a wonderful weekend! Don’t forget to leave a comment below and let me know if you grab makeup tee!
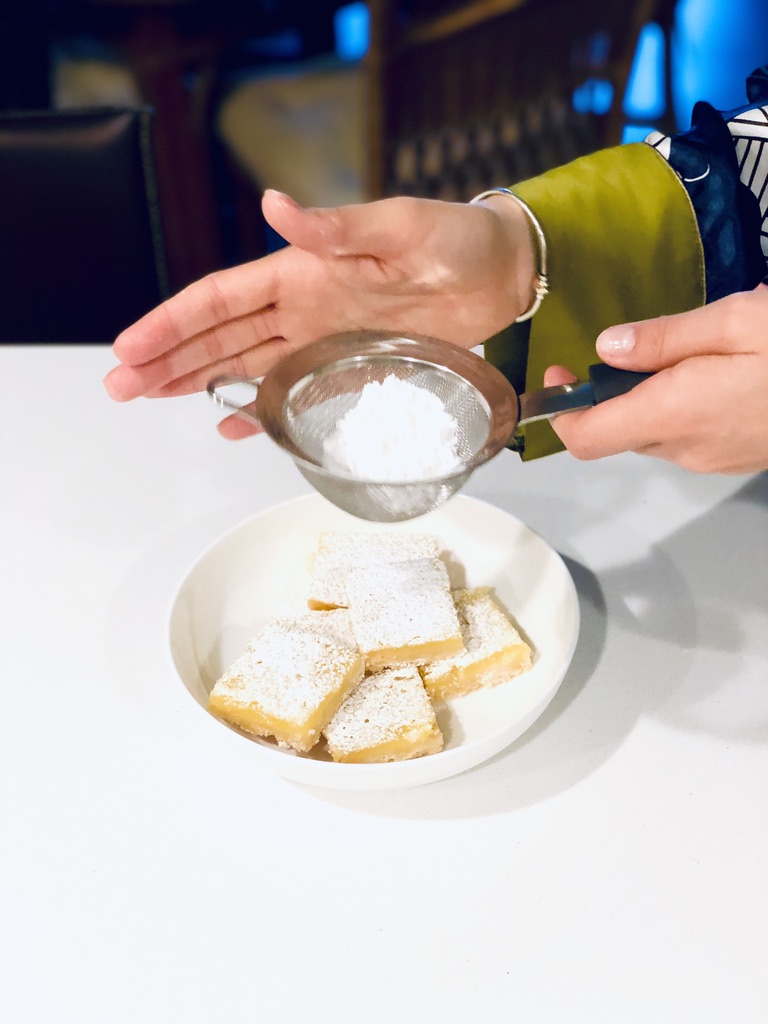
These lemon bars have a sweet, tangy filling that sits atop a buttery shortbread crust & are topped with a generous dusting of powdered sugar– if you are a lemon-lover like me, you will LOVE these bars!
Leave a comment below!
If I have to choose between having something chocolatey and something sweet and tangy… I’ll choose sweet and tangy ALL day. Sour candy truly is my nemesis. I just can’t say no; it’s almost as if I like having the roof of my mouth totally destroyed– if you’re a fellow sour-lover you know what I’m talking about. Dylan on the other hand would choose chocolate, in just about any form, over something tart. Opposites attract right ❤ ? To my surprise my chocolate-loving hubby was obsessed with these lemon bars! One of the best things about this super simple dessert is that by using both the juice and the zest you can really taste the lemon flavor!
This recipe packs a lemon punch that is perfectly balanced with its buttery shortbread crust– these lemon bars are sure to satisfy your sweet tooth.
What you’ll need to make the lemon bars:
For the crust-
1 and 3/4 cups all-purpose flour
1/2 cup white granulated sugar
1/4 cup cornstarch
1/4 tsp salt
1 cup unsalted butter, room temperature & cubed
For the filling-
1/2 cup fresh lemon juice (4-5 lemons)
Zest of 1 whole lemon
4 large eggs, room temperature
1 and 1/2 cups white granulated sugar
1/4 cup all-purpose flour
Servings: 24 lemon bars
Recipe:
Making the crust
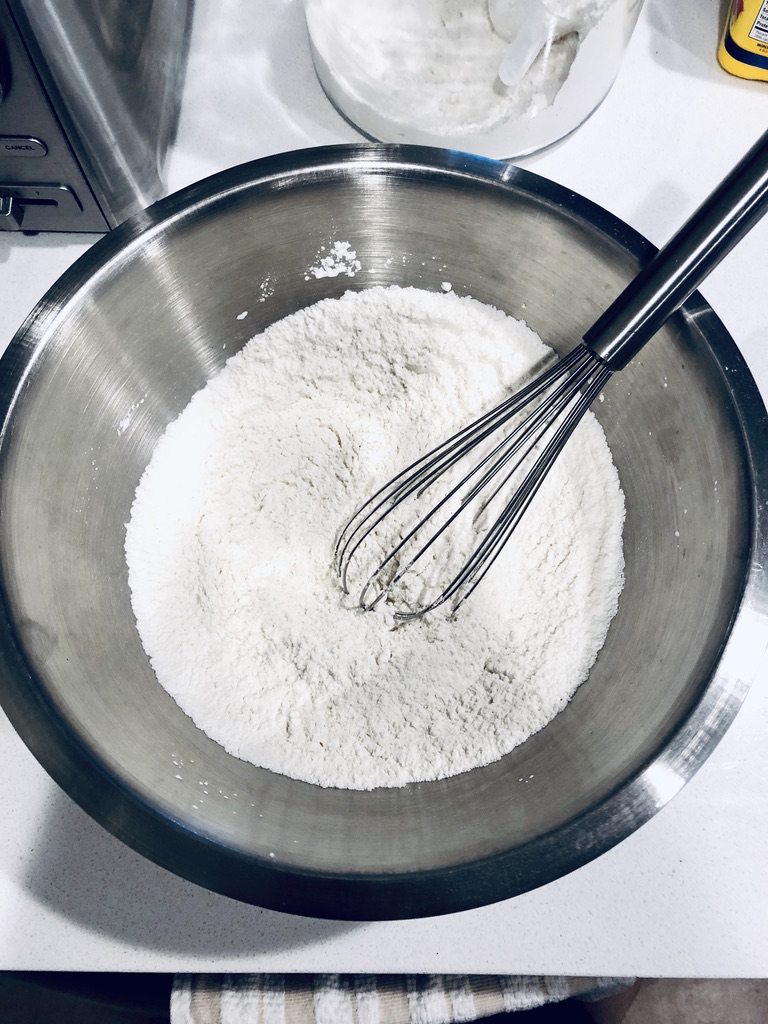
Preheat oven to 350 degrees and line a 9 x 13 inch baking dish with aluminum foil. Leave an overhang of foil (for easy removal of the lemon bars), and lightly spray the foil with nonstick cooking spray; set the prepared baking dish aside. In a mixing bowl, whisk together flour, sugar, cornstarch, & salt.
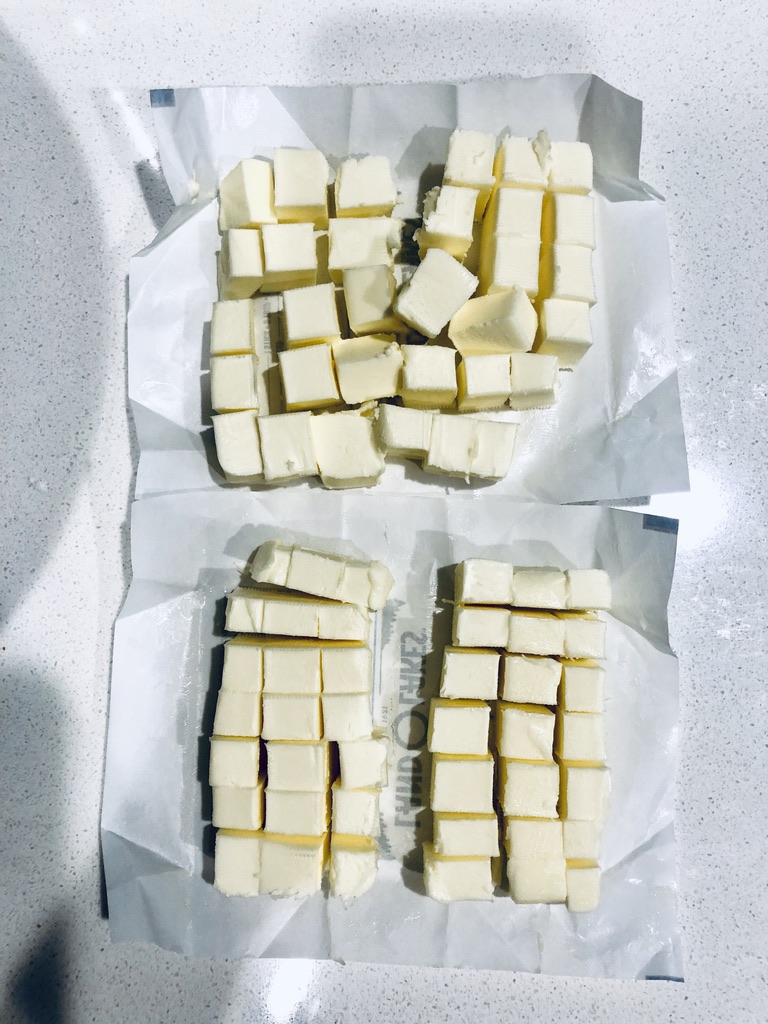
2. Cut butter into cubes and add to the dry ingredients. Tip: Set out the butter and cut into cubes before you allow it to come up to room temperature, it makes the process a little less messy!
3. Using a fork, pastry cutter, or your hands, cut butter into the flour mixture until it becomes crumbly and starts to come together.
Once the mixture looks similar to the image above it’s ready to go!
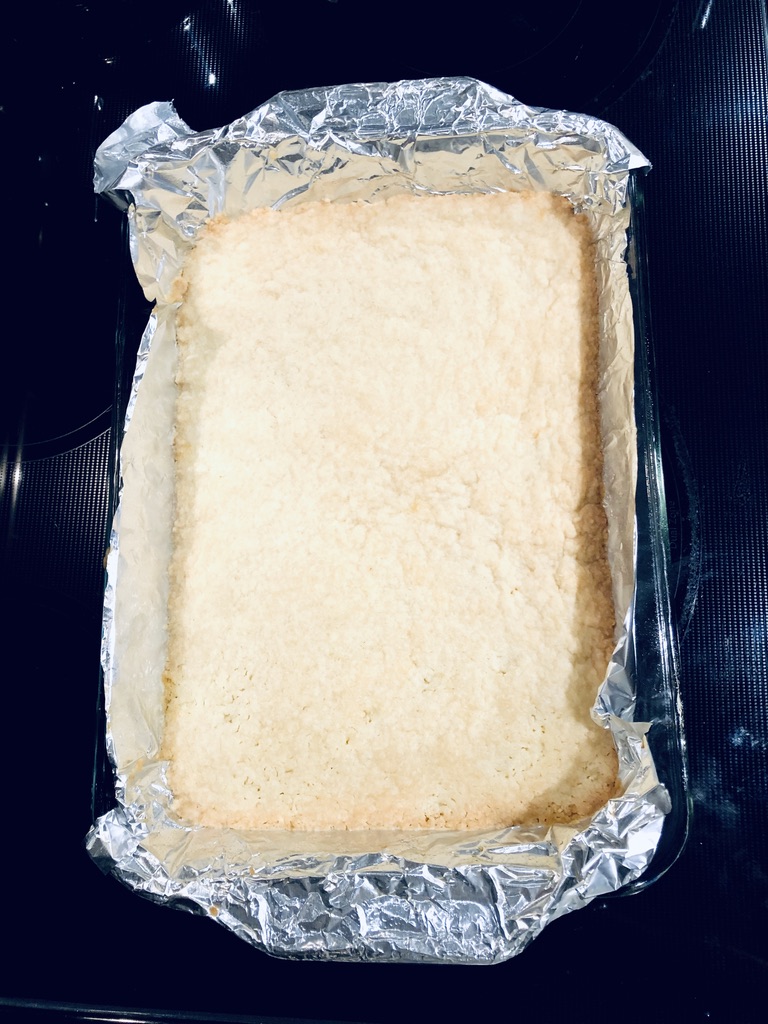
4. Transfer mixture into prepared baking dish & press down into one even layer.
5. Bake for 20-25 minutes at 350 degrees. Crust will be done when the edges are lightly golden brown and the top is set. Once removed from the oven, leave oven temperature at 350 degrees.
Making the filling
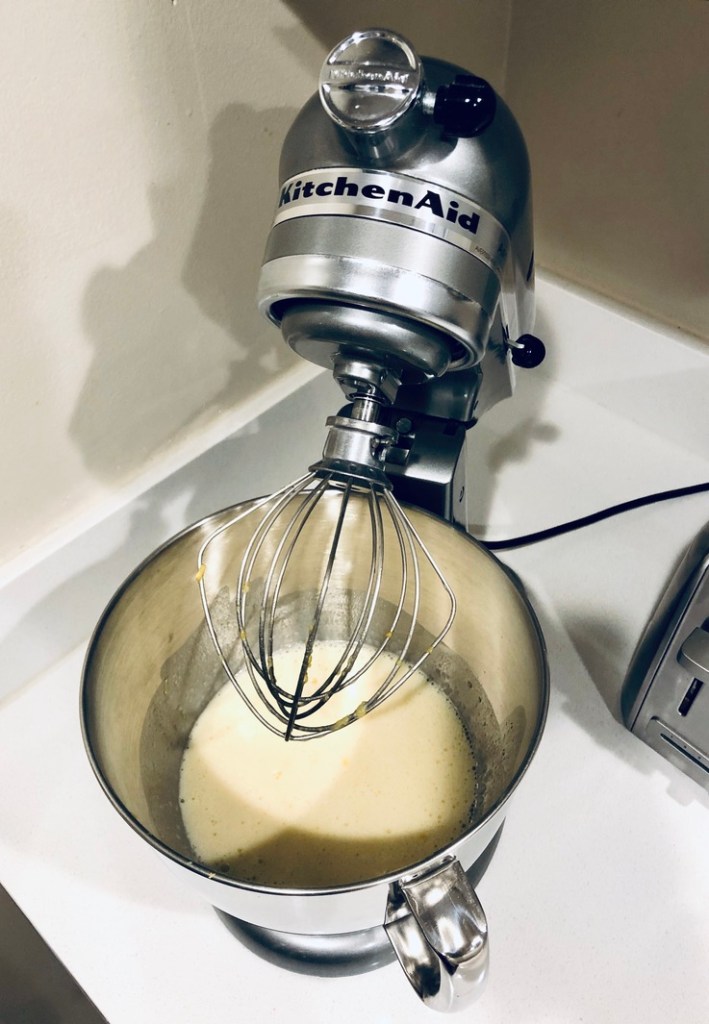
In a mixing bowl, whisk together flour & sugar. Add in eggs, lemon juice & lemon zest until fully combined and carefully pour mixture over the warm crust.
2. Return dish to the oven. Bake at 350 degrees for 18-22 minutes or until the filling no longer jiggles and appears to be set.
3. Remove from the oven and place baking dish onto a wire cooling rack for 1-2 hours, or until completely cooled. Cover tightly with plastic wrap and place in the fridge for at least 2 hours before cutting. I prefer to make these the day prior to serving and let them chill over night!
4. When ready to serve, pull on the aluminum foil and remove it from the baking dish. Cut lemon bars into desired size and dust with powdered sugar! Note: The powdered sugar will begin to dissolve into the lemon bars after a little while, so only sugar those you plan on serving right away!
These lemon bars were our Easter dessert this year & they did not disappoint. I hope that you enjoy them just as much as Dylan and I did!
Storing Instructions: Lemon bars can be served chilled or at room temperature, but they should be stored in an airtight container in the fridge!
Leave a comment below and if you make this recipe be sure to post a picture and don’t forget to tag me!
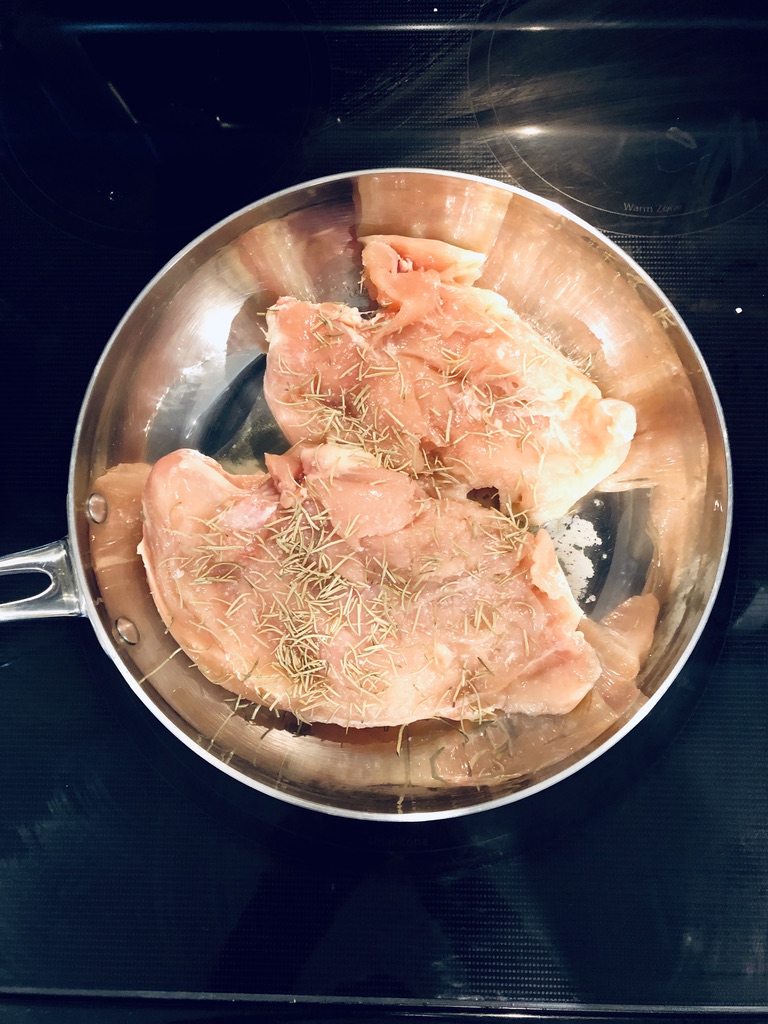
This super simple rosemary chicken is mouthwateringly delicious down to the last bite. Using just 3 ingredients you can prepare decadent chicken, flavored with rosemary, and smothered in a thick gravy… this recipe won’t disappoint!
The second best thing about this rosemary chicken is how easy it is to make (first of course being how good it tastes)! Using just three ingredients you can prepare a savory chicken dish that is sure to be a crowd pleaser! Whether you are new to cooking or are a seasoned at-home-chef, YOU CAN MAKE THIS DISH– I promise, it really is that simple.
What you’ll need to make the chicken:
2 chicken breasts
2-3 Tbsp rosemary (I prefer to use dried over fresh for this recipe)
1 cup chicken broth
1 Tbsp butter
1 Tbsp olive oil
Salt & pepper
Recipe:
Season chicken breasts with salt, pepper, and rosemary. Tip: When using dried herbs (such as rosemary) crush them in your hand before adding them to the recipe– this helps release the oils and will increase both fragrance & flavor!
2. In a pan, large enough to cook your chicken, heat up olive oil and butter over medium heat.
3. Add chicken breasts to the pan & allow one side to brown before flipping. I definitely could have used a larger pan for these ENORMOUS chicken breasts!
4. Flip the chicken breasts and brown the other side.
5. Once both sides are browned, add in chicken broth and cover with a lid. Cook the chicken covered with the lid for 5 minutes.
6. Remove the lid and allow the broth to almost completely evaporate, there should be just a thin layer of thick gravy coating the bottom of the pan. Cooking time will depend on the thickness of your chicken breast, it will be done once the internal temperature has reached 165 degrees*. Tip: While the broth is evaporating, occasionally flip the chicken and spoon some of the sauce over the top to keep it moist!
Today I served the rosemary chicken with mashed cauliflower!
7. Serve with your favorite vegetable, some pasta or rice & ENJOY!!
Leave a comment below and let me know what you think!
*Click here to see safe minimum cooking temperatures for meats and other cooked foods!
Spring cleaning is SO satisfying, and a big part of that comes from organizing areas of your home that have gotten a little messy. When it comes to organizing, it’s all about the bins. Big bins, small bins, bins that fit inside of other bins– the more the better! I use different sized containers just about everywhere in my home, but their most noticeable effect is in the bathroom. In this first part of my spring cleaning series, I’ll share tips on how I keep my bathroom — the drawers, under the sink, and the linen cabinet — organized all year long!
The first step to getting these areas tidied up: TAKE EVERYTHING OUT. It’s going to look worse before it gets better… so make sure you have a cup of coffee on hand to get you through this part; seriously, this part can be quite traumatic. After everything is out on your counter, sort through it. Throw away old and expired products and make piles for items you no longer use and may want to donate (though I don’t know how many items in the bathroom are really donation-worthy). Once you’re looking at only the things you want, wipe down your cabinets & drawers and get to organizing!
Bathroom Drawers:
Bathroom drawers can be tricky to organize as they’re typically very long and narrow; perfect for haphazardly throwing items into them. For most of us, the products in these drawers often get lost and expire, and the drawer itself ends up being a sticky mess from leaking tubes and creams. Gross. My first tip for organizing drawers: put down drawer liner. Not only is the lining aesthetically pleasing, it also keeps the base of the drawer clean. When it comes time to clean and/or move, just remove the liner and the base of your drawer looks the same as when you moved in!
I usually use leftover liner from my kitchen cabinets!
Next, use different sized and shaped containers for organizing. You can purchase containers specifically for organizing or use things that you already have around the house. Get creative; I store my cotton balls in an old Kate Spade jewelry box (see image above)! The items I put into my drawers are things that I use every single day— they live right next to my sink and are easily accessible.
Any products that I use on a daily basis that don’t fit into my drawers (either due to limited space or the size of the item) I set out on a decorative tray. This keeps my go-to products within arm’s reach, and it also makes putting them away super simple. If you use something regularly, it should be equally as easy to get out as it is to put away. If something requires extra energy to put back, chances are, it won’t be; it will likely be left out on the counter until the next time you use it. Keep this in mind when organizing– make things easier for yourself, not harder!
Under-The-Sink:
I mainly use the space under my sink to store my bath towels; typically, I would put them into a linen cabinet, but ours is very shallow and the towels just don’t fit. I use storage bins with drawers to separate my hand towels and wash cloths (upper drawer) from body towels (lower drawer). You can see how I’ve organized them below. Additionally, I have a basket with bathroom-specific cleaning supplies and toilet paper stored on the opposite side (not pictured because who really wants to see my toilet paper– am I right?!).
That wicker basket peeking out is filled with my bathroom cleaning supplies!
Linen Cabinet:
As I mentioned, I would normally store my towels in a linen cabinet, but the dimensions of this one just don’t allow for that– the shelves are very shallow! This is where my beloved bins really come into play. Open-bins store most of our regularly used, but not necessarily everyday, personal hygiene & beauty products. I organize the containers by category: for example, makeup, perfume/cologne, hair accessories (clips, headbands etc.), & blow dryer. Keep in mind that my organizational categories may be completely different from yours! Using containers without a lid makes these regularly used items easy to grab & put away quickly. Another way to make these easily accessible is to store them around eye-level; I store mine on the first two shelves in my linen cabinet!
Closed-lid storage containers store items that are rarely or less-frequently used– for me this includes backup products (toothpaste, razors, makeup, etc.) and beauty samples (because throwing them away is just too painful). These bins are stored on the top shelf as it’s the hardest for me to reach and I rarely need to get into them. A good rule of thumb when organizing is to place items frequently used within arms reach, and less used items on higher (or lower) shelves!
Happy organizing & keep an eye out for the second part of my spring cleaning series!
This delicious & comforting Italian wedding soup is full of never-ending flavor. From the homemade chicken broth and bitesize meatballs to the fresh carrots and spinach– you’ll keep coming back for more.
I grew up on Italian wedding soup; this recipe is more than just a delicious soup to me, it’s a little piece of my family. I have the most wonderful memories of sitting around the dining table at my Nana and Pap Pap’s house on Sunday’s, eating a giant bowl of wedding soup, topped with parmesan cheese and a thick slice of buttered Mancini’s bread on the side for dipping– true comfort food.
This soup was my Pap Pap’s mother’s recipe; my Nana wasn’t Italian, but she learned how to cook Italian food from my great grandmother (on my Pap Pap’s side). I grew up watching and learning how to make these family recipes from both my Nana and my Mom– just as my Mom grew up learning from her Nana and Mom. The passing on of family recipes is something so special, not just because the food is delicious, but because of the memories that are made over the years in the process. One of my favorite memories is from when I was younger helping to roll the meatballs for Italian wedding soup– if you’ve ever made this soup with me, or the lovely ladies mentioned above, you know exactly where I’m going with this story. Without fail, every time I was in charge of rolling meatballs (only for this recipe), I would hear the dreaded sentence “those are too big” over and over again. Italian wedding soup meatballs have a VERY specific size, and apparently that size is about the same as a small marble. In reality, they just need to be bitesize, but the Monti women wanted them to be just so ❤ . Honestly, I used to think it was insane, my meatball would be BARELY bigger than the last and sure enough, “that’s too big” would be lovingly spoken over my shoulder. I would take the most minuscule amount of meat away from the ball and re-roll it, thinking it looked exactly the same as before only this time it passed the size test. Eating the soup and tasting just how delicious those bitesize meatballs were, made all of that worth it.
The best part about this story? I have since taught my husband this recipe, and sure enough when he is rolling the meatballs… the words fly out of my mouth without control “those are too big”. It makes me laugh out loud every time I say it. I’m sure one day when Dylan and I have children and we’re making Italian wedding soup together, our kids will think I’m crazy for making them roll microscopic meatballs. Chances are, when they’re older, those tiny meatballs will make them laugh out loud & fill them with so much love, reminding them of cherished memories.
Thank you Nana and Mom for my cherished memories ❤
This is one of my all-time favorite recipes, I hope you all enjoy it just as much as I do. If you end up making it, leave a comment and tell me what you think!
What you’ll need to make the soup:
1 whole chicken
5-6 stalks of celery
6-7 large carrots, peeled
1 medium onion, peeled & cut in half
2 10 oz packages chopped frozen spinach
1 16 oz box acini de pepe pasta or orzo pasta (you may want a second box depending on how many noodles you like in your soup)
Salt & pepper to taste
5-6 whole cloves
Parmesan cheese to top
What you’ll need to make the meatballs:
1 lb 85% lean ground beef
1 large egg
1/2 small onion, finely diced
1 clove garlic, minced
1/2 cup Italian-style breadcrumbs
1 tsp salt
1 tsp pepper
Servings: This recipe makes a large pot of soup; 12-15 servings depending on serving size. See bottom of the post for storing instructions!
Recipe:
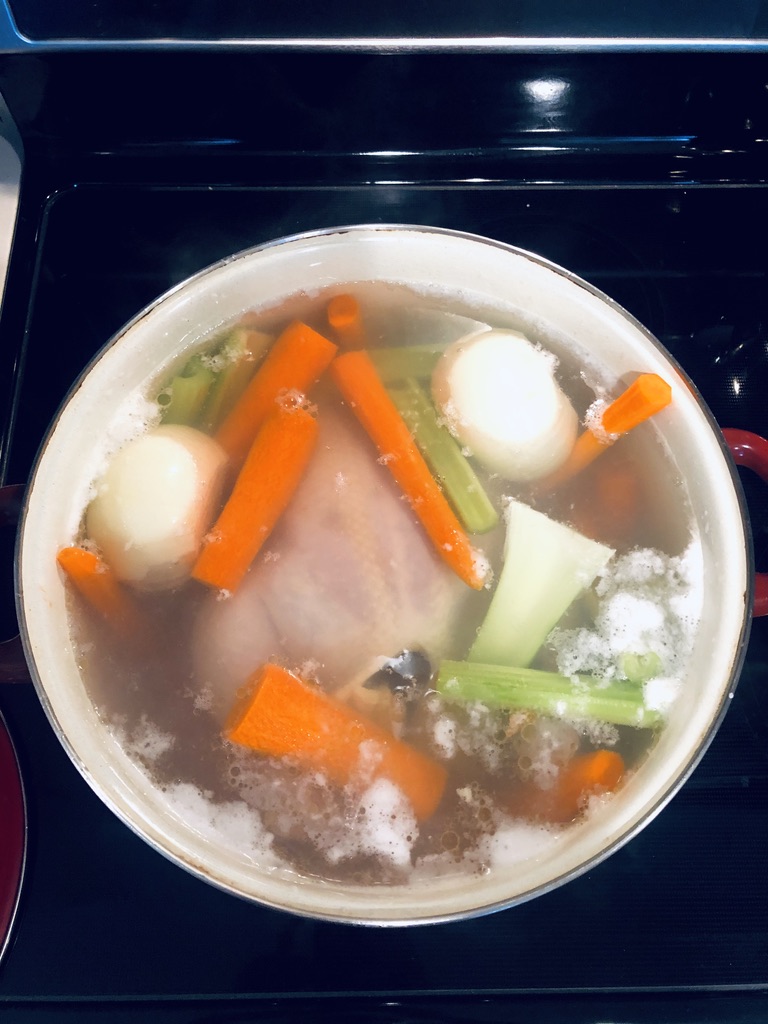
To make the broth: Cut carrots, celery, & onion in half. Stick 5-6 cloves into the outside of the onion– make sure they are pressed all the way into the onion so they don’t fall out into the broth. Note: The cloves are not pictured in this recipe solely because I ran out last time I made this soup!
2. Place whole chicken (make sure to remove any gizzards from the inside first), celery, carrot & onion into a large stockpot and fill with water just so that the top of the chicken is covered. Bring water up to a boil, then reduce to a simmer (medium-low heat) and cover; allow this to simmer for 2 hours.
3. To make the meatballs: While the broth is simmering, it’s time to make your meatballs! Sauté 1/2 finely diced onion and garlic in olive oil over medium heat– just until onions are soft and translucent. Remove from heat and allow them to cool. Meanwhile in a mixing bowl, combine ground beef, egg, breadcrumbs, salt & pepper (I usually use my hand for this) and add the cooked onion/garlic once cooled. Be careful not to over mix; mix just enough for the ingredients to combine. Roll meatballs into small bitesize balls (about the size of a marble or 1 tsp) and set them on a baking sheet. Bake at 350 degrees for about 25 minutes.
4. Once the broth has simmered for two hours use a slotted spoon or a spider strainer to remove the vegetables and then two forks to remove the whole chicken. Discard the onion and celery but save the carrots. Allow the carrots and chicken to cool enough to be handled. Slice carrots and return them to the broth. Next, break down the chicken & discard the skin; shred the white meat into bite size pieces and add it back into the broth. The dark meat can be put into a storage container– this recipe uses only the white meat (I typically use the dark meat for another recipe during the week). Once meatballs are done cooking they can be added into the soup.
Tip: If broth does not seem to have enough flavor from the chicken, chicken stock or chicken bullion can be added for more flavor.
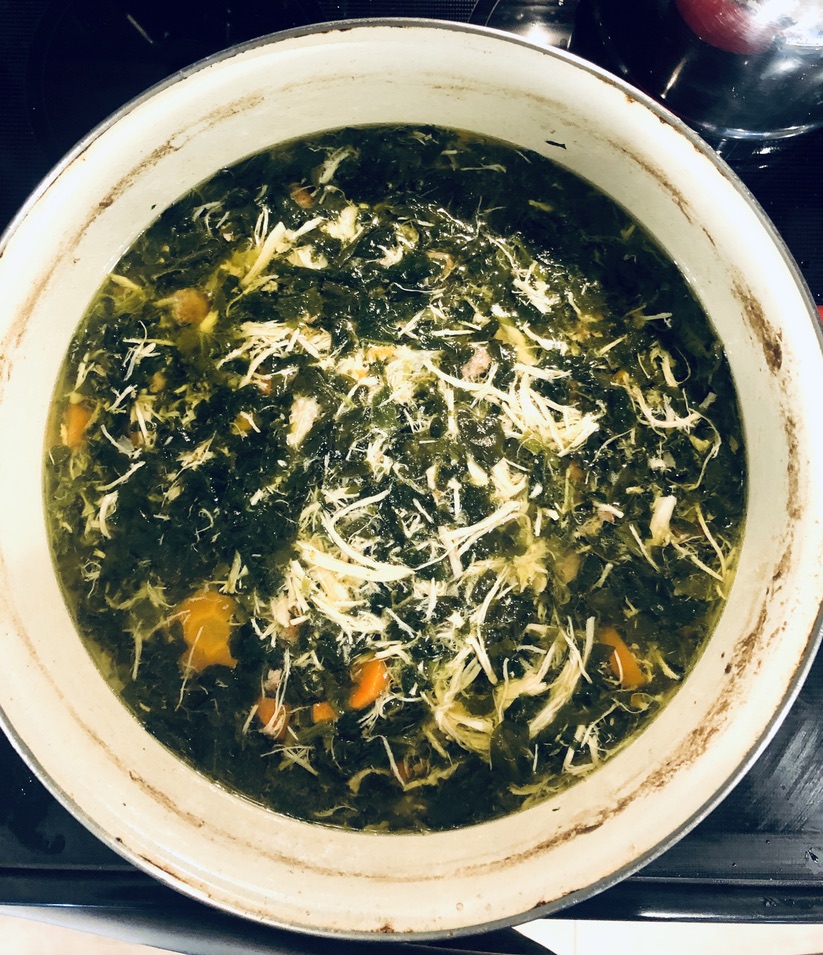
5. One package at a time, microwave the frozen spinach for about 2 minutes– not long enough to cook it just long enough to defrost it. Rinse the spinach in a colander, until the water runs clear. If you don’t rinse your spinach the soup will turn green! Reference the image above for my set up. I use a bowl underneath my colander so I know when the water is clear. Once spinach is well-rinsed, squeeze out as much excess water as you can (a dishcloth or cheese cloth could be used for this step but using your hand works just as well) and add it into the soup.
6. Salt & pepper to taste. Cook on low until read to eat! Mmmmmmm 🙂
6. Cook orzo or acini de pepe pasta according to package directions for al dente pasta. DO NOT ADD THE PASTA INTO THE POT OF SOUP!! The pasta will be added directly to the bowl (see image below) and stored separately from the soup– this prevents the noodles from getting mushy.
Top with parmesan cheese and ENJOY ❤
Storing Instructions: This recipe makes a BIG pot of soup that you will enjoy all week long…. or maybe even longer. If you plan to continue enjoying all week like Dylan and myself you can store the entire pot of soup, covered with the lid, directly in your fridge. The noodles can be stored in a tupperware container in the fridge as well. If you don’t plan to have all the soup that week it freezes very well– just make sure to put it in a freezer safe container!
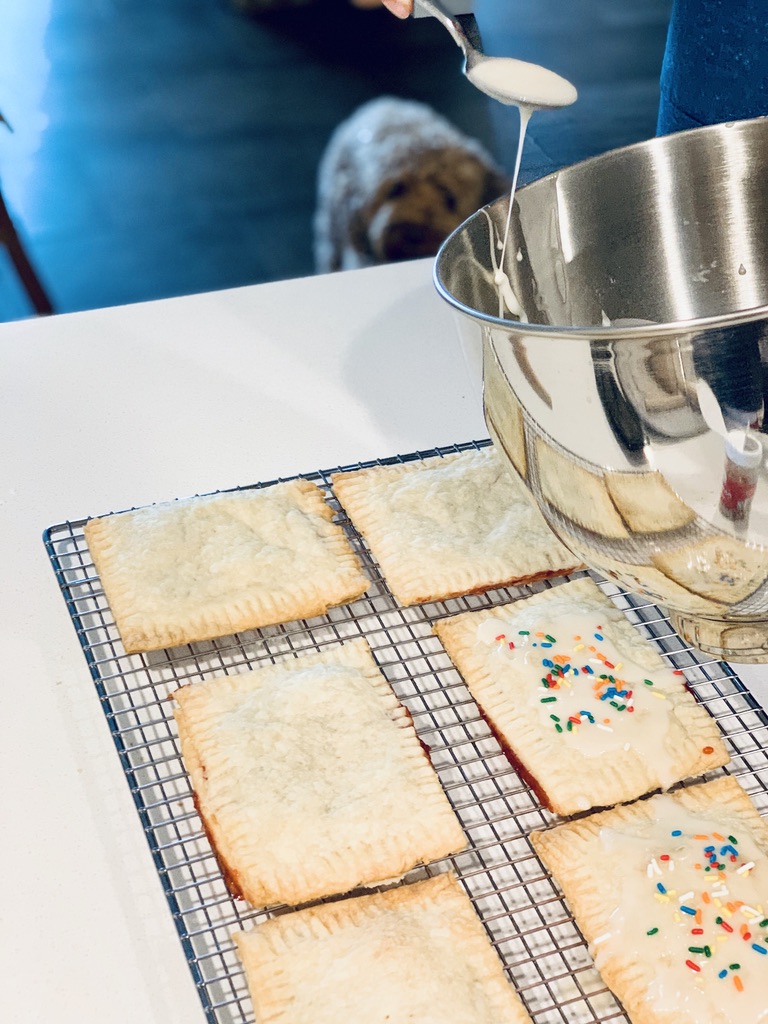
These strawberry pop-tarts are made with a buttery, flaky pie crust & filled with sweet, gooey, strawberry goodness, and they are oh so delicious! You simply won’t be able to stop after just one bite!
One of my favorite ways to start my morning is with a hot cup of coffee and a pastry– who’s with me?! Although this homemade strawberry pop-tart recipe is a little time-consuming for a breakfast pastry, you won’t be sorry you took the extra time… trust me. Not a morning sweets person? Not to worry; Dylan and I have been doing plenty of research, eating these bad boys morning AND night (all for you guys). Our conclusion: These tasty tarts double as the perfect dessert! So whether you decided to enjoy a homemade pop-tart at the crack of dawn with a cup of joe or at the end of your day with a big glass of milk, you are going to love them! Wyatt may or may not have had a taste too and he fully endorses these babies (you can see him lurking in the background of the picture below… how could I not let him have a taste?!).
If you’re not the biggest fan of strawberry, you can swap it out for a flavor you love! I’m using the Whole Foods brand strawberry conserves, and it tastes just like the filling of the boxed Pop Tarts I used to eat as a kid ❤ !
What you’ll need to make the pop tarts:
2 cups all-purpose flour (plus more for rolling)
1 cup unsalted butter, cold and cubed
1 tsp salt
1 tsp white granulated sugar
4 Tbsp ice water
1 cup strawberry conserves (you can use any flavor you’d like!)
What you’ll need to make the icing:
1 cup powdered sugar
1/4 tsp vanilla extract
1-2 Tbsp milk or half and half
Optional: Rainbow sprinkles for “decorating“
Servings: 6 Large pop-tarts
Recipe:
In a food processor, pulse together flour, salt & sugar 3-4 times. Slowly add cold cubed butter and pulse until it resembles cornmeal (see image above). Note: This step can be done without a food processor, use a pastry cutter or fork to cut butter into the mix just as you would when making a pie crust.
2. Add in 4 Tbsp of ice water and pulse until dough begins to come together. If dough is too dry, add 1 additional tbsp of ice water and continue to pulse.
3. Once dough comes together, turn it out onto a clean floured surface and form it into a ball.
4. Divide the dough in half and shape each half into a disk. Wrap each section of dough in plastic wrap and place in the fridge to chill for at least 1 hour.
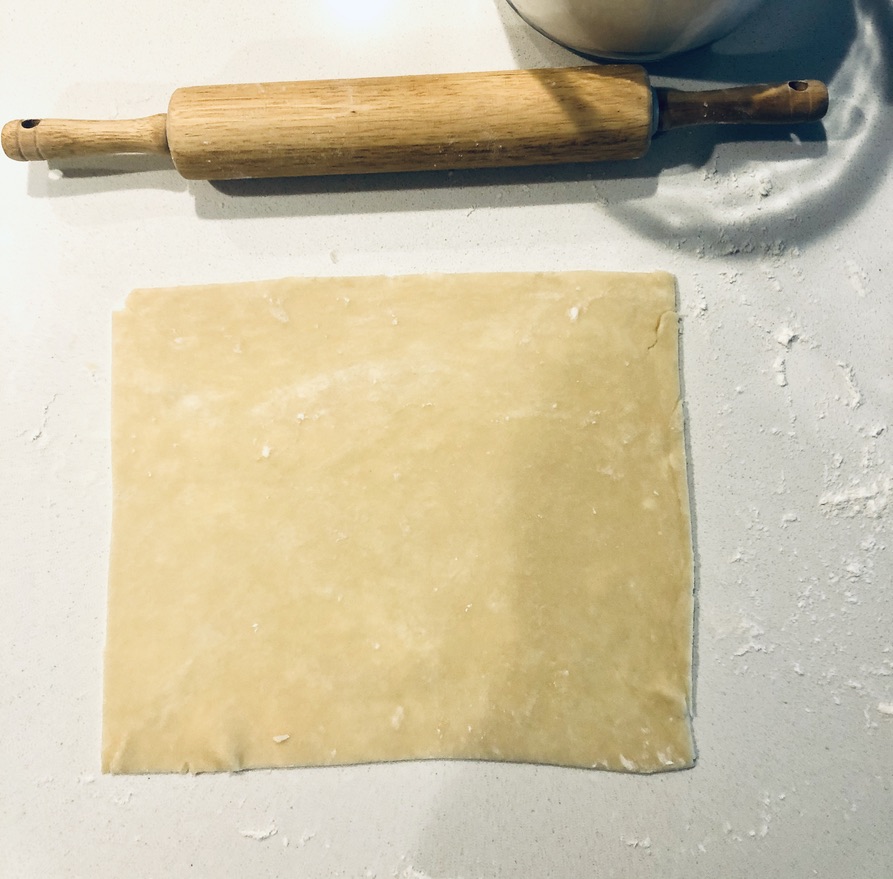
5. Once chilled, remove one disk from the fridge to work with at a time. On a floured surface, roll dough out into a rectangle that measures approximately 13 x 11 inches.
Note: Don’t worry if the edges of the dough begin to crack, you can re-seal them using your fingers as you roll. Your 13×11 inch rectangle should look something like the photo above! I highly recommend using a ruler (a tape measure works too) to measure your dough as you roll so you don’t over stretch it!
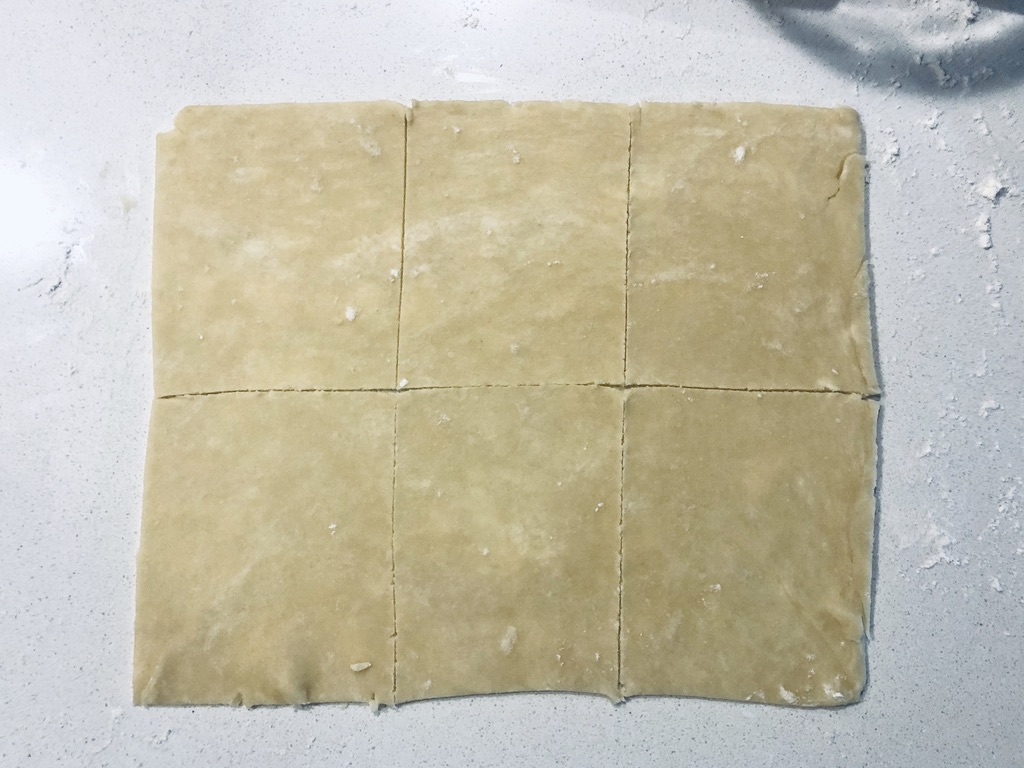
6. Trim the edges of your rectangle to measure 12 x 10 inches.
7. Cut 12 x 10 inch rectangle into 6 equal rectangles (shown above). Note: If you’d prefer to make smaller pop-tarts, cut the 12 x 10 inch rectangle into 8 equal rectangles; you will end up with 8 pop-tarts total instead of 6!
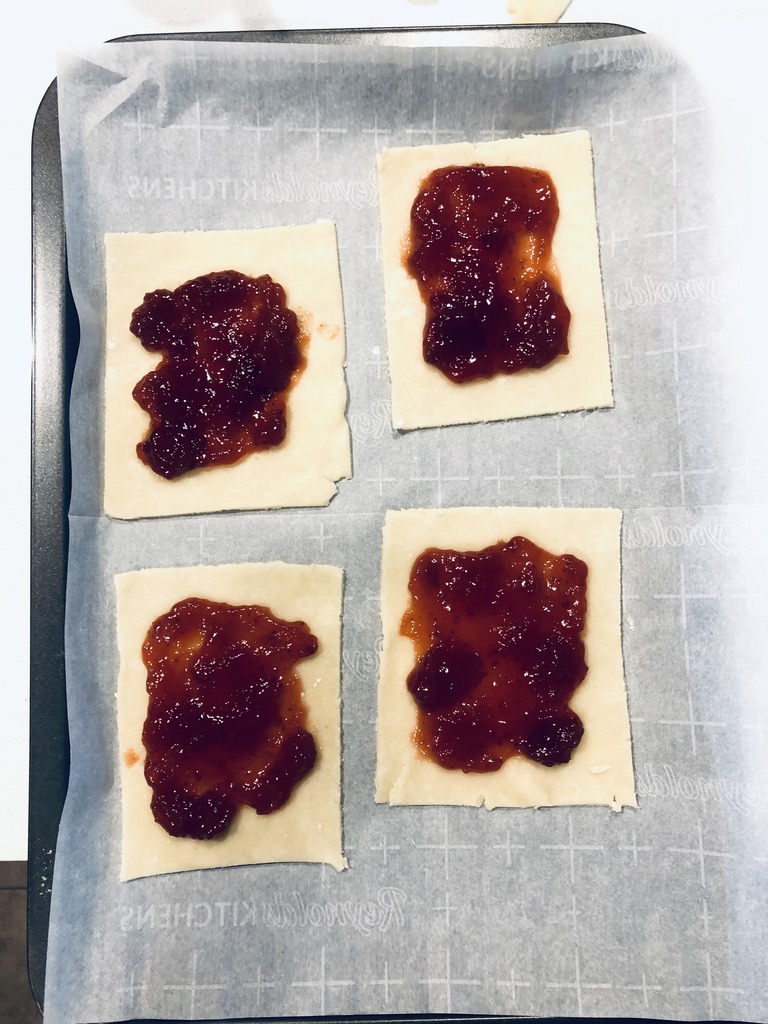
8. On a baking sheet lined with parchment paper, arrange 4 of the rectangles. Top each with 1-2 Tbsp of strawberry conserves, leave a small rim of dough uncoated all the way around.
9. Top each with another rectangle of dough, sealing all the way around with a finger, and then crimp with a fork. Use a toothpick to make 4 small holes in the top of each pop-tart. Repeat these steps with second disk of dough. Cover both baking sheets with plastic wrap and place in the freezer for 2 hours.
10. Preheat oven to 375 degrees. On two separate racks, bake both trays of frozen pop-tarts for about 25 minutes, rotating trays half way through. Note: Even if edges are well-sealed, some filling may spill out during baking!
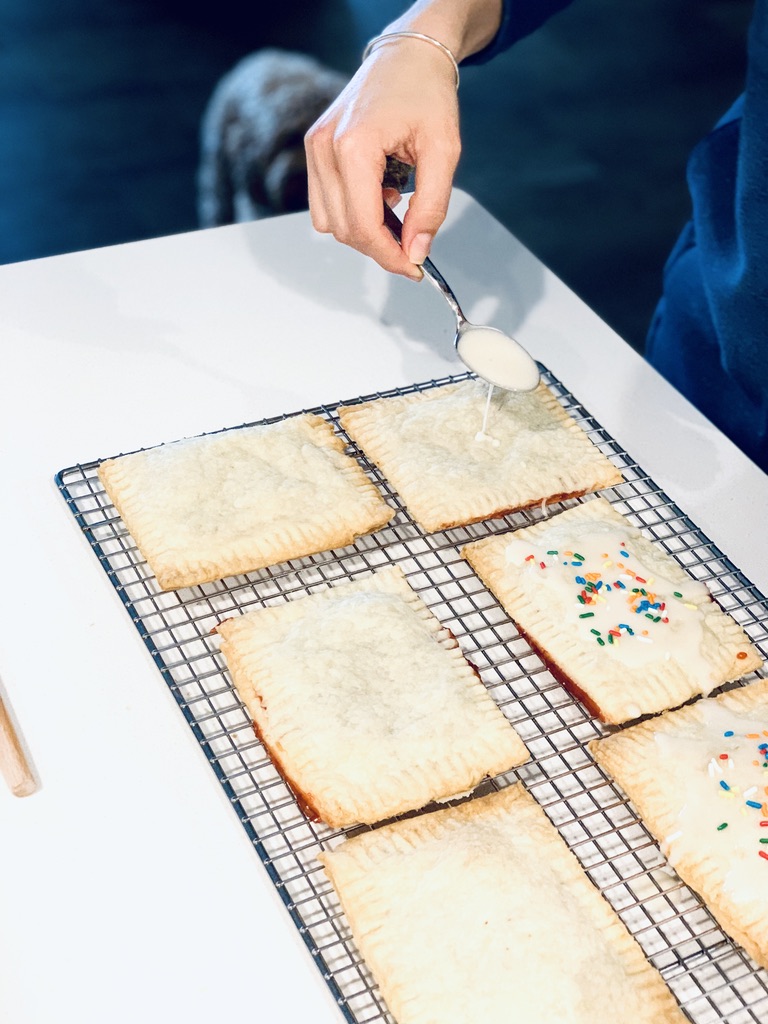
11. Allow pop-tarts to cool completely on a wire cooling rack before icing them. While they cool, prepare the icing.
12. To make the icing: mix together powdered sugar, vanilla, and half and half (or milk). If the icing is too runny, add more powdered sugar; if icing is too thick, add a little more half and half!
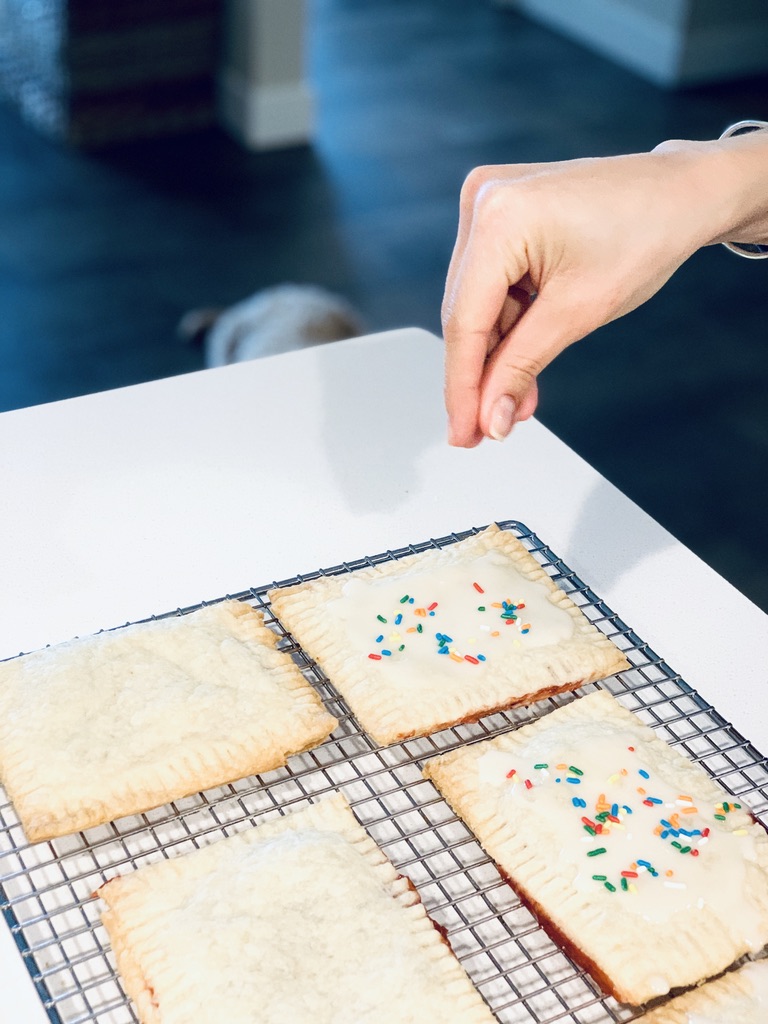
13. Ice your pop-tarts and top with sprinkles!
Just remember these are HOMEMADE, they don’t need to be perfect! ❤
I hope you enjoy these tasty strawberry pop-tarts! Leave a comment below and tell me what you think 🙂 . If you end up making them, post a picture to your social media account and don’t forget to tag me!
Happy Monday friends! It’s the start of a new week, which also means a whole week of dinner prep lies ahead of us; don’t worry I’m here to help make your week a tad easier. Today, I’m sharing one of my favorite quick and easy week-night recipes!
Before moving to San Francisco, Dylan and I lived in Ann Arbor, Michigan. One thing that I unexpectedly discovered during our five years in Ann Arbor was my love for Korean food. I realize that Korean food is probably not something that comes to mind when you think of the midwest (I get it). I’m not sure how, but we were lucky enough to find not one but TWO Korean restaurants that just thinking about make my mouth water. Our favorite place to go for dinner was Panda. Just to clarify it’s Panda, NOT Panda Express. It was this teeny tiny, hole-in-the-wall Korean restaurant, right behind our house, run solely by a husband and wife; he ran around taking orders and bussing tables while his wife cooked… and boy did she cook. It was here that I discovered my deepdeep love of bulgogi. Bulgogi is a Korean BBQ beef that can be enjoyed on its own or as part of dish; for example, bulgogi is often used as the meat in bibimbap! If you’re ever in Ann Arbor, do yourself a favor and check out Panda; I promise you won’t be disappointed.
Another hidden gem we found in Ann Arbor is Bell’s Diner. Bell’s serves both American-style breakfast as well as traditional Korean dishes. I’m sure everything they make is phenomenal, but I only ever ordered the bibimbap…because, let’s be honest, I can make scrambled eggs and toast at home. This rice bowl was like nothing I had ever had before, and I was pretty much obsessed with it (and still am). It was full of warm white rice, steaming hot bulgogi, cold bean sprouts, carrots, kimchi, & (of course) topped with a sunny-side up egg! Bibimbap has definitely made its way into the regular rotation of dinners here in the Kahl household! It’s so easy to make and is incredibly versatile. There’s no need to go out and buy a bunch of ingredients specifically for this dish; the beauty of it is you can use whatever’s already in your fridge! If you want to use beef instead of turkey, do it! Have a giant container of kimchi? Add some of that sweet or spicy goodness in! Have a bunch of vegetables that you need to use? Roast them up or add them in cold! Use my recipe below, just as it is or use it more of a guideline, and make your own!
What you’ll need to make bibimbap:
For the ground turkey-
1 lb ground turkey (you can use beef or chicken as well)
3 tbsp soy sauce
2 tbsp rice vinegar
2 tsp sesame oil
1-2 tsp each of: cumin, garlic powder, ground ginger, red pepper flakes, salt & pepper
For the rest of the rice bowl-
1 cup white rice, uncooked
1 white onion, halved and thinly sliced
2 large carrots, shredded
2 cups red cabbage, shredded
1 avocado diced
1-2 tbsp olive oil
chili oil (to taste)
Salt & pepper
1 large egg, fried (per rice bowl)
Recipe:
Cook rice according to package instructions
While rice is cooking, peel onion, cut in half (from stem to stem), then slice each half into thin semicircles (see picture below).
Toss onion slices in olive oil, salt, and pepper, and arrange in a single layer on a baking sheet. Roast onion at 400 degrees for about 20 minutes. Be sure to keep an eye on them so they don’t burn! Tip: I use these baking mats when roasting vegetables, it makes the clean up 10x easier!
In a medium sauté pan, heat 1 tbsp of vegetable oil over medium-high heat before adding ground turkey. Season the meat with salt, pepper, cumin, garlic powder, ground ginger & red pepper flakes.
Once the meat begins to brown, add soy sauce, rice vinegar, & sesame oil. The ground turkey will take about 15 minutes to cook in total. Once done, remove from heat.
Shred carrot and cabbage using a medium size grater. and then dice avocado
Once all of the components of the rice bowl are prepped and ready, prepare 1 fried egg (per rice bowl)
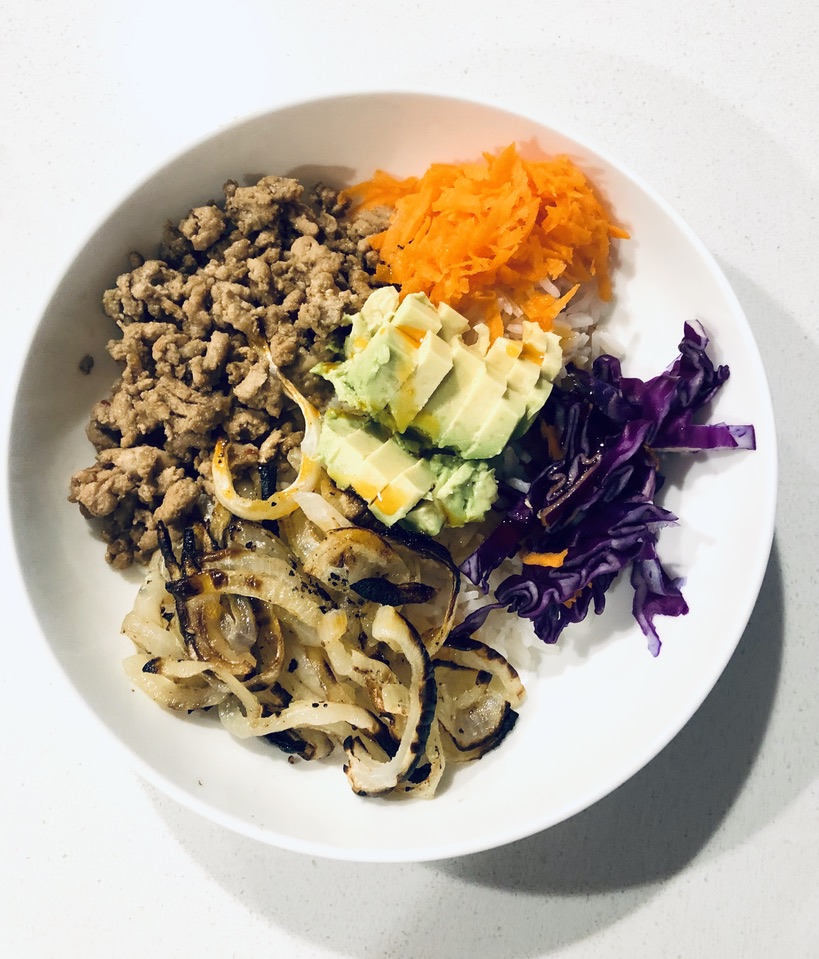
To assemble the rice bowl: Layer 1/2 cup of white rice at the bottom of the bowl; assemble meat, carrot, cabbage, onion and avocado around the bowl; and top with fried egg. For an added kick, drizzle chili oil or sriracha over the top!
Servings: 2-4 people
Make sure you post a picture of your bibimbap and don’t forget to tag me 🙂
Happy Friday! I hope that you and your loved ones had a great week… and if you didn’t, well it’s the weekend now, so pour yourself a glass of wine, and pretend. Pretend what you ask? Whatever you want. Pretend your week didn’t happen. Pretend you’re on a beach somewhere with a margarita. Maybe pretend that your quarantine/isolation buddy doesn’t breathe so loudly?? Just kidding 🙂 … sort of.
Our week here in San Francisco was pretty much the same as it has been for the past 3 weeks. Shelter in place orders are still in effect, and Dylan, Wyatt and myself have been confined to our 750 sq ft apartment. Having my hubby work from home is a blessing for sure (the more time I get to see his handsome face the better), but I am still adjusting. I have to constantly remind myself that he is WORKING; he’s not just home to talk and hang out with me. I understand this sounds easy but… it’s not.
One of my favorite things to do is shop. If I’m happy, I shop. Sad? I shop. Basically any emotion, I shop. Can you say “I got it from my momma”? Because I totally did! During this crazy time, I am so grateful for online shopping– not just for clothes, but everyday essential items too. Being able to have what we need (well almost everything) delivered and not have to leave the apartment is such a blessing. Not only do I love to shop, but I also pride myself on being able to find killer deals. With that being said, I have decided to dedicate my Friday posts, here on Clyde’s Corner, to all my favorite Amazon finds! First up, are these Gucci look-alike mules. I’m not sure if ‘flattering shoes’ are a thing, but if they are, these babies are definitely that.
These snakeskin mules are a STEAL. Not only are they totally cute and comfortable, they are so affordable! They come in several colors & patterns, and all of them are less than $34. That’s right, THIRTY FOUR DOLLARS! I may or may not have a pair of black and white sitting in my Amazon cart right now. They fit true to size and come in half sizes, hallelujah!! If you’re diggin’ this mule trend like me, I highly recommend snagging a pair for yourself before your size sells out. You can check them out here, happy shopping 🙂
Here’s how I’m wearing them:
**DISCLOSURE: This photo was taken pre-shelter in place. I have been living in sweats and pajamas for the past three weeks. I don’t even remember what it’s like to wear pants that have a zipper …